Generating Variant BOMs
|
|
• If you have designs that were created using previous releases of Windchill Workgroup Manager for Cadence Team Design Option, they are updated for compatibility with the current release when you generate variant BOMs. During this process, the top-level schematic/board is implicitly iterated in Windchill . This is done once for each project that existed before the current release. A warning message is presented before the update is performed. Once the update completes, it is advisable to refresh your Cadence Team Design Option dashboard.
• A design update is not possible when another user has your design checked out.
|
|
|
As described in the following procedure, before generating variant BOMs, you use the Allegro Variant Editor tool to create one or more design variants. The Windchill BOM Manager window does not appear on the next design checkin unless one or more new design variants have been created. If you are unfamiliar with the Allegro Variant Editor tool, refer to your Cadence documentation.
|
To generate and check in variant BOMs for your design:
1. In the Cadence Team Design Option dashboard, locate the BOM object for the top-level design (either the schematic or the board) that you want to generate variant BOMs against.
|
|
The schematic/board design selection depends on what the Windchill preference Default Part Structure Source is set to at your site. See your Cadence Team Design Option project integrator or Windchill administrator for details.
|
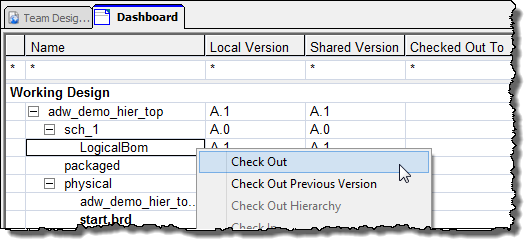
2. Right-click the BOM object and select Check Out as shown in the following figure.
An open padlock icon appears next to the BOM object in the dashboard indicating that it is checked out to you.
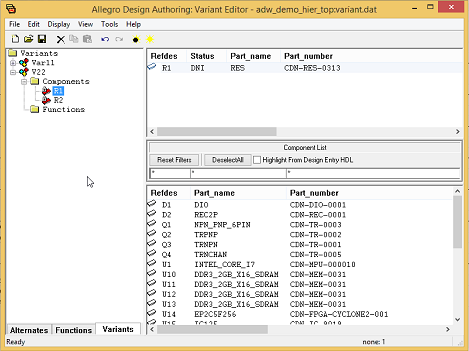
3. Right-click the BOM object and select Open as shown in the following figure.
The Variant Editor tool opens.
| If the Variant Editor fails to launch, check with your Cadence Team Design Option project integrator or Windchill administrator to see if the following specification was added to your policy file. </attachment>
<tools>
<tool args="-proj,${projdir}/${cpm}" label="Open" name="vedit"/>
</tools>
</derivedObject> |
4. In the Variant Editor, create and save one or more design variants, then exit the tool.
A variant.dat file is created and contains all the design variant definitions for your design. The variant.dat file is located in the Variant folder within your design directory.
5. In the Cadence Team Design Option dashboard, right-click the design (parent) object and select Generate BOM as shown in the following figure.
The BOM-HDL window opens as shown in the following figure.
| The master BOM must be saved with the filename Design.rpt. Variant BOM filenames can be user-defined, with a .rpt extension. |
6. In the Variant BOM panel at the bottom of the window, do the following.
a. Load the variant.dat file created in a previous step by browsing to it or entering its file path. This file contains the definitions for your design variants.
b. Select Variant BOM output.
c. Select the name of a single design variant, or select All Variants from the drop-down list to generate and check in BOMs for all your design variants.
d. Click Generate.
A message appears stating that the BOM reports have been generated successfully.
7. Click Close to exit the BOM-HDL window.
8. In the Cadence Team Design Option dashboard, right-click the BOM object and select Check In.
The Check In window opens as shown in the following figure.
9. In the Check In window, do the following:
a. Select the BOM object for checkin.
b. Optionally, select other objects that you want to check in with the BOM.
c. Optionally, include comments and change information.
d. Click OK.
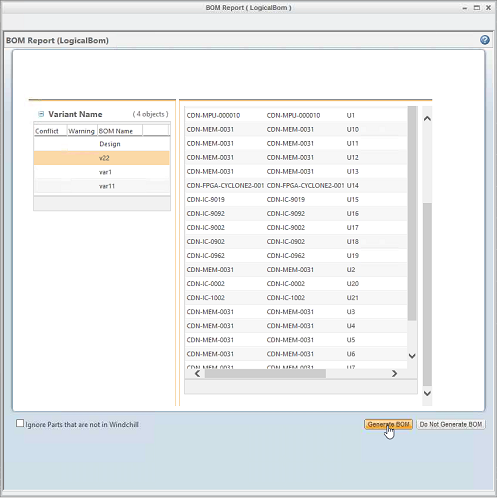
The BOM Report window opens as shown in the following figure. This window enables you to view the details of the BOM reports and confirm the checkin.
10. Click Generate BOM at the bottom of the window to proceed with the checkin.
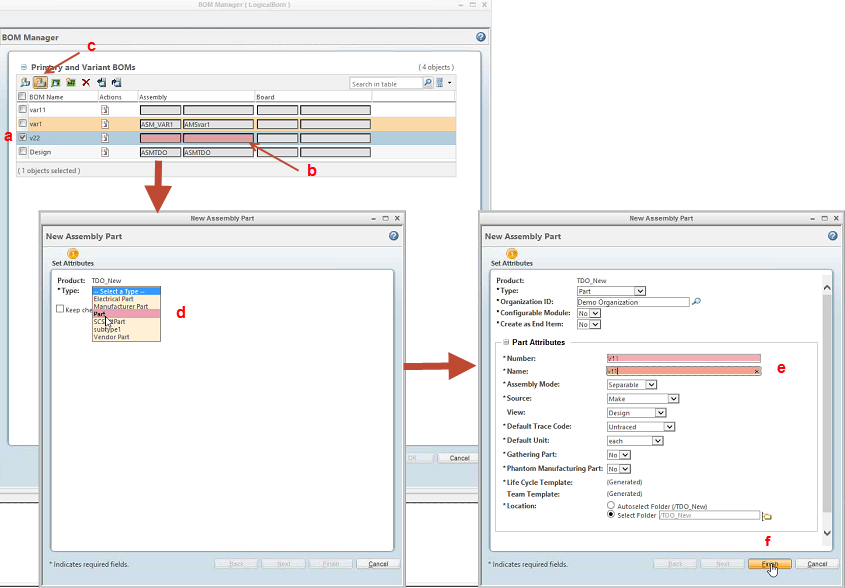
The BOM Manager window opens to enable you to define Windchill assembly parts that represent the new variant BOMs about to be checked in.
11. Within the BOM Manager and New Assembly Part windows, complete the following steps for each new variant BOM to be checked in.
a. In the BOM Manager window, select the name of a new variant BOM.
b. Enter an assembly part name for the new variant BOM.
c. Click the Create New Assembly Part icon in the toolbar.
The New Assembly Part window opens.
d. In the New Assembly Part window, select Part from the Type drop-down list.
e. In the Part Attributes panel, enter the assembly part name and number.
f. Click Finish.
A message appears confirming the successful creation of the Windchill assembly part. Repeat these steps for other variant BOMs as needed, or proceed to the next step.
12. Click OK in the BOM Manager window to resume the checkin process.
A progress meter appears and the checkin process completes.
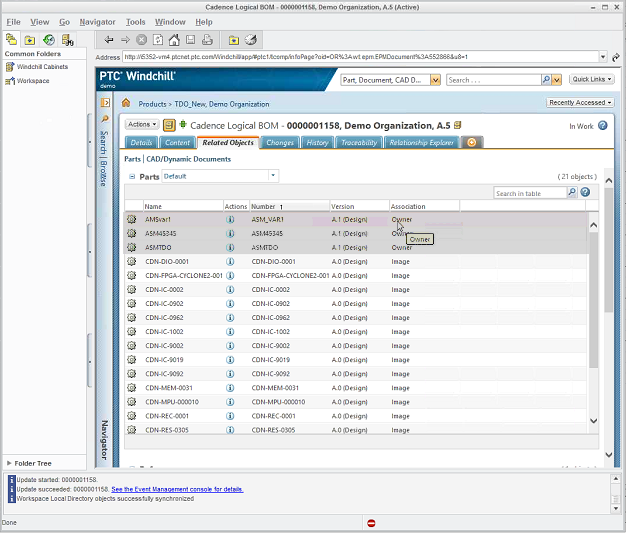
13. Optionally, you can confirm the existence of the new variant BOM assembly parts in Windchill by displaying the Related Objects page for the design as shown in the following figure. Note the Owner association.
Variant BOM Build and Design Object Iteration Behavior
The following table illustrates how variant BOMs are built and how related design object versions and iterations are handled within Windchill .
Scenario and Action | Version and Iteration Result in Windchill |
A master BOM is generated. • The electrical engineer checks out the schematic/physical top-level design, generates a BOM object containing the master BOM, and checks them back in. | • The schematic/physical top-level design is iterated to A.2 • A BOM object is created, associated with the design, and versioned A.1 • The master BOM (assembly object) is created and versioned to A.1 |
Initial variant BOMs are generated. • The electrical engineer checks out the design’s BOM object, generates design variants, and checks the BOM object back in. | • The initial variant BOMs (assembly objects) are zipped and stored in the BOM object, along with the master BOM (assembly object). They are versioned A.1. • The BOM object has changed and is iterated to A.2 • The master BOM (assembly object) is not iterated, since it was not changed. • The schematic/board design object is not iterated. |
Additional variant BOMs are generated. • The electrical engineer checks out the BOM object, adds more design variants, and checks the BOM object back in. | • The additional variant BOM assembly objects are zipped and stored in the BOM object, along with the master BOM and initial variant BOMs. They are versioned A.1. • The initial variant BOMs are not iterated, since they were not changed. • The BOM object containing master BOM and all variant BOMs has changed and is iterated to A.3 • The master BOM is not iterated, since it was not changed. • The schematic/board design object is not iterated. |
Changes are made to variant BOMs. • The electrical engineer checks out the BOM object, edits some of the variants, and checks the BOM object back in. | • The edited variant BOM assembly objects are iterated to A.2 • The unedited variant BOM assembly objects are not iterated. • The BOM object has changed and is iterated to A.4 • The master BOM is not iterated, since it was not changed. • The schematic/board design object is not iterated. |
Update the master BOM. • The electrical engineer regenerates the BOM object from the schematic/physical design object to update the master BOM. | • The master BOM (assembly object) is iterated only if the schematic/physical design object was iterated since the last generation of the master BOM. • The variant BOM assembly objects are not iterated since they were not changed. • The BOM object has been changed and is iterated to A.5 • The schematic/board design object is not iterated. |
The BOM object is checked into Windchill along with the new variant BOMs. The variant BOM names are based on the .csv file names. For example, Variant1.rpt is called Variant1 in Windchill.
| You can remove variant BOMs if they are obsolete, or no longer needed. For more information, see Removing a Variant BOM |