Customizing the Process Plan Explorer
Process plans are the detailed description of what needs to be done on the shop floor in order to produce, inspect, repair, or maintain a given part or assembly. They contain the operations to be performed, the order in which they must be done, the physical resources, plants and skills required, document references, text description, and time and cost requirements.
Using Windchill MPMLink Process Plans you can define the following.
• The operations needed to carry out the manufacturing of a product.
• The sequences in which these operations are carried out.
• The time, costs, and constraints for each operation.
• The physical resources and skills required to carry out operations.
• The parts required to manufacture the product, as well as where and how they are used during the manufacturing process.
In Windchill MPMLink Process plans are also used to create shop-floor Work Instructions. Work instructions are the step by step instructions that are used on the shop floor when producing, inspecting, repairing or maintaining parts. A work instruction is a dynamically generated HTML document that combines process plan information (sequences, operations, part allocations, resource allocations, time, etc.) and all related documents such as drawings, images and 3D sessions with annotations.
Creating Custom Formulas
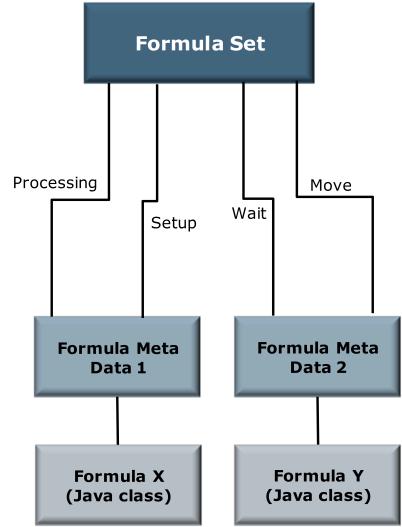
A formula set is used to relate a set of attributes with the corresponding formulas or equations that are to be used to calculate their value. The components that make up a formula set are as follows:
• FormulaSet identifies the set
• FormulaMetaData defines the name and description for a Java formula
• FormulaValuatedLink relates an attribute name to a formula definition
The following graphic is an example of data that needs to be created in order to add custom formulas:
The Formula Sets tab is used to select pre-defined formula sets that can be used to calculate the time and cost associated with an operation. For example, a standard time and cost formula set, and a periodic time and cost formula set. These formula sets take into account the number of parts to be produced in the operation and use the specifications defined for work center (For example, setup time, queue time). Formulas and formula sets are used when the Calculate Time and Cost action has been selected, and when you are loading process plans and operations into the Manufacturing Gantt Explorer.
While multiple formula sets can be associated with a work center, one formula set can be designated as the default formula set for the work center. It is this formula set that is assigned to an operation when the work center is allocated to that operation.
| Formulas must be assigned to a Formula set. If you do not have an existing formula set, you must define one before you can define a custom formula. The PSE can be customized to allow you to use the PSE to add additional values to your customized formula sets. For more information, see the PSE documentation. |
To create a custom formula, use the following procedure:
1. Using the LoadFromFile utility, load an XML-based load file where <csvname> is unique to the system. This load file must contain all of the following elements:
◦ csvFormulaSet - This creates a FormulaSet object.
◦ csvFormulaMetaData - This creates a FormulaMetaData object.
◦ csvAddFormulaMetaData - This links the FormulaMetaData to the FormulaSet.
<csvFormulaSet handler="com.ptc.windchill.mpml.formula.LoadFormula.
createFormulaSet">
<csvuser></csvuser>
<csvname>Standard Time and Cost</csvname>
<csvdescription>This formula Set is used to calculate the time and
cost of an Operation</csvdescription>
<csvfolder>/Default/Design</csvfolder>
<csvparentcontextPath></csvparentcontextPath>
<csvorganizationName></csvorganizationName>
</csvFormulaSet>
2. Create a formula metadata by linking to a java class name that implements Formula interface and returns a calculated value. For example, FloatingPointWithUnits.
Using the LoadFromFile utility, load an XML-based load file where <csvname> is unique to the system and where <csvformulaClassName> is the Java Class implementing formula interface.
<csvFormulaMetaData handler="com.ptc.windchill.mpml.formula.
LoadFormula.createFormulaMetaData">
<csvuser></csvuser>
<csvname>StandardAttributeValueFormulaTime</csvname>
<csvdescription>Standard Attribute Value Formula</csvdescription>
<csvtype>time</csvtype>
<csvformulaClassName>com.ptc.windchill.mpml.formula.Standard AttributeValueFormula</csvformulaClassName>
<csvfolder>/Default/Design</csvfolder>
<csvparentcontextPath></csvparentcontextPath>
<csvorganizationName></csvorganizationName>
<csvorganizationID></csvorganizationID>
</csvFormulaMetaData>
3. Link the formula metadata to the formula set by using an attribute name.
For example, when the service to calculate the formula is called, all the formula metadata associated to the formula set will be executed and a map of all calculated values will be returned using the attribute name as the key. .
Using the LoadFromFile utility, load an XML-based load file where <csvattributeName> is the time and cost reusable attribute on the MPMOperation object
<csvAddFormulaMetaData handler="com.ptc.windchill.mpml.formula.
LoadFormula.addFormulaMetaDataToFormulaSet" >
<csvformulaSetName>Standard Time and Cost</csvformulaSetName>
<csvformulaMetaDataName>StandardAttributeValueFormula Time</csvformulaMetaDataName>
<csvattributeName>IBA|MPM_Attr_MPMOperationSetupTime </csvattributeName>
</csvAddFormulaMetaData>
When creating a java class that implements Formula interface, these inputs are accessible out-of-the-box in the inputs map.
◦ FormulaHelper.FORMULAVALUATED: the object on which the formula set is linked and that casts to ForumlaValuated.
◦ FormulatHelper.FORMULAVALUATED_TI: the object type instance on which the formula set is linked and that casts to TypeInstance. It can be null.
◦ FormulaHelper.FORMULAVALUATED_ATTRIBUTE_NAME: the attribute name used to link the formula meta data to the formula set and that casts to String. This will be used as the key in the results map.
◦ FormulaHelper.LOT: the lot value specified by the user in the context of the Calculate Time and Cost action. It casts to Double.
The following is an example of a formula java class:
import com.ptc.core.meta.common.AttributeIdentifier;
import com.ptc.core.meta.common.AttributeTypeIdentifier;
import com.ptc.core.meta.common.TypeinstanceIdentifier;
import com.ptc.core.meta.context.common.AttributecontextSpec
import com.ptc.core.meta.server.TypeIdentifierUtility;
import com.ptc.core.meta.type.common.TypeInstance;
import com.ptc.core.meta.type.common.TypeInstanceFactory;
import com.ptc.windchill.mpml.MPMLinkHelper;
import java.text.NumberFormat;
import java.util.HashMap;
import wt.units.FloatingPointWithUnits;
import wt.util.WTContext;
import util.WTException;
public class StandardAttributeValueFormula implements Formula{
private static final String RESOURCE = "com.ptc.windchill.mpml.formula.formulaResource";
private static NumberFormat numberFormat =
NumberFormat.getInstance(WTContext.getContext().getLocale());
/** Creates a new instance of StandardAttributeValueFormula */
* This Formula simply return the value of the attribute.
public StandardAttributeValueFormula() {
}
public FloatingPointWithUnits calculate(HashMap inputs)throws
InvalidFormulaInputException, WTException{
//Get the object on which the formula is call
Object object = inputs.get(FormulaHelper.FORMULAVALUATED);
//Get the TI on which the formula is call
TypeInstance ti =(TypeInstance)inputs.get(FormulaHelper.FORMULAVALUATED_TI);
//Get the attribute that is calculated by the formula
String attribute_name = (String)inputs.get(FormulaHelper.FORMULAVALUATED_ATTRIBUTE_NAME);
if(object == null)
throw new InvalidFormulaInputException( RESOURCE, formulaResource.REQUIRED_FORMULA_INPUT_MISSING, new Object[]{FormulaHelper.FORMULAVALUATED} );;
TypeInstanceIdentifier tii = null;
//Get the TI of the object if null
if(ti==null){
tii = TypeIdentifierUtility.getTypeInstanceIdentifier(object);
ti = TypeInstanceFactory.newTypeInstance(tii);
}else
tii = (TypeInstanceIdentifier)ti.getIdentifier();
//Get ATI for the attribute to calculate
AttributeTypeIdentifier ati = (AttributeTypeIdentifier)MPMLinkHelper.getIdentifierFactory().get(attribute_name,tii.getDefinitionIdentifier());
AttributeIdentifier[] ais = ti.getAttributeIdentifiers(ati);
//If the attribute value is not in the TI, update it to get the value
if(ais.length<1){
AttributecontextSpec fl = new AttributecontextSpec();
fl.putEntry(ati);
ti = MPMLinkHelper.updateTypeInstance(new TypeInstance[] {ti}, fl, null)[0];
ais = ti.getAttributeIdentifiers(ati);
}
//Get the attribute value
Object value = null;
if(ais.length>0)
value = ti.get(ais[0]);
//Return the value of the attribute if it’s a FloatingPointWithUnits
if(value instanceof FloatingPointWithUnits)
return (FloatingPointWithUnits)value;
// value is null
return FloatingPointWithUnits.valueOf(numberFormat.format(0));
}
}
| It is also possible to add more input to the formula by creating a new action and then using formula services to call the execution of the formula set. For more information on creating new actions, see the PSE documentation. |
Enabling the Periodic Time and Cost Formula
To enable the periodic time and cost formula use the following procedure:
1. Launch the Type and Attribute Management utility.
2. In the Manage reusable attributes pane, select the Resource_Attribute_Org organizer.
3. Insert a new attribute with following properties:
◦ Name: MPM_Attr_SetupLotInterval
◦ Data type: Real Number
◦ Internal Name: MPM_Attr_SetupLotInterval
◦ Description: Display Name and Hierarchy Display Name: Setup Lot Interval
4. Insert a new attribute with following properties:
◦ Name: MPM_Attr_SetupTimeDuringProcessing
◦ Data type: Real Number
◦ Internal Name: MPM_Attr_SetupTimeDuringProcessing
◦ Description: Display Name and Hierarchy Display Name: Setup Lot Interval
5. Insert a new attribute with following properties:
◦ Name: MPM_Attr_SetupCostDuringProcessing
◦ Data type: Real Number
◦ Internal Name: MPM_Attr_SetupCostDuringProcessing
◦ Description: Display Name and Hierarchy Display Name: Setup Cost During Processing
6. In the Manage Types pane, edit the Work Center type located under > >
7. In the Template tab, select Attribute Root, click Add Attribute and associate the three previously created attributes to the Work Center type.
8. Launch the Manufacturing Resource Explorer.
9. For each existing Work Center, check out the Work Center and set a value in the Information tab for attributes Setup Lot Interval, Setup Time During Processing and Setup Cost During Processing. When all attributes are set, check in the Work Center.
Changing Units of Measure for Cumulated Time and Cost
The Cumulated Time and Cost function of the Process Plan Explorer does not use the Measurement System default units.
To change the units for the time & cost roll-up, the following properties must be modified:
com.ptc.windchill.mpml.CumulatedTimeAndCostActionTimeUnit
com.ptc.windchill.mpml.CumulatedTimeAndCostActionCostUnit
These properties can be located in the following location:
codebase/com/ptc/windchill/mpml/xconf/mpmlin.properties.xconf
The default values are “min” and “$”, respectively.
Customizing Work Instructions
The work instruction template installed with Windchill MPMLink can be customized to fit your needs. To customize work instructions you should have a basic knowledge of JSPs and Info*Engine.
Info*Engine tasks are used to gather the information that is to be displayed in the work instruction, while the JSPs are used to arrange and format the display of that information:
Location | Description |
<WT_Home>\codebase\netmarkets\jsp\ mpml | Location of the JSPs used in work instructions. |
<WT_Home>\tasks\com\ptc\windchill\ mpml\workinstructions | Location of the Info*Engine tasks used to collect work instruction data. |
<WT_Home>\codebase\com\ptc\windchill\ mpml\xconfs\ mpmlink.properties.xconf | Location of work instruction properties. |
<WT_Home>\codebase\netmarkets/css/wor kInstructionStyles.css | Location of the work instruction style sheet. This file can be used to change the fonts used in work instructions, as well as the color of report titles. |
JSPs Used in Work Instructions
The following table lists and describes the JSPs used to configure work instructions.
JSP | Description |
headerWorkInstruction.jsp | Creates the logo image shown in the top corner of the work instructions report. Right next to the logo, it creates a table showing information about the process plan for the operations shown in the report. At the far right, it creates the assembly table information for which this process plan was associated. |
configSpecWorkInstruction.jsp | Creates the configuration specification table used in the work instructions report. Three types of configuration specifications are valid for this report: standard, baseline, and effectivity. The values shown are the ones for the expansion criteria that were applied to the data when the work instructions report was launched. |
operationHeaderWorkInstruction.jsp | Displays the information created in the sequenceHeaderWorkInstruction.jsp in the left margin. Creates the label number of the operation or sub-operation and places it next to the sequence number. Below the label number, it creates a table showing the name, number, version, and short description of that operation. |
operationDetailHeaderWorkInstruction. jsp | Creates the table below the operations header. It shows details of the operation, including work centers used, times and costs. |
operationDetailWI.jsp | Creates the tables with the operation long description, its associated parts, its allocated resources, and its associated documents. If the value of the Displayed column in the documents table is Yes, the associated document is a recognized image to be displayed in the work instructions panel on the left of these detail tables. Image files that can be shown in work instructions must end with an extension specified by the following property: com.ptc.windchill.mpml.WorkInstructi
onIllustrationFileExtensionAllowed |
sequenceHeaderWorkInstruction.jsp | When operations are part of a sequence, this JSP creates links to the branching and return operations. If the operation is a sub-operation of another operation, this JSP creates links to the parent operation. |
footerWorkInstruction.jsp | Creates the footer area shown at the end of each operation section. This displays the present state of the operation, its status, its inspection, when it was first created, who updated the operation last, and the last date and time of the update. |
coreWorkInstruction.jsp | The core JSP that constructs the work instructions report. Processes the URL parameters and calls the Info*Engine tasks used to gather the data related to the operations found in a process plan. If the JSP is launched from a process plan, it calls processPlanLogicWorkInstruction.jsp If launched from an operation it calls operationLogicWorkInstruction.jsp This JSP also computes the parent and child relationship between operations, and the sequence branching and return operations. For each operation, it will call the JSPs that create the tables and displays the data returned by the Info*Engine tasks. |
operationLogicWorkInstruction.jsp Info*EngineInfo*Engine | Launches Info*Engine tasks that find all operations and standard procedures under an operation. Operations are sorted by operation label number. This JSP does not display items in the report. |
processPlanLogicWorkInstruction.jsp | Launches Info*Engine tasks that find all operations, sequences, and standard procedures under an operation. The operations found are sorted by operation label number. This JSP does not display items in the report. |
Info*Engine Tasks Used in Work Instructions
The following table lists and describes the Info*Engine tasks used to gather the data used in work instructions.
Info*Engine Task | Description |
describeAttributes.xml | Each webject in this task creates a group where the values of the attributes are localized. These localized values are then displayed in the work instructions report. |
getOperationData.xml | The webjects in this task query an operation for the data that is displayed in the work instructions report. The following data sets are collected; work center, process, parts, manufacturing capabilities, resources, and documents. Each set of data is stored in an Info*Engine group. |
getOperationsAndStProceduresUnderAnOperation.xml | The webjects in this task create a group containing all the first depth sub-operations and standard procedures found under a particular operation. |
getProcessPlanAndAssemblyInformation.xml | The webjects in this task create a group containing information on the assembly associated to the process plan. |
getSequencesAndStProceduresUnderAProcessPlan.xml | The webjects in this task create a group containing all the first depth sequences and standard procedures found under a process plan. |
sortingOperations.xml | The webjects in this task create a group containing the sub-operations and standard procedures found under a particular operation. It also sorts the operations and standard procedures in each level. Currently, the algorithm is not recursive; it goes up to a depth of 3 levels. That is, it will only find 3 levels of sub-operations and then stop regardless if there are more sub-operations. To get to deeper levels, follow the pattern applied in this task and add more levels accordingly. |
sortingSequences.xml | The webjects in this task create a group containing the sub-sequences and standard procedures found under a particular sequence. It also sorts the sequences and standard procedures in each level. Currently, the algorithm is not recursive; it goes up to a depth of 3 levels. That is, it will only find 3 levels of sub-sequences and then stop regardless if there are more sub-sequences. To get to deeper levels, follow the pattern applied in this task and add more levels accordingly. |
Work Instruction Properties
Work Instruction Customizations
Work instructions can be customized for a number of reasons, including to replace the header and logo with our own information, or to provide simpler work instructions.
The following table lists some common work instruction customizations.
Customizations | Description |
To change the time units of an operation: | Modify the following JSP: timeUnit in coreWorkInstruction.jsp For example, to change from seconds to minutes, change to m. |
To change the time units for the steps in an operation: | Modify the following JSPs, as required: setupTimeUnit
processingTimeUnit
LaborTimeUnit
queueTimeUnit,
teardownTimeUnit,
waitTimeUnit,
moveTimeUnit For example, to change from seconds to minutes, change to m. |
To relocate a table in the work instruction: | Navigate to the end of the following JSP: coreWorkInstruction.jsp Then re-design the HTML display. |
To display the processing cost of an operation in a work instruction: | Navigate to that the following tasks: • getOperationsAndStProceduresUnder AnOperation.xml • sortingOperations.xml Add the following attribute to the above tasks: MPM_Attr_MPMOperationProcessingCost Then create the column and display data in the following JSP: operationDetailHeaderWorkInstruction
.jsp |
To change the font, size, or color of the titles in a work instruction: | Modify the following CSS file and the JSPs that use the definition in the CSS file: workInstructionStyles.css |
To change the logo at the top of the work instruction, or in the operation table: | Use the following procedure: xconfmanager -d com.ptc.windchill.mpml.WorkInstructionLogo=<logo> -t codebase/wt.properties where <logo> is the full path to the logo .gif file found in the following folder: codebase\netmarkets\jsp\mpml The default value is: ../../images/ptcLogo_workInstructions.gif corresponding to folder codebase\netmarkets\images |
To add an image extension type: | Add the extension type to the following property: com.ptc.windchill.mpml.WorkInstructi
onIllustrationFileExtensionAllowed |
To rearrange, remove, or add new tables: | Modify the following JSP: coreWorkInstructions.jsp |
Changing Operation Numbering
Windchill MPMLink numbers operations in sequential increments of 10. For example operation 10, operation 20, and so on. However, you may wish to configure your operations so that automatically increment by a different numbering scheme.
To change numbering schemes you can modify the following properties:
• wt.operationLabelIncrement
• wt.operationLabelNumberOfCharacters
For example, to have operation labels with three characters and which are increased by 5 (005, 010), put the following in site.xconf, and then run xconfmanager -pF:
• <Property name="wt.operationLabelIncrement" overridable="true" targetFile="codebase/wt.properties" value="5"/>
• <Property name="wt.operationLabelNumberOfCharacters" overridable="true" targetFile="codebase/wt.properties" value="3"/>
Additionally, to change the padding that an operation uses (for example, to something other than 0), modify the following property:
• wt.operationLabelPaddingCharacter