ドキュメント送付状の設定手順例
Adobe Experience Manager サーバーを WVS で設定して PDF ドキュメントの送付状を作成するには、次の手順に従います。
1. xconfmanager ユーティリティ (<Windchill>/bin ディレクトリ内) を使用して、wvs.properties.xconf ファイルを編集して次のプロパティを設定します。
◦ Adobe Experience Manager サーバー情報を設定:
<Property default=" http\://adobelc-host\:8080/soap/services/
AssemblerService " name="edrload.livecycle.assembler.serviceurl"/>
<Property default="$(edrload.livecycle.assembler.serviceurl)?WSDL&
lc_version=9.0.0" name="edrload.livecycle.assembler.wsdlurl"/>
<Property default="PRODUCTVIEW R&D" name="edrload.livecycle.
assembler.credentialalias"/>
<Property default="$(wt.home)$(wvs.dir.sep)livecycleauth.properties"
name="edrload.livecycle.authfile"/>
|
|
前述のステップ 3 の 4 つ目のプロパティを使用します。
|
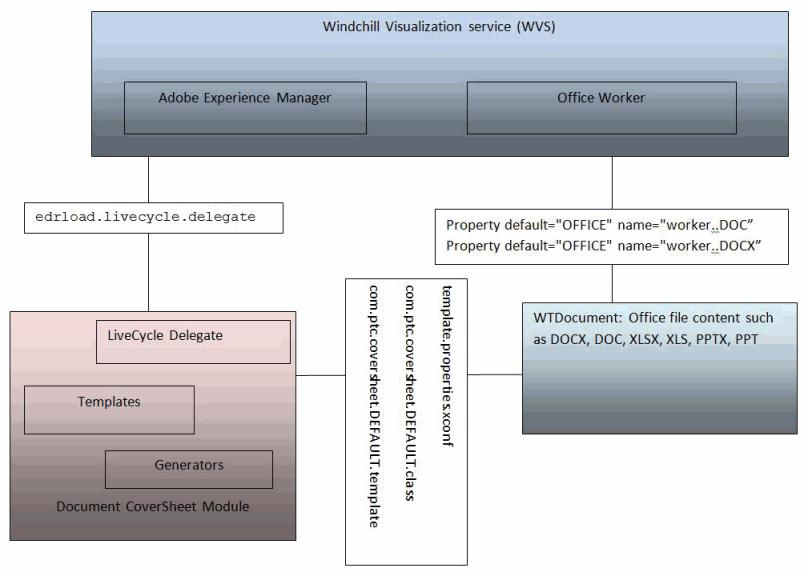
ドキュメント送付状向けの Adobe Experience Manager Delegate およびそのメソッドを設定:
<Property name="edrload.livecycle.delegate"
default="com.ptc.coversheet.wvs.LiveCycleDelegate/getLiveCycleInvocationParams" />
◦ 変更時にドキュメントを再パブリッシングする
<Property default="true" name="publish.republishondocumentchange"/>
2. Windchill\codebase\WEB-INF\conf\wvs.properties.xconf に次のプロパティを追加:
<Property default="OFFICE" name="worker..DOC">
<Property default="OFFICE" name="worker..PDF">
<Property default="OFFICE" name="worker..PPT">
<Property default="OFFICE" name="worker..XLS">
<Property default="OFFICE" name="worker..DOCX">
<Property default="OFFICE" name="worker..PPTX">
<Property default="OFFICE" name="worker..XLSX">
3. livecycleauth.properties ファイル (ステップ 1 参照) を <Windchill> ディレクトリに作成して次の行を追加します。これは、Experience Manager サーバーに認証されるユーザー名とパスワードです。設定の詳細については、このトピックの「Adobe Experience Manager サーバーの設定」を参照してください。
4. OFFICE Worker を設定します。Worker の設定ガイドラインについては、Creo View MCAD Adapters Installation and Configuration Guide を参照してください。
5. xconf を次のようにインストールします。xconfManager -i <Windchill>\codebase\com\ptc\coversheet\template.properties.xconf
6. すべてのプロパティを適用します。xconfManager -p
次の図に、Experience Manager Delegate と Worker の間のやり取りの概念図を示します。