Using the Windchill Setup Assistant
After completing the Windchill PDM Essentials installation, the Windchill Setup Assistant opens in a browser window. It may take up to a minute to completely load and render this initial page.
This Windchill Setup Assistant is organized into five pages, described below. Your progress through these pages is indicated at the top.
The current page number is orange, completed or skipped page numbers are green, and pages not yet completed have gray numbers.
Each page is optional, use the Back and Next buttons to go to applicable pages, or click the step number. Click Finish at any time to complete the Windchill Setup Assistant.
| After clicking Finish and closing the Windchill Setup Assistant, you cannot access it again. Be sure you complete all of the configuration options that are applicable to your organization before completing the Windchill Setup Assistant. |
1. Number Scheme—Use the Number Scheme page to enable and configure a number scheme to use for automatically generating numbers for new CAD documents. The default setting is to prompt users to manually enter identifying numbers for CAD documents.
2. Publishing—Enable server-side publishing and automatically generate thumbnails and 3–D viewable images that are accessible from CAD documents. Specify publishing filters to define what file types are published. This configuration option is only available if you selected the option to install Creo Parametric publishing.
3. Version Scheme—Select a scheme to use for file version management.
4. Participants—Add users as participants and select the team roles to which they belong.
5. Attributes—Add attributes to make available for CAD documents (for example, part, assembly, and drawing files). Attributes are visible and modifiable from within the CAD application.

Number Scheme
Numbering schemes control how numbers are generated for baselines, documents, CAD documents, and dynamic documents. You can configure Windchill either to prompt the user to manually enter numbers or to automatically generate numbers using a defined scheme.
Select one of the following options:
• Enter Numbers manually—Select this option if you want users to manually specify a number for each new CAD document. For example, if you get new part numbers from an ERP or MRP system, from another part number generator, or if you manage a list of numbers in a spreadsheet.
| CAD document file names and numbers must be unique across the system, this uniqueness is enforced by Windchill. |
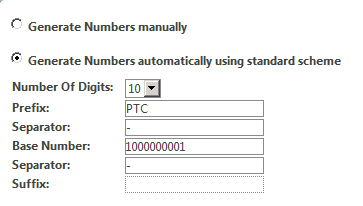
• Generate Numbers automatically using standard scheme—Define the scheme you want all generated numbers to have using the following optional fields:
◦ Number Of Digits—Select the number of digits for the number scheme. Windchill pads with zeros. For example, the number one using a six digit number scheme appears as 000001.
◦ Prefix—Type a prefix. Each number begins with this prefix. For example, the number one using a prefix of PTC and a number of six digits appears as PTC000001. The prefix must use the following characters: alphanumeric (A–Z, a–z, 0–9), hyphen(-), or underscore(_).
◦ Separator—Type a character to use as the separator between the prefix and number. For example, the number one using a prefix of PTC, a number of six digits, and a separator of a dash appears as PTC-000001.
◦ Base Number—Type the number you want to use as the number on which to begin incrementing. For example, the first number that is assigned if the numbering scheme uses six digits, a prefix of PTC, a separator of a dash, and a base number of 000101 is PTC-000101.
◦ Separator—Type a character to use as the separator between the number and the suffix. For example, the number one using a prefix of PTC, a number of six digits, a separator of a dash between the prefix and the number, a separator of an asterisk between the number and the suffix, and a suffix of CAD is PTC-000001*CAD.
◦ Suffix—Type a suffix. Each number ends with this suffix. For example, the number one using a prefix of PTC, a number of six digits, a separator of a dash between the prefix and the number, a separator of an asterisk between the number and the suffix, and a suffix of CAD is PTC-000001*CAD. The suffix use the following characters: alphanumeric (A-Z, a-z, 0–9), hyphen(-), or underscore(_).
For more information about object numbers, see
Object Numbering.
For more information about number schemes, see
Creating Numbering Scheme Rule Content.

Publishing
On the Publishing page, specify whether or not you want server-side publishing to be enabled and select any applicable publishing filters. Server-side publishing automatically generates thumbnails and 3–D viewable images that are accessible from CAD documents.
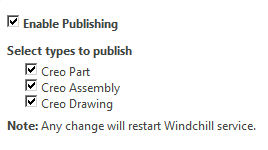
• Enable Publishing—Enables server-side publishing for parts, drawings, and assemblies for Creo View using the PVS format. Clear this checkbox to disable server-side publishing.
| If you choose not to enable server-side publishing, viewable images are created client-side during custom Creo Parametric checkin. |
• Select types to publish—For Creo Parametric, select the file types for which to generate 3–D viewable images and thumbnails. File types that are not selected are not published at all. This is used to manage server load.
◦ Creo Part
◦ Creo Assembly
◦ Creo Drawing

Version Scheme
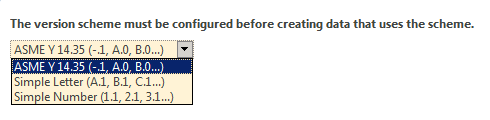
On the Version Scheme page, select a version numbering scheme from the list that you would like to use when revising version-controlled items.
| The ASME version scheme adheres to the standards of the American Society of Mechanical Engineers. |
For more information, see
Object Versioning.

Participants
The Participants page is used to add users to predefined profiles and team role groups. These groups are associated with permissions for Windchill information and actions at various steps of the life cycle.
| It is a best practice to add at least one user to each predefined role/group. A user can be added to multiple roles/groups. |
To add a participant:
1. Click the create new user icon

.
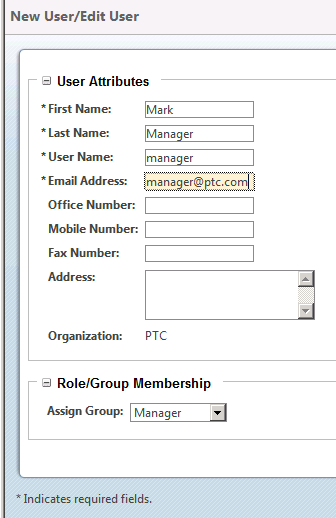
2. In the User Attributes section, enter information for the new user. An asterisk (*) indicates a required field.
| The default password for the added user is the same as the User Name specified here. You can change users passwords or inform users to change their password when they first log on. For information on how to change user passwords from the Participant Administration utility, see Changing User PasswordsWhen instructing users to change their own password, refer them to the following link: Changing Your Password. |
3. In the Role/Group Membership section, select one of the following groups from the Assign Group list of predefined team roles, and then click OK.
◦ Administrator—Also referred to as the Organization Administrator, users associated with this profile have visibility to administer the system and the ability to create, update, and delete all objects at the organization level.
| This administrator (Organization Administrator) is not the same as the site administrator (wcadmin), who manages the site context and is specified in the installation assistant. However, the same user may be created as Site Administrator (wcadmin) in the Windchill Installation Assistant and assigned to the Administrator role (Organization Administrator) in the Windchill Setup Assistant. |
◦ Manager—Users associated with this profile can perform the following actions:
▪ Product Management—Create and manage products and content within a product, including changing the state of an object (to release it, for example).
▪ Library Management—Create and manage libraries and content within a library, including changing the state of an object (to release it, for example).
▪ Promotion Requests Management—Initiate and approve promotion requests.
▪ Document Management—Manage CAD documents and view, create, and edit non-CAD documents.
▪ Organization Administration—Perform organization administration tasks, such as adding and managing organization users.
◦ CAD Author—Users associated with this profile can view, create, and edit CAD documents in products and can view CAD documents in libraries.
◦ Contributor—Users associated with this profile can create and edit documents and can view CAD documents that are in the released state. These members can also view and markup 3–D viewable images associated with CAD documents.
◦ Viewer—Users associated with this profile can view documents and CAD documents that are in the Released state.
| You can only select one role/group for the current user. If you want to add this user to more than one role/group, follow the above steps for each role/group. For example, if you want to add a user to the CAD Author and the Contributor groups, you must add that user to the participants list twice, once for each intended group. |
For more information about the available roles and groups, see Participants.
| The Manager group is automatically added to the Product Creators group and the Library Creators group. Other than Organization Administrators, only members of these groups can create products and libraries, respectively. |
Each added user appears in the participants list.
To remove users from the list, select the checkbox in front of each user and click the remove selected objects icon

.
To edit information for a user in the list, select the checkbox in front of the user and click the edit objects icon

.
When all users are added, click Next to continue.
| As you add users to the system, make sure you understand how to be compliant regarding the licenses you have acquired. For more information, see Managing License Use. |
For more information, see
Creating a New User.

Attributes
The Attributes page is used to specify custom attributes that you want to associate with CAD models such as parts, assemblies, and drawings. These attributes are created as Windchill reusable attributes. These Windchill attributes are associated with parameters in Creo Parametric if the Windchill attribute Internal Name and the attribute type matches the CAD parameter name and type, and if the CAD parameter is “designated.” If this association is in place the parameter or attribute values are automatically exchanged between the server and CAD file.
To add an attribute:
1. Click the add attribute to list icon

.
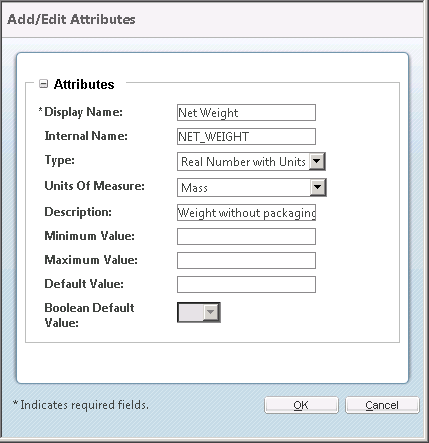
The Add/Edit Attributes page opens in a new window.
2. In the Attributes section, enter information into the following fields:
◦ Display Name—Type the attribute name you want to be displayed in attribute lists. The attribute name cannot begin with “PTC_” (for example, “PTC_NetWeight”), and the name cannot contain special characters (characters that are not alpha-numeric) except hyphens and underscores, which are allowed.
◦ Internal Name—This name is automatically generated based on the Display Name and is the string you should use to create and designate matching CAD file parameters in Creo Parametric.
◦ Type—Select one of the following attributes from the list. The value selected in this list determines which attribute fields are available.
▪ Boolean—True/False (Yes/No)
▪ Integer Number—Integer number (no decimal)
▪ Real Number—Decimal number
▪ Real Number with Units—Decimal number with units
▪ String—Text
◦ Units Of Measure—For an attribute type of Real Number with Units, select the units indicating the quantity of measure you want the numeric attribute to represent.
◦ Description—Type an attribute description.
◦ Minimum Value—For an attribute type of Integer Number, Real Number, or Real Number with Units, type a minimum possible numeric value. This field, along with Maximum Value, defines a range of valid numeric values. This range is inclusive, meaning the minimum and maximum values are allowed as well as the numeric values between.
◦ Maximum Value—For an attribute type of Integer Number, Real Number, or Real Number with Units, type a maximum possible numeric value. This field, along with Minimum Value, defines a range of valid numeric values. This range is inclusive, meaning the minimum and maximum values are allowed as well as the numeric values between.
◦ Default Value—Type a default value for the attribute. Characters allowed are defined by the attribute type:
▪ Integer Number—Numeric values allowed.
▪ Real Number—Decimal values allowed.
▪ Real Number with Units—Characters allowed are the same as the Real Number attribute type.
▪ String—All characters are allowed.
◦ Boolean Default Value—For an attribute type of Boolean, select whether you want the default value to be Yes, No, or blank (no default value).
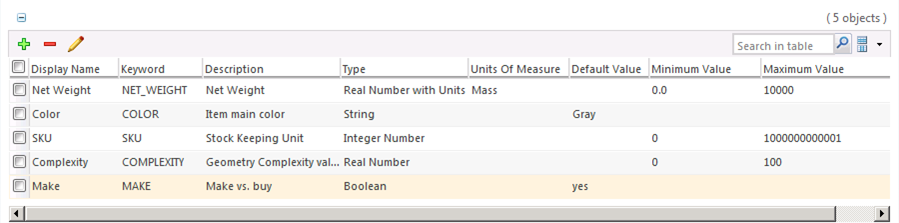
Each added attribute appears in the attributes list.
To remove attributes from the list, select the checkbox in front of each attribute and click the remove selected objects icon
.
To edit information for an attribute in the list, select the checkbox in front of the attribute and click the edit objects icon
.
When all attributes are added, click Next to continue.
For more information on the attributes added by the Windchill Setup Assistant, see Attributes.
Completing the Windchill Setup Assistant
After your configuration selections are complete, click Finish.
| Make sure you have specified all of the configuration settings you need before clicking Finish, the Windchill Setup Assistant cannot be opened again. |
The configuration specifications are applied and the Windchill server restarts. This may take several minutes.
When the configurations have been successfully applied:
• The
WindchillHome
page opens in your default browser.
| On the WindchillHome page, the browser address bar contains the server name and location; everything before “/app/” in the address. For example, http://servername.ptcnet.ptc.com/Windchill. Email this address to each user; it is used when they set up integration between Windchill and their CAD application. For more information, see Integrating with Your CAD Application. |
• A shortcut to the
WindchillHome page is created on the server desktop.
• A link to the
WindchillHome page is created in the bookmarks or favorites of your default browser.
• A Windchill Windows service is created so that when the server machine is rebooted, all of the Windchill components automatically start in the proper sequence. For more information, see Restarting the Windchill Windows Service.
Additional Configuration Steps for Autodesk Inventor and SolidWorks
Windchill PDM Essentials is configured with the Creo Parametric CAD worker installed on the same machine as Windchill.
If you wish to publish formats for Autodesk Inventor or SolidWorks, you must purchase the CAD adapter for these applications and configure a CAD worker on a separate physical or virtual machine because Autodesk Inventor and SolidWorks do not support installation into a Windows Server operating system.
For more information, see Configuring a Remote CAD Worker for Autodesk Inventor and SolidWorks.

 . For more information, see Using the Windchill Help Center.