Windchill Customer Experience Management: Enhancements for Part Instances and Documents
Product: Windchill Customer Experience Management, Windchill Quality Solutions
Release: 11.0 F000
Benefit
Functionality has been expanded to allow users to associate part instances and documents to a product.
Additional Details
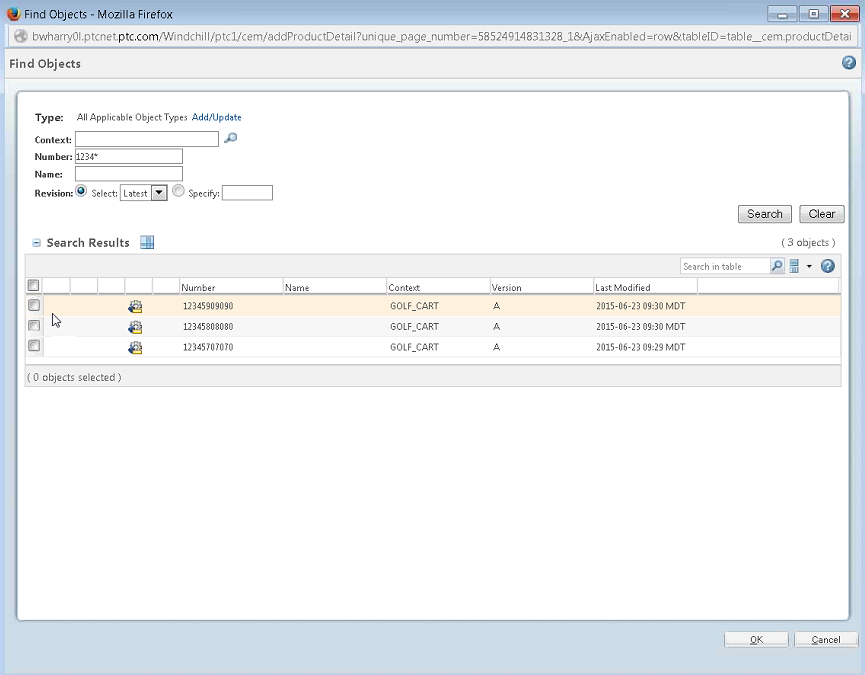
Previously, when you were selecting objects in the Find Objects window to add to the Related Products table, you could only associate parts to a product. Now, you can select other object types in addition to parts. Out-of-the-box, you can select parts, documents, and part instances.
• In the Find Objects window, you can search for and select one or more objects. The search defaults to all applicable object types. To limit the search to specific object types, click Add/Update, select the object types, and click OK.
◦ If you know the part number, but not the serial number of the product, you can search using the part number. You can enter the serial number manually when you know it later, or you can advance the workflow without it.
◦ If you know the part number and serial number, you can search on either number.
◦ If you do not know either the part number or the serial number, use the add as reported product icon

to record the information you have in the
Related Products table.
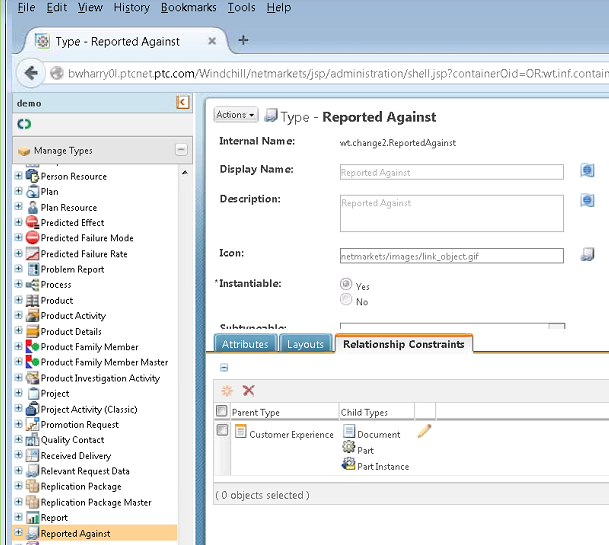
• To control the object types that appear in the Find Objects window, edit the selections in the Relationship Constraints tab for the Reported Against type in the Type and Attribute Management utility. The default object types are parts, part instances, and objects.
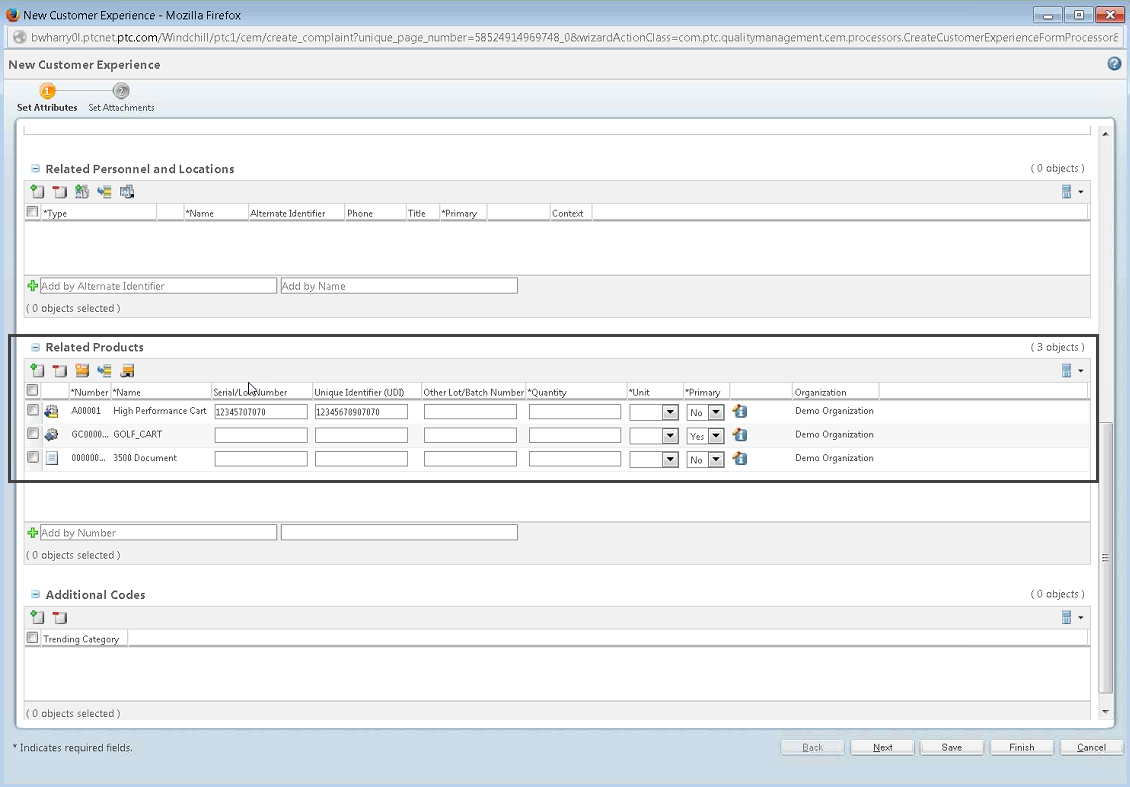
• When you select an object type, the system automatically completes certain fields in the Related Products table. This saves you from entering this information manually.
◦ If the object is a part instance, the system completes the Serial/Lot Number field.
◦ If the object is associated with a unique device identifier, the system completes the Unique Identifier (UDI) field.
• After you have added a part or part instance to the Related Products table, you can assign a failure code. If a failure code is added to a part instance, the failure code is reported against the part and not the part instance. You cannot enter failure codes for other objects, such as documents.
You need to create your own part instances. You can create part instances for every product or specific products you choose.
To create part instances to associate to a customer experience, see
Creating a New Part Instance.
• When creating the part, create it as an end item and set the default trace code to Serial Number, Lot, or Lot/Serial Number.
• When creating the part instance, enter the Serial Number, Lot, or Lot/Serial Number to make the part instance searchable in the quick lookup and in the Find Objects window.
To configure attributes on the Related Products table, update the CEProductDetail object using the CEM.ProductDetailAttributePopulator.properties.xconf file located in <Windchill>\codebase\com\ptc\qualitymanagement\cem\xconfs.
• The property name value in the file contains a concatenation of the type, period character, and internal name of an attribute that exists on the From type.
• The property default value contains the internal name of an attribute that exists on the CEProductDetail type.
• Any Changeable2 type and attribute combination can be defined in the property name value.
• All CEProductDetail attributes can be defined in the property default value.
• All attributes are supported on both the From types and the CEProductDetail type.
• For example, the out-of-the-box entry for mapping the uniqueIdentifierNumber from a part instance to the uniqueIdentifierNumber attribute on the CEProductDetail type is
<Property name=”wtpart.WTProductInstance2.uniqueIdentifierNumber” default=”uniqueIdentifierNumber”/>
To add an Organization attribute to the Product Details window, do the following:
1. Create a calculated attribute on the Product Details (CEProductDetail) type. The data type should be String.
2. Add the calculated attribute to the layouts where you want to display the organization.
3. Right-click the new attribute in the layout and select Edit Group Attribute Properties. In the Data Utility Id field, enter productDetailOrganizationDataUtility.
4. Save the changes to the layout. The organization appears on the windows where you added the calculated attribute.