Use Case Example for PDM Checkout
The following is an example of the steps you might take when checking out a PDM object to multiple projects.
1. Create a part in PDM.
“Part A.1” is created in a product context named “Product A.”
The product manager determines that the product team cannot complete the necessary work on the part. However, because this part is a required component of the product assembly, it cannot be moved to another product context.
As a result, the product manager requests that resources from project teams be allocated to continue the work on the part.
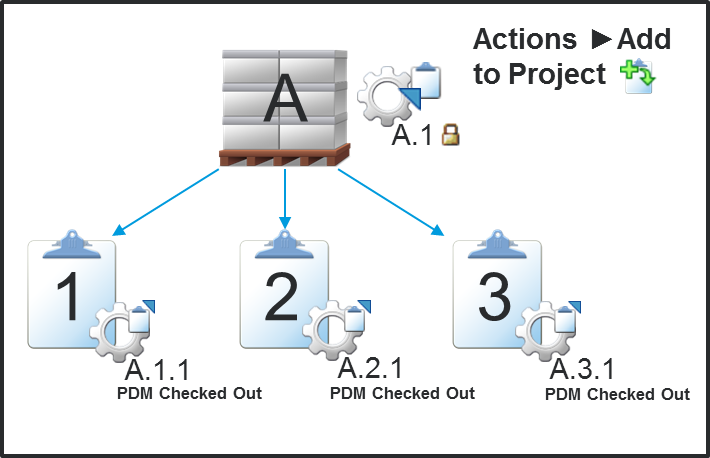
2. Check out the part to multiple project contexts.
The product manager selects three projects and requests that the project team members complete design work on the part.
Using the Add to Project action, the product manager checks out the part to each project. In this example, the projects are named “Project 1,” “Project 2,” and “Project 3.”
The Add to Project checkout action results in the following events:
◦ The part is locked in Product A.
◦ A project-specific version of the part is created in each project.
| Although not illustrated here, the product manager can optionally include related and dependent objects when checking out the part. For example, related documents, structural annotations, lower-level part components, and related CAD documents. These objects can either be shared or checked out to each project. |
| If the product manager decides to allocate work to Product A members instead, you can simply perform an Undo PDM Checkout action. The project-specific versions are deleted and replaced with a read-only, shared object. |
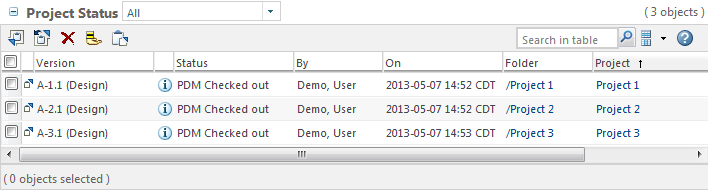
3. Project members check out and check in the object.
Team members with appropriate access can check out the part from the project to make changes. Each modification creates a new project-specific iteration of the part.
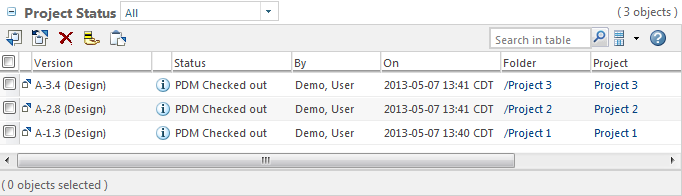
The Project Status table reflects the latest project-specific versions:
| Version numbers might be different depending on the numbering scheme enforced at your site. In this example, the members of Project 1 checked out and checked in Part A.1.1 to create Part A.1.2. Then it was checked out and checked in again to create Part A.1.3. The members of Project 2 have modified their version eight times; the members of Project 3 have modified their version four times. |
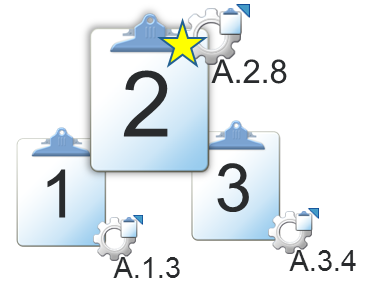
4. Determine which project version to incorporate back into the product structure.
The product manager evaluates each version and selects the version created in Project 2.
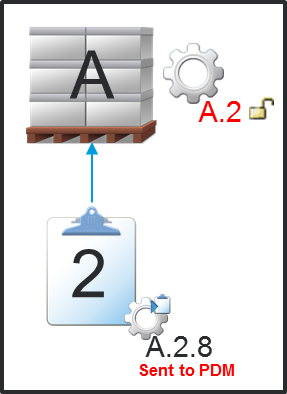
5. Send the winning design back to PDM.
The manager completes the
Send to PDM action on Part A.2.8 (the version created in Project 2).
| 1. The source part in Product A is updated to reflect the changes made in Project 2. In this example, this means that the product part moves from version A.1 to version A.2. Part A.2 includes all the work performed in Project 2. 2. The source part is unlocked, allowing Product A members to resume their work on Part A.2. 3. The winning design alternative, Part A.2.8, is moved to the Sent to PDM state. Project members can still view this part version, but can no longer modify it. |
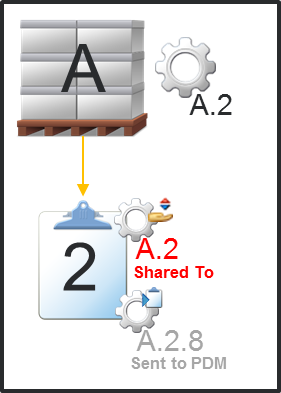
| 1. The latest version of the source part (A.2) is shared back to Project 2. This means that if Product A members make changes to it, then the users in the project can use the Update Project action to reflect those changes in the shared part. 2. The shared version appears in the Folder Contents table of the project, and the Sent to PDM version is hidden (but is still accessible from the Project Status table). |
| Although not illustrated here, you can also send any related or dependent objects created in the project. Those objects are then shared back to the project as well. If you want to allow members of Project 2 to continue working on the part, you can perform a Convert to PDM Checkout operation on the shared Part A.2. |
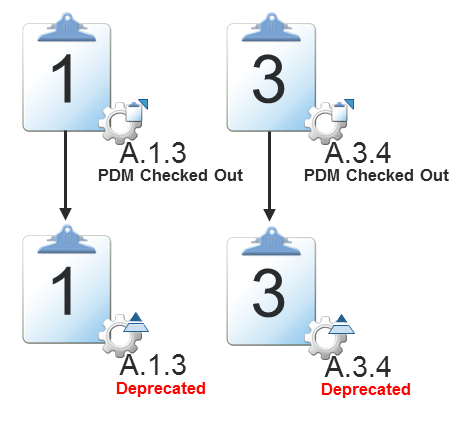
6. Update the remaining projects.
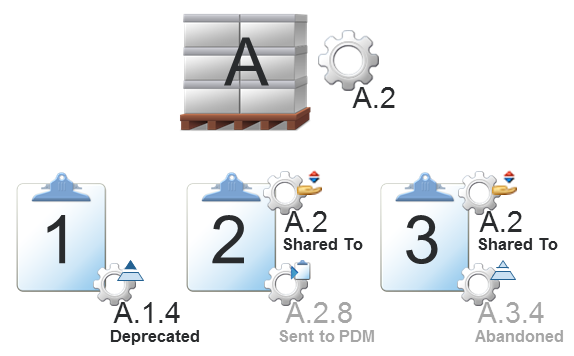
When the Send to PDM action is completed, the part versions checked out to Project 1 and Project 3 are automatically moved to the Deprecated state.
As a result, the following objects appear in their respective project contexts (grayed-out versions do not appear in the Folder Contents table):
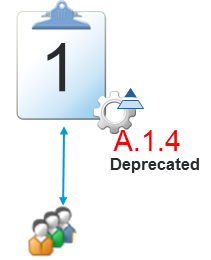
7. Project 1: Maintain the deprecated part version.
Project 1 decides to continue working with the part in the Deprecated state:
The following rules apply to deprecated objects:
◦ Deprecated objects cannot be sent to PDM.
◦ Project members can continue to check out and check in deprecated objects.
◦ Deprecated objects still appear in the Folder Contents table of the project.
◦ It is possible to add a deprecated object as a child of a new object or different PDM checkout object. However, when you send the parent to PDM, you cannot send the deprecated child. Instead, the deprecated child is replaced by the latest PDM version of its source.
◦ If the deprecated object is associated with another project object, then that association is maintained. However, if you want to send the associated object to PDM, then you must first remove the association.
For example, a member of Project 1 creates an illustration and uses the Describes relationship to associate the illustration with Part A.1.4. After Part A.1.4 moves to the Deprecated state, the illustration is still associated with that part.
Later, the product manager from Product A requests that the illustration be sent to PDM so that it can be used with the PDM source part, Part A.2. To send the illustration to PDM, the Project 1 user must first remove the Describes relationship.
8. Project 3: Convert a deprecated object to a share.
This results in the following events:
◦ The latest version of the source PDM part is shared back to the project.
◦ The project-specific version moves from the Deprecated state to the Abandoned state.
◦ Project members can still view abandoned objects, but can no longer perform a checkout to modify the object.
◦ Abandoned objects only appear in the Folder Contents table when the view is set to All - including hidden objects.
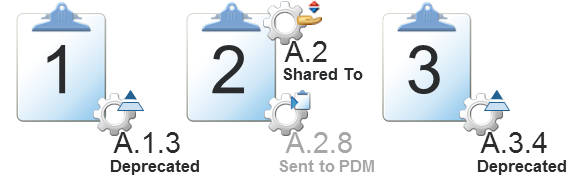
9. Review your changes.
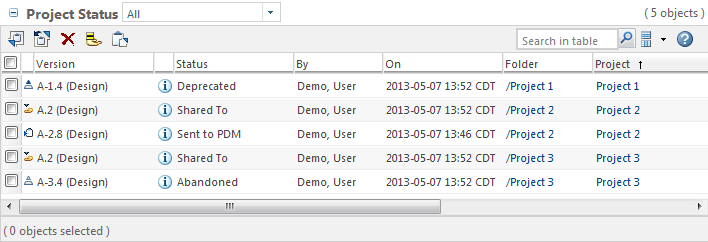
At the end of this process, the following versions are available for the original part (grayed-out versions do not appear in the Folder Contents table):
You can review these changes in the Project Status table:
For more information, see the following topics: