Configuring Document Parameters
This involves defining document types. To define document types, perform these steps:
1. From the Implementation Guide for Customizing (IMG), select > > .
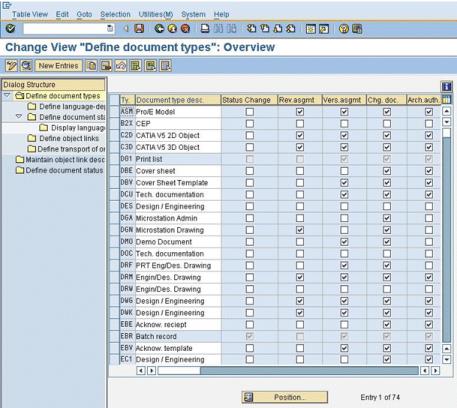
2. Select Define document types. The following window appears:
3. Deselect all indicators forWindchill ESI document types: DES, DOC, DRW, SPE, and TST.
4. Save your changes.
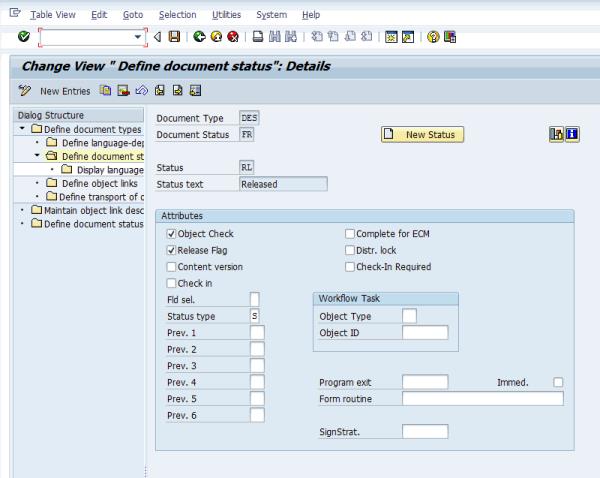
5. Select DES (the document type). Double-click to display details on the document types as shown in the following window:
| These descriptions are unique to each document type and do not need to be changed; however, certain fields need to be populated as shown in the preceding window. |
6. Enter the following values for these fields:
Field | Value |
Internal number range | Any valid internal number range |
External number range | |
Number exit | MCDOKZNR |
Vers. no. incr. | 8 |
File size | 12000000 |
Class type | 017 |
Class | CL0001 |
Document Status | Does not equal “-” (suppress field) |
Document desc. | Does not equal “-” (suppress field) |
User | Does not equal “-” (suppress field) |
Change number | Does not equal “-” (suppress field) |
7. Save changes.
8. Press F3 to go back to the Define document types: Overview window. Repeat steps 5–7 for all the other document types: DOC, DRW, SPE, and TST.
9. Press F3 to go back to the Define document types: Overview window. Highlight DES and select Define object links from the panel on the left. The following window appears:
10. Verify that MARA and MARC are listed with Scr. No. (screen numbers) 201 and 211, respectively. If they are not listed, then add the screen numbers by clicking New Entries.
| Make sure the 1:n ratio field is deselected for both MARA & MARC entries. |
11. Save changes.
12. Repeat Steps 9–11 for all the other document types: DOC, DRW, SPE, and TST.
When you are done defining all these document object links, perform the next step.
13. Press F3 to go back to the Define document types: Overview window. Select DES (Document Type) and select Define document status from the panel on the left. The following window appears:
14. Double-click Status IA. If entry IA does not appear, click New Entries and add the type IA. The following window appears:
15. Verify that the following Status IA attributes are set to:
Attribute | Value/Action |
Status type | Leave this field blank |
Object check | Selected |
Release flag | Selected |
Prev. 1 ...6 | Leave this field blank |
Go back to the previous window and double-click FR in the Doc.St column. If entry FR does not appear, click New Entries and add the type FR. The following window appears:
16. Verify that the following Status FRattributes are set to:
Attribute | Value/Action |
Status type | S |
Object check | Selected |
Release flag | Selected |
Prev. 1 | Leave this field blank |
Prev. 2 | Leave this field blank |
Prev. 3 | Leave this field blank |
| These are not the default values. You must change them. |
17. Verify that the document status for each document type is listed. If they are not, click New Entries to add them.
18. Repeat for each document type: DOC, DRW, SPE and TST.
19. Click Save and create a Transport Request.
| For these functional changes to take effect you must create a Transport Request. |