建立顏色組態
在最後一節中,您學習了如何在您的體驗中使用 model 應用程式參數變更模型的配置。現在,您將建立功能相似,名為 color 的應用程式參數。但是,必須建立一些指令編寫才能啟用它。
在本節中,我們會建立包含 RGBA 顏色的物件,Vuforia Studio 會存取該物件。從物件擷取出顏色後,就會將其傳送給 setColor 函數。然後 setColor 函數會改變模型的外觀變,變為任何 color 應用程式參數指定的顏色。
1. 按一下「Home.js」,然後輸入下列內容:
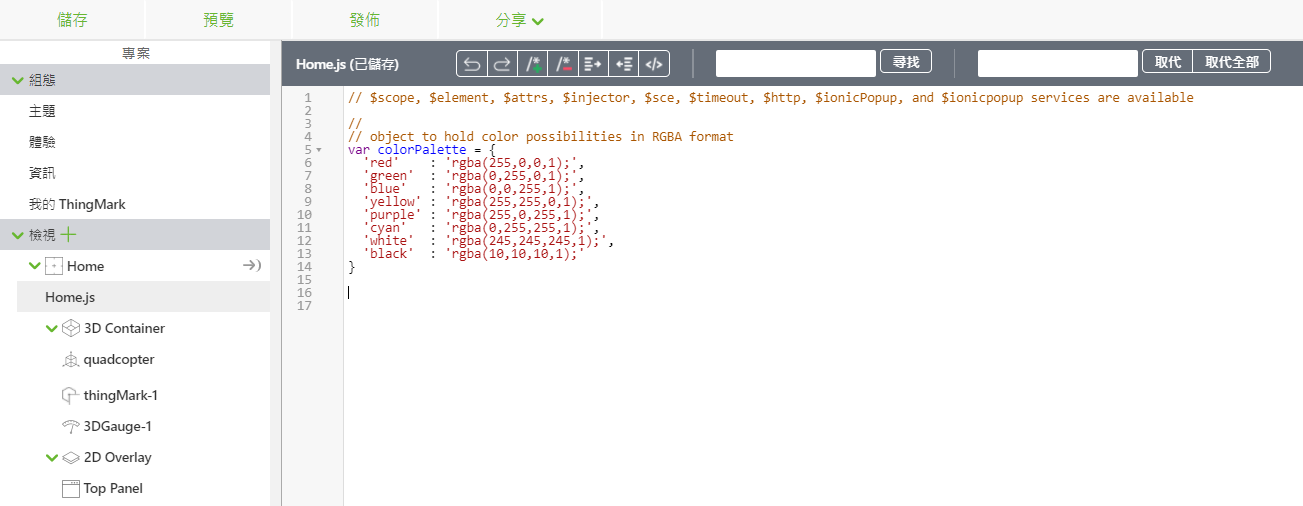
//
// object to hold color possibilities
var colorPalette = {
'red' : 'rgba(255,0,0,1);',
'green' : 'rgba(0,255,0,1);',
'blue' : 'rgba(0,0,255,1);',
'yellow' : 'rgba(255,255,0,1);',
'purple' : 'rgba(255,0,255,1);',
'cyan' : 'rgba(0,255,255,1);',
'white' : 'rgba(245,245,245,1);',
'black' : 'rgba(10,10,10,1);'
}
colorPalette 物件會用來保留所有您模型可能可配置的顏色。基本顏色清單已新增至此體驗,但由於 Studio 可解讀 RGBA 顏色代碼,因此您可以新增其他任何想要的顏色至體驗。
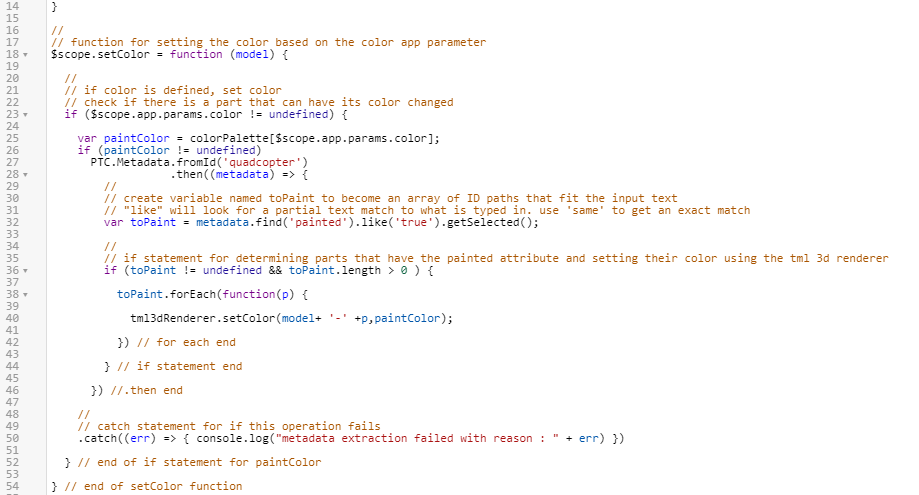
2. 接下來,您將建立 setColor 函數,用以設定想要的 quadcopter 顏色。如果在 color 應用程式參數中定義了顏色,就會啟動 if 語句內的編碼。
a. 會根據您在 color 應用程式參數中輸入的值,會從 colorPalette 物件中選取一個 RGBA 值,並將其設定為名為 paintColor 的變數。
b. 如果您在 colorPalette 輸入的顏色是有效的值,就會觸發 PTC 中繼資料 API Promise 。會建立名為 toPaint 的變數來確定是否已履行 Promise,該變數會轉變為具有 painted 屬性且值為 true 的零件清單。然後,如果有符合該條件的零件,TML 3D 轉譯器就會依照 paintColor 的值變更那些特定零件的顏色。
c. 如果 Promise 遭到拒絕,會在主控台中記錄一筆錯誤陳述。
d. 在 Home.js 輸入下列程式碼:
//
// function for setting the color based on the color app parameter
$scope.setColor = function (model) {
//
// if color is defined, set color
// check if there is a part that can have its color changed
if ($scope.app.params.color != undefined) {
var paintColor = colorPalette[$scope.app.params.color];
if (paintColor != undefined)
PTC.Metadata.fromId('quadcopter')
.then((metadata) => {
//
// create variable named toPaint to become an array of ID paths that fit the input text
// "like" will look for a partial text match to what is typed in. use 'same' to get an exact match
var toPaint = metadata.find('painted').like('true').getSelected();
//
// if statement for determining parts that have the painted attribute and setting their color using the tml 3d renderer
if (toPaint != undefined && toPaint.length > 0 ) {
toPaint.forEach(function(p) {
tml3dRenderer.setColor(model+ '-' +p,paintColor);
}) // for each end
} // if statement end
}) //.then end
//
// catch statement for if this operation fails
.catch((err) => { console.log("metadata extraction failed with reason : " + err) })
} // end of if statement for paintColor
} // end of setColor function
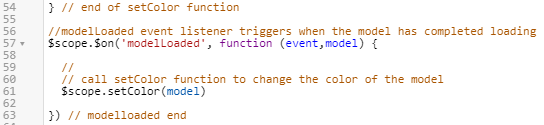
3. 現在,您已經建立了可變更模型顏色的函數,但尚未呼叫它們。若您希望在載入 Studio 後立即執行此函數,則需要建立 modelLoaded 事件接聽程式函數。如名稱所示,Studio 載入模型時,會執行此函數的內文。在此情況下,載入模型時,會針對指定模型觸發 setColor 函數,以根據配置設定其顏色。
//modelLoaded event listener triggers when the model has completed loading
$scope.$on('modelLoaded', function (event,model) {
//
// call setColor function to change the color of the model
$scope.setColor(model)
}) // modelloaded end
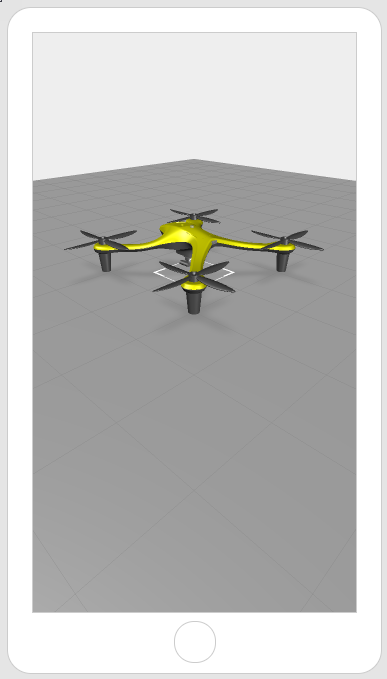
4. 這會完成本節所需的所有指令編寫。如要測試您的代碼,請將您在 colorPalette 物件內建立的其中一個顏色當作 color 應用程式參數值輸入。按一下「預覽」觀看模型顏色的變化。在範例中,我們使用了黃色。如果您看到模型的顏色改變,即表示您成功完成此部份!
| 此方法適用於小規模,若您有許多具有多個配置的模型,那這就無法使用,因為可以新增至 Vuforia Studio 的模型有限。繼續探索這個 Digital Twin 使用案例,以瞭解如何使用識別解析度服務及 ThingWorx 建立可擴展體驗。 |