Finalize the Vuforia Studio Experience
Once the bindings have been created, the last step in creating the persistent cart, is to call the
addToCart service using the popup that appears when a part is selected. Invoking the
addToCart service is what will ultimately add parts to the cart inside
ThingWorx. In this section, you’ll also look back to
3D-Guided Service Instructions 101, when you combined the battery and PCB into the
electronics part. Additionally, code that is no longer needed will be deleted to keep the code as clean as possible.
|
|
The full code for this section can be found in Appendix 1 in GitHub. |
1. Open Home.js.
2. Delete the priceInfo application parameter from the code. It’s no longer needed since the total of the cart will be calculated in ThingWorx.
3. With priceInfo removed from the code, the price variable must be changed to $scope.price to make it accessible throughout the code. Additionally, the $ can be removed from the conditional statement, as that will be added in the text of the popup itself and in the label filter.
a. Inside the template for the popup, change the price input for setTemplate to be $scope.price to account for the new scope.
//
// call the setTemplate function to popuplate the template
template: $scope.setTemplate(meta, $scope.price),
b. Navigate to the setTemplate function. In the addTo variable, add a $ to the variable so that the popup displays the dollar sign before the price in the case that the part is available.
//
// if price != unavailable, define an add to cart button and have the price displayed in the popup, if it is unavailable, just display price
var addTo = price != 'UNAVAILABLE' ? '$' + price + ' </div><div class="btnadd" ng-click="hiliteOff();popup.close();addToCart();">Add to Cart</div>'
: price ;
4. Scroll up to the addToCart function.
a. The addToCart service has the same functionality as the addToCart function, therefore, remove the entire body of the function so it just looks like the code below.
//
// function for adding a selected part to the cart
$scope.addToCart = function () {
} //end of addToCart function
b. Use the triggerDataService function to call the addToCart service from ThingWorx. Use the variables below for the pid, qty, and price inputs.
//
// call addToCart service from ThingWorx
twx.app.fn.triggerDataService('cartThing', 'addToCart', {pid: $scope.meta.partNumber, qty: 1, price: $scope.price});
5. Remove the entire clearCart function since it has been transitioned to a service in ThingWorx.
6. Remove the code for creating the cartLabel application parameter and the cart object, as they are not necessary anymore.
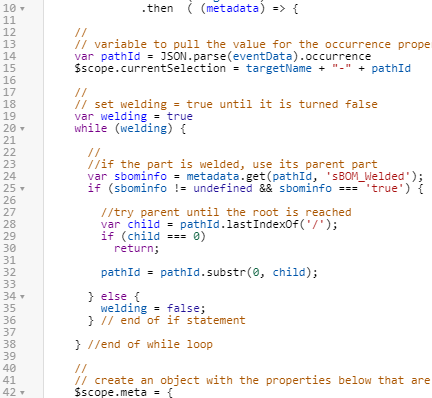
7. In order to access the pricing data for the electronics combined part, logic must be added to bring the occurrence data up a level in its structure. This allows for data about the electronics part to appear in the popup when you click on either the PCB or battery.
a. Add the following code directly above $scope.meta:
//
// variable to pull the value for the occurrence property in the eventData JSON object from the model. Create variable for the currently selected part
var pathId = JSON.parse(eventData).occurrence
$scope.currentSelection = targetName + "-" + pathId
//
// set welding = true until it is turned false
var welding = true
while (welding) {
//
//if the part is welded, use its parent part
var sbominfo = metadata.get(pathId, 'sBOM_Welded');
if (sbominfo != undefined && sbominfo === 'true') {
//try parent until the root is reached
var child = pathId.lastIndexOf('/');
if (child === 0)
return;
pathId = pathId.substr(0, child);
} else {
welding = false;
} // end of if statement
} //end of while loop
The code above works as follows:
▪ A variable named welding is created that triggers the while loop to occur.
▪ Inside the while loop, a variable named sbominfo is created. The sbominfo variable is set with the value of the sBOM_Welded attribute. If sbominfo has information in it and the sBOM_Welded attribute had a value of true, then the index of the occurrence will be rolled back a level to the parent part of the selected parts.
▪ In other words, since electronics is considered to be the parent part of the PCB and battery, whenever the PCB or battery is selected, the occurrence path (pathId) will become the path of the electronics part. If the selected part does not have the sBOM_Welded attribute, then welding is set to false and the while loop ends.
b. To see how this works, click Preview. Click on the end of the PCB. You’ll notice that the popup now has the part name, display name, and price of the electronics combined part. Before, there was no price displayed and the information for the PCB appeared in the popup.