Call getPriceAvailability and Use the serviceInvokeComplete Event Listener
Once the
getPriceAvailability service has been added to
Vuforia Studio, it must be called in the experience to make the data accessible for manipulation. In order to do this, you’ll need to update the code from
3D-Guided Service Instructions 301. Additionally, a new event listener needs to be added to the code to make the data from this service accessible by the experience.
|
|
Full code for this section is available in Appendix 1 in GitHub. |
1. Open Home.js.
2. In the userpick event listener, make the following changes:
a. Delete the priceString variable; the data will now be accessed from the shoppingThing in Vuforia Studio instead of from the attributes in the model.
b. Create an object named meta and set it to the scope of the application so that it can be accessed by different functions in the script. Change the partName, instructionName, and partNumber variables so that they are properties of the meta object.
//
// create an object with the properties below that are based on attribute names from Creo Illustrate for this model. Use metadata.get to obtain the data from the JSON properties for this occurrence.
$scope.meta = {
partName : metadata.get(pathId, 'Display Name'),
instructionName : metadata.get(pathId, 'illustration'),
partNumber : metadata.get(pathId, 'partNumber'),
} // $scope.meta end
c. Delete the price variable and priceInfo application parameter since they were directly dependent on the priceString variable.
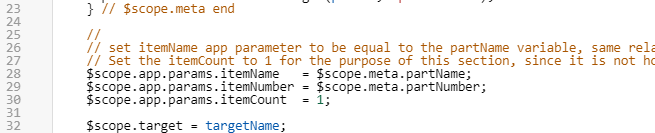
d. Edit the definition of the itemName and itemNumber application parameters so that they are consistent with the new syntax for calling partName and partNumber from the meta object. Then, create a new variable named target (scoped to the application) and set it to the targetName variable from the userpick event.
//
// set itemName app parameter to be equal to the partName variable, same relationship with itemNumber and partNumber and priceInfo and price.
// Set the itemCount to 1 for the purpose of this section, since it is not hooked up to an actual inventory.
$scope.app.params.itemName = $scope.meta.partName;
$scope.app.params.itemNumber = $scope.meta.partNumber;
$scope.app.params.itemCount = 1;
$scope.target = targetName;
e. Add the following code to trigger the getPriceAvailability service inside the shoppingThing. This code follows a format of twx.app.fn.triggerDataService (‘<TWX Entity>’, ‘<TWX Service>’, ‘<parameter>’). The triggerDataService function calls a service provided by ThingWorxVuforia Studio, where the ThingWorx Entity and Service are called, along with any input parameters that the service takes. In our case, the Thing being called is shoppingThing which holds all part information, the service being called (getPriceAvailability), and the parameter (pid), which is a parameter for the part number of the selected part. The output of this service is called using an asynchronous callback, which calls the serviceInvokeComplete event listener. The serviceInvokeComplete event listener will be created later in this section.
//
// call the getPriceAvailability ThingWorx service based on partNumber
twx.app.fn.triggerDataService('shoppingThing', 'getPriceAvailability', {pid: $scope.meta.partNumber})
f. The if statement for the popups below will be moved out of the userpick event listener and into the serviceInvokeComplete event listener. Copy the PTC Metadata API end brackets, catch statement, and userpick end brackets and paste them below the service trigger. Make sure to delete the code that you just copied from below the disassemble function for the popup, or you will have extra brackets.
}) //end brackets for PTC API and .then
//
//catch statement if the promise of having a part with metadata is not met
.catch( (err) => { console.log('metadata extraction failed with reason : ' +err) })
}) //end brackets for userpick function. Will continue to move throughout code
3. With the userpick event listener updated, now it is time to create the serviceInvokeComplete event listener. This event listener will only be activated once the getPriceAvailability service has been completed.
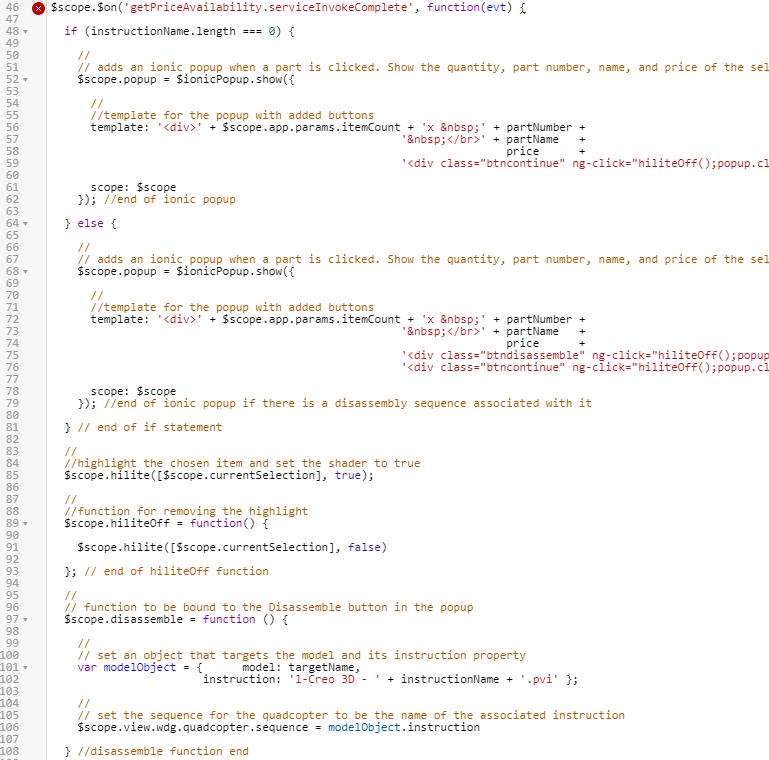
a. Add the following code for the event listener above the if statement for the popup. Select the code from the beginning of the if statement to the end of the disassemble function and outdent it to line it up properly.
| There will be an X in a red circle next to this line because the end bracket for it has not been created yet. This is expected. |
$scope.$on('getPriceAvailability.serviceInvokeComplete', function(evt) {
b. The process for calling the popup will change now that data is being added dynamically from ThingWorx. Below the serviceInvokeComplete event listener, create a variable named rowData, which will call upon the current row of the infotable that has been created with the getPriceAvailability service.
//
// variable holding all data for the current row in the infotable
var rowData = twx.app.mdl['shoppingThing'].svc['getPriceAvailability'].data.current
c. Next, add scripting to determine what the price of the selected object is. The price variable will use information from ThingWorx and will be set to either a string with the price of the part in the selected row with a $ in front of it, or ‘UNAVAILABLE’ if the part is unavailable. The information that the price variable uses is created using a conditional operator which validates that the part is available before checking on the price of the part. This can also be done using an if statement with the same conditions. Similar logic is used to create the priceInfo application parameter used for adding up prices in the cart.
//
// price is going to be the variable that is referenced in the popup, while the app parameter priceInfo will be used for adding the total in the cart
var price = rowData.avail === true ? '$' + rowData.price
: 'UNAVAILABLE';
$scope.app.params.priceInfo = rowData.avail === true ? parseFloat(rowData.price)
: undefined ;
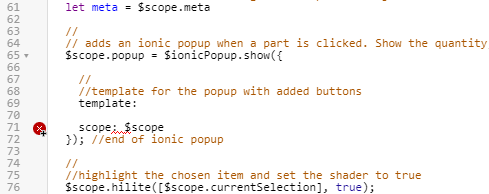
d. Create a variable named meta which will be used to bring the $scope.meta object into the event listener as a local object to allow for easy access to its values.
//
// create a variable to bring the $scope.meta object into this event listener as a local object
let meta = $scope.meta
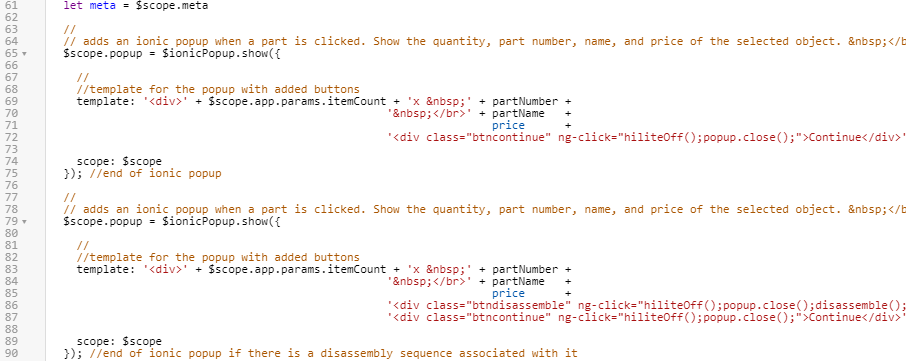
e. Since additional information will be added into the popup to account for determining whether a part is available or not based on information from shoppingThing, the template for the popup is now going to be set using a function that will be created later in the activity. So for now, delete the conditions and end brackets for the if statement that you created earlier and outdent the code for calling the popup.
f. Delete the code for the popup for what would have previously been the else case for the if statement. Additionally, delete the value for the template property; it will be replaced in the next step. There will be error indicators next to these lines of code, but they will be resolved when the template value is populated.
g. The template property should have a value that calls the setTemplate function (which will be created later) with inputs of the meta object and the price variable for the selected part. The code for calling the popup should now match with the code provided below.
//
// adds an ionic popup when a part is clicked
$scope.popup = $ionicPopup.show({
//
//call the function for setting the template
template: $scope.setTemplate(meta, price),
//
// set the scope for the popup
scope: $scope
}); //end of ionic popup
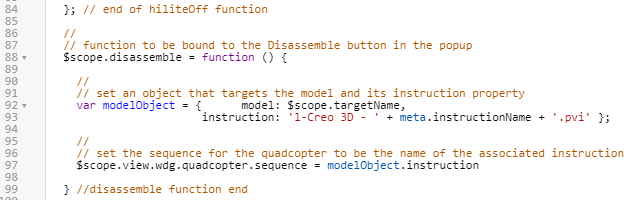
h. For the disassemble function, the model and instruction properties in the modelObject for setting the animation sequence of the model need to be updated. This is where the $scope.target variable that was created earlier will be accessed, and instructionName will be updated with its new location inside the meta object.
//
// function to be bound to the Disassemble button in the popup
$scope.disassemble = function () {
//
// set an object that targets the model and its instruction property
var modelObject = { model: $scope.targetName,
instruction: 'l-Creo 3D - ' + meta.instructionName + '.pvi' };
//
// set the sequence for the quadcopter to be the name of the associated instruction
$scope.view.wdg.quadcopter.sequence = modelObject.instruction
} //disassemble function end
i. Add an end bracket and parenthesis to complete the getPriceAvailability service invoke.
}) // getPriceAvailability end
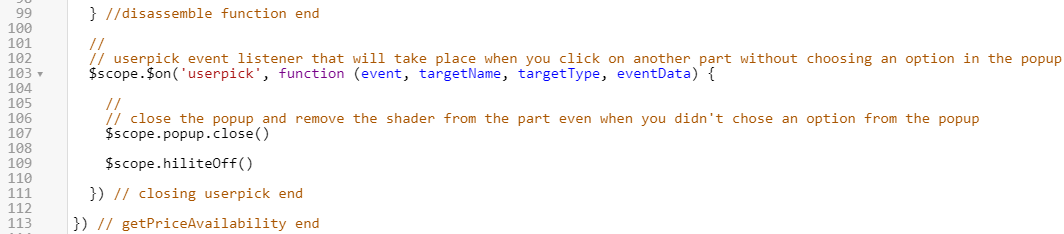
4. To streamline the process of using Ionic popups in your experience, another userpick event listener must be added. This event listener is used to close a popup that was not closed before clicking on another part. When triggered, this event listener will close the popup for the first part that you clicked on and remove the shader from it before opening a new popup and shading in the next part that is selected.
//
// userpick event listener that will take place when you click on another part without choosing an option in the popup
$scope.$on('userpick', function (event, targetName, targetType, eventData) {
//
// close the popup and remove the shader from the part even when you didn't chose an option from the popup
$scope.popup.close()
$scope.hiliteOff()
}) // closing userpick end
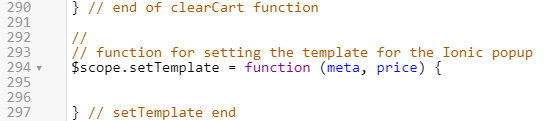
5. The final step in updating your experience is to create the setTemplate function previously mentioned. This function will be used to set the template variable that will be used in the popup to determine the information that is available for the part. This will include the logic for determining if there is a disassembly sequence associated with a part and if it is available in shoppingThing.
a. Below the clearCart function, create a function named setTemplate with inputs of meta and price.
//
// function for setting the template for the Ionic popup
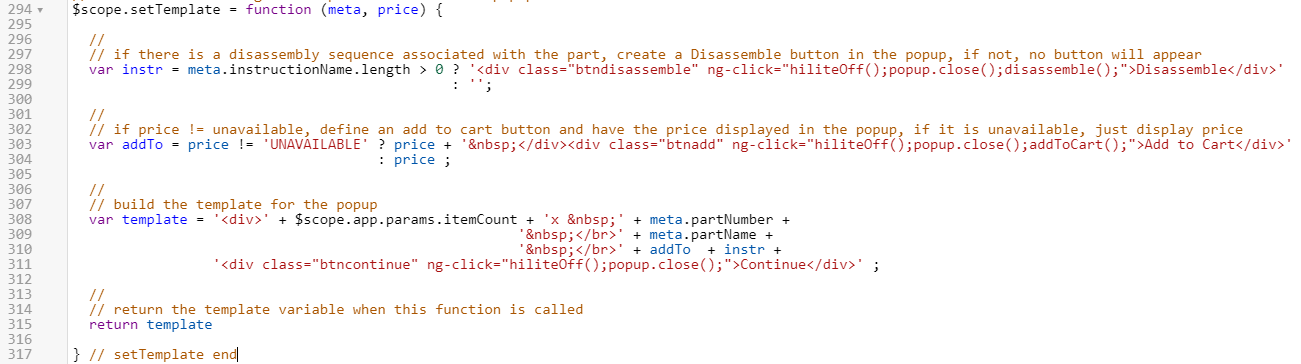
$scope.setTemplate = function (meta, price) {
} // setTemplate end
b. First, you’ll add logic to the function to determine if there is a disassembly sequence associated with the selected part. The instr variable uses a conditional operator to see if the instructionName property of meta is populated or not and it will take the place of the if statement that you previously had. If there is an associated sequence, a button will be created that can be clicked to trigger the disassemble function, turn off the shader, and close the popup. If there is not an associated sequence, instr becomes an empty string.
//
// if there is a disassembly sequence associated with the part, create a Disassemble button in the popup, if not, no button will appear
var instr = meta.instructionName.length > 0 ? '<div class="btndisassemble" ng-click="hiliteOff();popup.close();disassemble();">Disassemble</div>'
: '';
c. Additionally, you must add logic to determine if a part is available or not. Create the addTo variable as the result of a conditional operator determining if a part has an associated price with it or not based on the information in shoppingThing. If it does, then the price is displayed in the popup along with a clickable Add to Cart button that triggers the addToCart function. If not, then only the price is added to the popup.
//
// if price != unavailable, define an add to cart button and have the price displayed in the popup, if it is unavailable, just display price
var addTo = price != 'UNAVAILABLE' ? price + ' </div><div class="btnadd" ng-click="hiliteOff();popup.close();addToCart();">Add to Cart</div>'
: price ;
d. After the available buttons for the popup have been determined, the template variable will be created just like the one that you created for previous popups. The popup will display the quantity, part number, part name, and price of the selected part, along with the buttons that apply to the part. The Continue button will once again be added to close the popup. A return statement will be added for the template variable so it is output from the function when run. This will complete the setTemplate function.
//
// build the template for the popup
var template = '<div>' + $scope.app.params.itemCount + 'x ' + meta.partNumber +
' </br>' + meta.partName +
' </br>' + addTo + instr +
'<div class="btncontinue" ng-click="hiliteOff();popup.close();">Continue</div>' ;
//
// return the template variable when this function is called
return template
6. Click Preview.
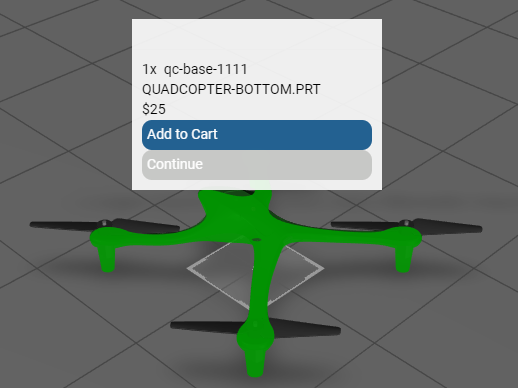
a. Click the base of the quadcopter to view the popup option that includes a part that is available, but doesn’t have a disassembly sequence associated with it. Click Continue to close the popup.
| If the Continue button is not clicked before clicking on another part, the popups will stack on top of one another instead of the first one closing. |
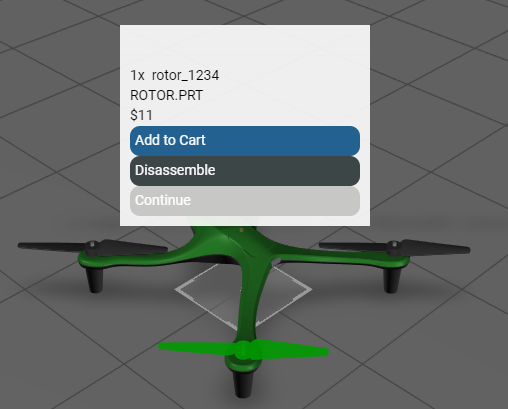
b. Select one of the rotors to view the popup that shows a part that has a disassembly sequence associated with it and is available.
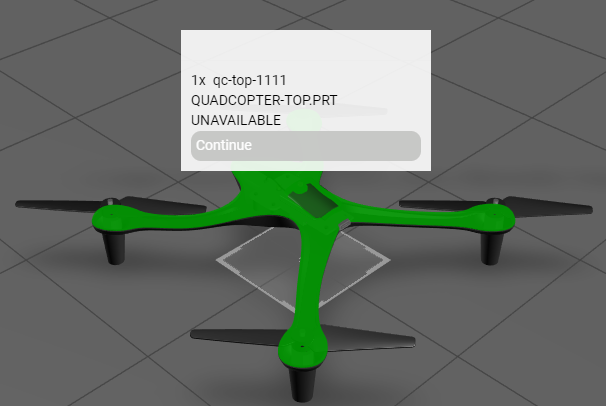
c. Select the top of the quadcopter to view the popup showing a part that doesn’t have a disassembly sequence associated with it and is unavailable.
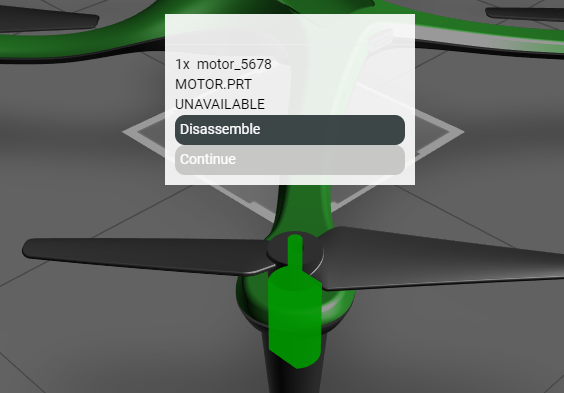
Select any of the motors to view the popup that displays when a part has a disassembly sequence associated with it but is unavailable.
7. This section is now complete. All other code in this section is the same as it was in
3D-Guided Service Instructions 301. You should be able to click on a part, a popup should appear, and you should be given one of the four options above for a popup. And, if applicable, you should be able to add the part to the cart. You should also be able to search for parts using the
userInput widget.