작업 만들기
작업은 워크플로를 통해 수행할 작업을 지정합니다. ThingWorx Flow CLI를 사용하여 프로젝트에 대한 새 작업을 만들 수 있습니다.
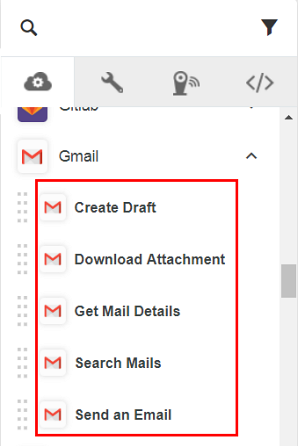
예를 들어, Gmail의 작업은 아래 이미지에 표시되어 있습니다.
새 작업 또는 작업의 새 버전을 커넥터에 추가하려면 다음을 수행합니다.
1. 명령 프롬프트에서 다음 명령을 실행합니다.
a. cd <project root directory>
b. flow add action <name>
|
|
작업 이름에는 하이픈(-)을 제외한 특수 문자를 포함할 수 없습니다. 예를 들어, 'servicename-action'이 작업 이름입니다.
|
위의 명령을 실행하면 <projectDir>\action\action name 폴더 위치에 폴더가 작성됩니다.
◦ 이 폴더에는 v1(버전 1)이라는 하위 폴더가 있습니다.
◦ v1 폴더에는 다음 파일이 포함되어 있습니다.
▪ action.json 파일 - 작업의 입력 및 출력과 같은 메타데이터를 포함합니다. 작업 양식에 표시되는 정보는 이 파일에 정의됩니다.
▪ index.js 파일 - 작업 코드의 논리 및 구현을 포함합니다.
다음은 add action 명령에 사용할 수 있는 옵션입니다.
|
옵션
|
설명
|
데이터 유형
|
|---|---|---|
|
--version
|
버전 번호를 표시합니다.
|
[부울]
|
|
--help
|
도움말을 표시합니다.
|
[부울]
|
|
--parentDir, -d
|
프로젝트에 대한 상위 디렉터리입니다.
|
[기본값: "."]
|
|
--logLevel, -1
|
로그 수준을 설정합니다.
|
[기본값: "info"]
|
|
-- artifactVersion, -v
|
테스트할 아티팩트의 버전입니다.
|
[기본값: "v1"]
|
2. action.json 파일에 입력 및 출력 속성을 설정한 다음 index.js 파일에 JavaScript 코드를 추가합니다.
아래에 완료된 action.json 파일과 해당 설명이 나와 있습니다.
{
"_id": "56b838816f724b0e259dae20",
"created_at": "2017-04-07T14:48:36.129Z",
"updated_at": "2017-04-07T14:48:36.129Z",
"uid": "actd47559da24fb85fae90b29099558e201cefa",
"name": "google-gmail-details-get",
"label": "Get Mail Details",
"input": {
"title": "Get Mail Details",
"type": "object",
"properties": {
"access_token": {
"title": "Authorize Gmail",
"type": "string",
"oauth": "gmail",
"minLength": 1
},
"id": {
"title": "Message ID",
"type": "string",
"minLength": 1,
"description": "Select/specify ID of the message of which details you wish to retrieve",
"lookup": {
"id": "g1",
"service": "gmail",
"auth": "oauth",
"enabled": true,
"searchable": true,
"dependencies": [
"access_token"
]
}
}
}
},
"output":
{
"title": "output",
"type": "object",
"properties": {
"id": {
"title": "id",
"type": "string",
"displayTitle": "ID"
},
"threadId": {
"title": "threadId",
"type": "string",
"displayTitle": "Thread ID"
},
"labelIds": {
"type": "array",
"title": "labelIds",
"displayTitle": "Label IDs",
"items": {
"type": "string"
}
},
"snippet": {
"title": "snippet",
"displayTitle": "Snippet",
"type": "string"
},
"historyId": {
"title": "historyId",
"displayTitle": "History ID",
"type": "string"
},
"internalDate": {
"title": "internalDate",
"displayTitle": "Internal Date",
"type": "string"
}
//schema truncated for clarity
},
"usage": {
"link": {
"href": "https://support.ptc.com/help/thingworx_hc/
thingworx_8_hc/activity/google-mail/get-mail-details",
"title": "Doc Link"
},
"html": "Fetch details of an email"
},
"version": "v1",
"icon": "gmail",
"act_type": "default",
"default_value": "",
"__v": 0,
"tags": [
"Gmail"
],
"category": "service"
}
action.json 파일의 속성에 대한 설명은 다음 표를 참조하십시오.
|
속성
|
JSON 파일의 속성을 입력합니다.
|
||
|---|---|---|---|
|
name
|
작업의 이름입니다.
gmail-details-get 작업에서 gmail은 커넥터 이름이고 details-get은 작업 이름입니다.
|
||
|
label
|
작업의 레이블을 표시합니다.
|
||
|
input
|
입력 양식에 대한 JSON 스키마입니다. 표 다음의 예제 입력 스키마를 참조하십시오.
지원되는 입력 필드 유형은 any, string, boolean, array 또는 object입니다.
또한 입력 스키마는 작업에 지원되는 인증 메커니즘을 정의합니다.
|
||
|
output
|
이 속성은 이 작업이 실행될 때 반환될 수 있는 출력 스키마를 정의합니다.
지원되는 출력 키 유형은 String, Number, Boolean 또는 Any입니다.
|
||
|
version
|
아티팩트의 버전입니다. ThingWorx Flow CLI를 사용하여 만드는 경우에는 이 값을 변경해서는 안 됩니다.
|
||
|
tags
|
사용자 인터페이스에서 커넥터가 표시되는 그룹을 결정하는 값이 포함된 문자열 배열입니다. 일반적으로 커넥터의 표시 이름입니다.
|
ThingWorx Flow는 여러 인증 체계를 지원합니다. 예를 들어, 다음 코드는 OData 커넥터의 다양한 인증 체계(예: 없음, 기본 및 OAuth)를 보여줍니다.
{
"type": "object",
"title": "Select an Authentication Scheme",
"oneOf": [
{
"type": "object",
"title": "None",
"id": "act1",
"properties": {
"odataUrl": {
"type": "string",
"title": "Odata Metadata Url",
"displayTitle": "Odata Metadata Url",
"minLength": 1,
"description": "Please provide the odata metadata url"
},
"entitySets": {
"type": "string",
"title": "Entity Set",
"minLength": 1
}
}
},
{
"type": "object",
"title": "Basic",
"id": "act2",
"properties": {
"connection": {
"title": "Odata Connection",
"type": "string",
"connection": "odata",
"minLength": 1
},
"entitySets": {
"type": "string",
"title": "Entity Set",
"minLength": 1
}
}
},
{
"type": "object",
"title": "OAuth",
"id": "act3",
"properties": {
"oauth": {
"title": "Odata OAuth",
"type": "string",
"oauth": "odata",
"minLength": 1,
"needUrl": true
},
"entitySets": {
"type": "string",
"title": "Entity Set",
"minLength": 1
}
}
}
]
}
"type": "object",
"title": "Select an Authentication Scheme",
"oneOf": [
{
"type": "object",
"title": "None",
"id": "act1",
"properties": {
"odataUrl": {
"type": "string",
"title": "Odata Metadata Url",
"displayTitle": "Odata Metadata Url",
"minLength": 1,
"description": "Please provide the odata metadata url"
},
"entitySets": {
"type": "string",
"title": "Entity Set",
"minLength": 1
}
}
},
{
"type": "object",
"title": "Basic",
"id": "act2",
"properties": {
"connection": {
"title": "Odata Connection",
"type": "string",
"connection": "odata",
"minLength": 1
},
"entitySets": {
"type": "string",
"title": "Entity Set",
"minLength": 1
}
}
},
{
"type": "object",
"title": "OAuth",
"id": "act3",
"properties": {
"oauth": {
"title": "Odata OAuth",
"type": "string",
"oauth": "odata",
"minLength": 1,
"needUrl": true
},
"entitySets": {
"type": "string",
"title": "Entity Set",
"minLength": 1
}
}
}
]
}
작업에 대한 index.js 파일은 아래 코드에 표시된 바와 같이 객체를 execute 메소드로 내보내야 합니다.
module.exports = function () {
/*
This function will receive an input that conforms to the schema specified in
activity.json. The output is a callback function that follows node's error first
convention. The first parameter is either null or an Error object. The second parameter
of the output callback should be a JSON object that conforms to the schema specified
in activity.json
*/
this.execute = function (input, output) {
let outputData = {}
return output(null, outputData)
}
}
연결 객체를 입력 객체의 속성으로 사용할 수 있습니다. 이 필드에 액세스하려면 input.connection.user_name과 같은 식을 사용합니다.
커넥터가 oauth를 대신 사용하는 경우, 식 input.access_token을 사용하여 액세스 토큰을 읽어들일 수 있습니다.
다음 비디오에서는 ThingWorx CLI를 사용하여 새 작업을 만드는 과정을 보여줍니다.
예를 들어, Gmail 계정에 대해 gmail-details-get이라는 새 작업을 정의하려면 action.json 파일에 입력 속성을 설정합니다.
아래 그림에서는 ThingWorx Flow 캔버스에 표시되는 작업 양식과 입력 속성 코드의 매핑을 보여줍니다.
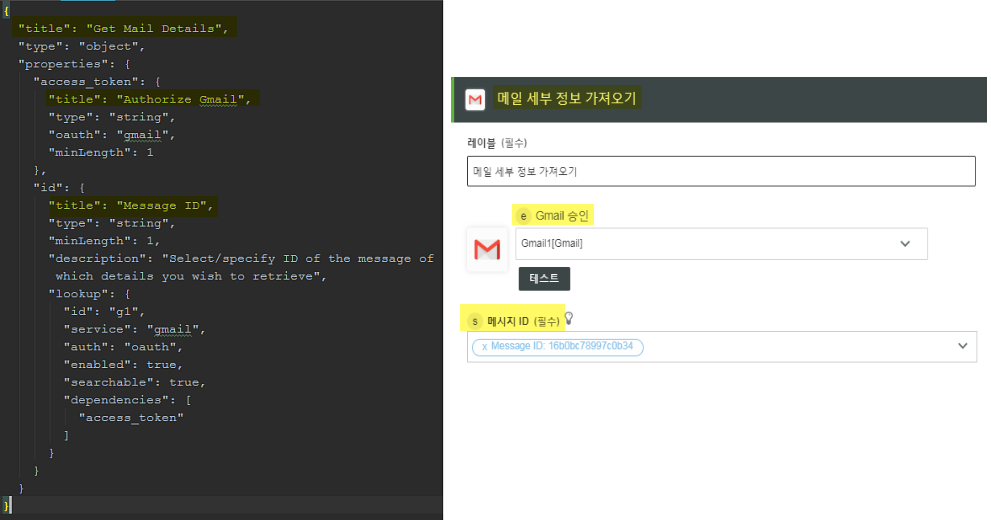
입력 속성에 대한 설명은 다음 표를 참조하십시오.
속성 | 아래 설명대로 입력 속성 입력 | ||
|---|---|---|---|
title | ThingWorx Flow 캔버스의 입력을 수락하는 데 사용되는 양식의 제목입니다. | ||
type(필수 항목) | 최상위 객체의 유형은 항상 object여야 합니다. | ||
properties | 작업을 실행하는 데 필요한 입력 컬렉션입니다. 결과 양식에서 각 속성은 텍스트 상자, 드롭다운, 라디오 버튼 등의 일부 사용자 인터페이스 요소에 해당됩니다. 각 입력에는 다음과 같은 속성이 있어야 합니다. title, type, minLength(선택 사항), description(선택 사항), format, minValue, maxValue, pattern, minItems, maxItems(배열 유형 등)
입력 스키마에 propertyorder 요소를 사용하여 작업 양식에서 속성의 순서를 지정할 수 있습니다. 작업 양식에서 선택적 필드를 표시하려면 이 속성을 true로 설정합니다. 예를 들면 다음과 같습니다. visible=true | ||
lookup | 모든 입력에는 위에 설명된 조회에 의해 검색된 값으로 필드를 채워야 할지를 지정하는 lookup 속성이 있을 수 있습니다. 모든 lookup에 대해 다음 속성을 지정해야 합니다. • id - 함수의 이름입니다. • service - 조회 시 화살표를 클릭하면 호출되는 조회 함수의 이름입니다.
• auth - 연결 또는 OAuth입니다. • searchable - 값을 true로 설정하면 searbyById 및 searchByValue 메커니즘이 활성화됩니다. • dependencies - 문자열 배열입니다. 조회에 필요한 필드를 지정합니다. • onSelect - 조회에 의해 표시된 목록에서 특정 항목을 선택하면 호출되는 조회 함수의 이름입니다. 이는 일반적으로 양식 스키마를 처리하는 데 사용됩니다. |
마찬가지로, action.json 파일에 출력 속성을 설정한 다음 index.js 파일을 실행해야 합니다. 자세한 내용 및 예는
부록 B: ThingWorx Flow 커넥터 자습서를 참조하십시오.
작업을 만들 때 다음에 유의하십시오.
• 지원되는 입력 필드 유형은 Any, String, Boolean, Array, Object입니다.
• 지원되는 출력 키 유형은 String, Number, Boolean, Any입니다.
• minLength는 필드를 필수로 표시합니다.
• minItems는 배열 필드를 필수로 표시합니다.
• maxItems는 배열 필드에 대한 최대 제한을 설정합니다.
• select2—{active:true}는 필드를 select 2 필드로 표시합니다.
• Format - 입력 필드에 날짜/날짜 및 시간/시간 선택기를 추가하는 date/datetime/time입니다.
• ThingWorx Flow는 oneOf를 지원합니다.
• ThingWorx Flow는 현재 로컬만 참조하는 $ref를 지원합니다.
출력 속성에 대한 설명은 다음 표를 참조하십시오.
속성 | 아래 설명대로 출력 속성 입력 |
|---|---|
type(필수 항목) | 최상위 객체의 유형은 항상 object여야 합니다. |
properties | 작업에 의해 반환되는 출력 필드를 정의하는 데 사용되며 후속 작업에도 사용할 수 있습니다. |
더 명확하게 하기 위해 형식 지정된 출력 속성의 예는 다음과 같습니다.
{
"title": "output",
"type": "object",
"properties": {
"id": {
"title": "id",
"type": "string",
"displayTitle": "ID"
},
"threadId": {
"title": "threadId",
"type": "string",
"displayTitle": "Thread ID"
},
"labelIds": {
"type": "array",
"title": "labelIds",
"displayTitle": "Label IDs",
"items": {
"type": "string"
}
},
"snippet": {
"title": "snippet",
"displayTitle": "Snippet",
"type": "string"
},
"historyId": {
"title": "historyId",
"displayTitle": "History ID",
"type": "string"
},
"internalDate": {
"title": "internalDate",
"displayTitle": "Internal Date",
"type": "string"
}
//schema truncated for clarity
}
작업에 사용할 수 있는 API용 SDK에 대한 자세한 내용은
ThingWorx Flow 커넥터 SDK 단원을 참조하십시오.
문맥 인식 도움말 작성
ThingWorx Flow에는 커넥터 개발자가 URL에 대한 문맥 인식 도움말을 제공하는 메커니즘이 있습니다.

위의 이미지와 같이 작업 페이지에서  을 클릭하여 문맥 인식 도움말을 시작할 수 있습니다.
을 클릭하여 문맥 인식 도움말을 시작할 수 있습니다.문맥 인식 도움말의 경우 URL이 usage 요소의 href 속성에 제공됩니다.
"usage": {
"link": {
"href": "http://organization.com/help/topic",
"title": "connector:i18nkey-for-title"
},
"html": " connector:i18nkey-for-html"
}
"link": {
"href": "http://organization.com/help/topic",
"title": "connector:i18nkey-for-title"
},
"html": " connector:i18nkey-for-html"
}
href는 작업에 대한 도움말을 제공하는 절대 URL일 수 있습니다. 또한 사이트에서 언어별 도움말 페이지를 지원할 경우에는 언어 ID에 대한 자리 표시자를 제공하기 위한 프로비젼이 있습니다. ThingWorx Flow 서버는 자리 표시자를 사용자가 선호하는 언어로 대체합니다. 사이트의 필요에 따라 locale 토큰을 배치할 수 있습니다.
예는 다음과 같습니다.
예를 들어, 사용자가 선호하는 언어가 French(프랑스어)인 경우 ThingWorx Flow는 <%=locale%>을 fr로 대체하여 다음 링크와 같이 URL을 생성합니다.