Creating Triggers
A trigger launches a workflow when a subscribed event occurs in the connected system. This enables you to automate complex business processes without manually running the workflow every time.
For example, the following figure displays a list of triggers that can be created from your project.
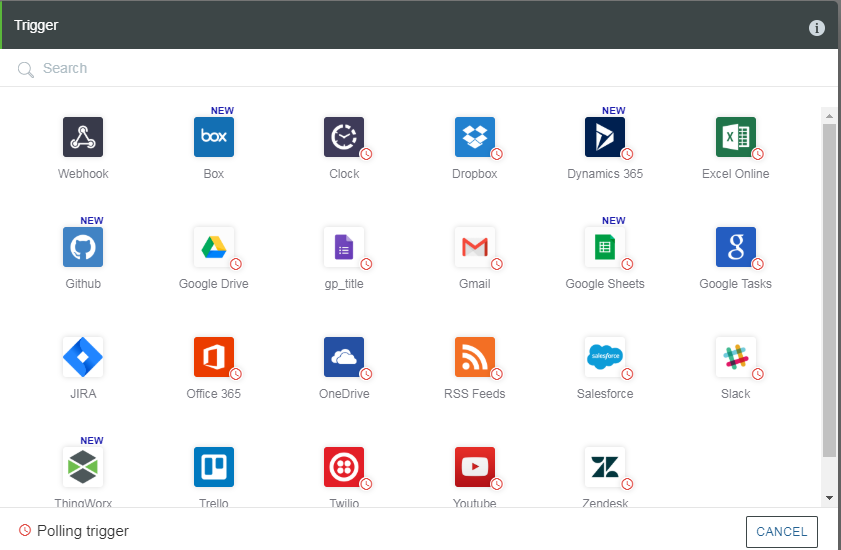
There are two types of triggers:
• Polling triggers
• Webhook triggers
Polling Triggers
They check for updates periodically, at regular intervals. All the polling triggers are marked with a clock icon in the triggers list. To create polling triggers, do the following:
1. From the command prompt, execute the following commands:
a. cd <user project root directory>
b. flow add trigger -p
The following options are available for the add trigger command.
Options | Description | Data Type |
|---|---|---|
--version | Displays the version number. | [boolean] |
--help | Displays the help. | [boolean] |
--parentDir,-d | The parent directory for the project. | [default: “.”] |
--polling,-p | Indicates that this is a polling trigger. | [default: false] |
-- artifactVersion,-v | Version of the artifact to create. | [default: “v1”] |
2. Executing the add trigger command creates a metadata file trigger.json that contains input and output and a index.js JavaScript file that contains the code logic. These files are created under the directory <projectDir>\trigger\poll\<triggername>\v1
By default, the Webhook trigger is created. Use the -p option to create a polling trigger. |
For information on formatting the input and output schema, refer to the note under the topic Creating Actions. The following is a truncated and simplified schema.
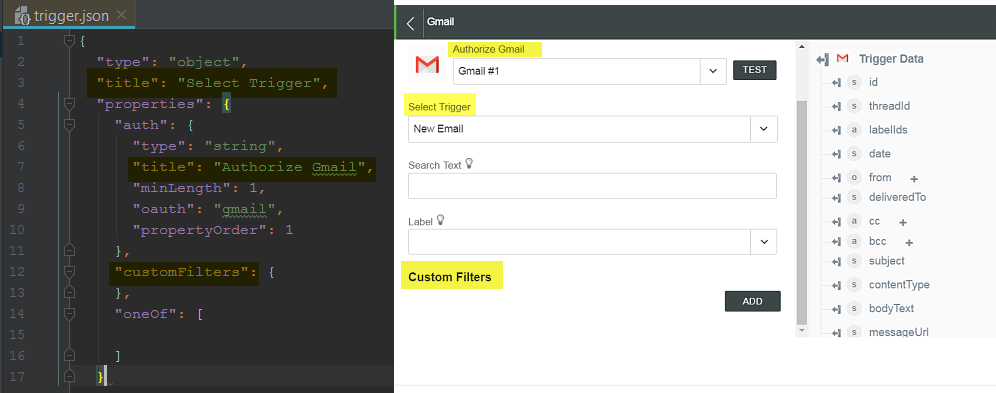
The options in the trigger.json file are described in the table that follows:
Options | Description |
|---|---|
type(required) | The type of the outermost object must be an object. |
title (required) | Label of the list to allow selection of the trigger. |
description | Short description for the trigger. |
properties | Used to define the input form fields for the trigger configuration. It contains the following definitions: • Input fields to appear in the trigger configuration window • Event name to appear in the trigger service list. |
A trigger definition starts with a set of common properties such as the authentication and customFilters and any other properties that are common to all trigger events. All properties have a type, title and description properties. External systems usually expose a number of events and the events must be represented in a oneOf. Each object inside the oneOf corresponds to a single event. If a system exposes a single event, then the oneOf block is not required.
The oneOf array contains one or many events. Each event is a JSON object . The example below applies to a service that has 2 events Event1 and Event2. Note that each event may require different number and type of inputs.
[{
"type": "object",
"title": "Event1",
"description": "Event 1 description",
"properties": {
"event": {
"type": "string",
"title": "Trigger",
"enum": [
"Event1"
],
"propertyOrder": 2,
"options": {
"hidden": true
}
},
"input_for_event1": {
"title": "input for event 1 ",
"minLength": 1,
"type": "string",
"propertyOrder": 3,
"description": "input required by event 1"
}
}
},
{
"type": "object",
"title": "Event2",
"description": "Event 2 description",
"properties": {
"event": {
"type": "string",
"title": "Trigger",
"enum": [
"Event1"
],
"propertyOrder": 4,
"options": {
"hidden": true
}
},
"input_for_event2": {
"title": "input for event 2 ",
"minLength": 1,
"type": "string",
"propertyOrder": 5,
"description": "input required by event 2"
}
}
}
]
"type": "object",
"title": "Event1",
"description": "Event 1 description",
"properties": {
"event": {
"type": "string",
"title": "Trigger",
"enum": [
"Event1"
],
"propertyOrder": 2,
"options": {
"hidden": true
}
},
"input_for_event1": {
"title": "input for event 1 ",
"minLength": 1,
"type": "string",
"propertyOrder": 3,
"description": "input required by event 1"
}
}
},
{
"type": "object",
"title": "Event2",
"description": "Event 2 description",
"properties": {
"event": {
"type": "string",
"title": "Trigger",
"enum": [
"Event1"
],
"propertyOrder": 4,
"options": {
"hidden": true
}
},
"input_for_event2": {
"title": "input for event 2 ",
"minLength": 1,
"type": "string",
"propertyOrder": 5,
"description": "input required by event 2"
}
}
}
]
Each of these events should have a corresponding output schema in the output property. For example, if there are 2 events as shown above then the output should have a schema each for Event1 and Event2 as follows:
"output": {
"Event1": {
"type": "object",
"properties": {
"opfield1": {
"type": "string",
"title": "Output field 1"
},
"opfield2": {
"type": "string",
"title": "Output field 2"
}
}
},
"Event2": {
"type": "object",
"properties": {
"opfield3": {
"type": "string",
"title": "Output field 3"
},
"opfield4": {
"type": "string",
"title": "Output field 4"
}
}
}
}
The index.js file for polling triggers has the following structure:
module.exports = Trigger
Trigger.execute = function (input, options, output) {
}
Trigger.validate = function (input, options, output) {
}
Trigger.activate = (input, options, output) {
}
Trigger.execute = function (input, options, output) {
}
Trigger.validate = function (input, options, output) {
}
Trigger.activate = (input, options, output) {
}
The code for the validate method is similar to the execute method. Refer to the sample to see the code.
The following are the methods used in polling triggers:
• execute method—Called periodically. The interval is a configuration of ThingWorx Flow server. The execute method uses the connection information from the input, then connect to the external system and fetch data from ThingWorx Flow server. It can use the APIs of the option object to cache information about the fetched objects, to determine if new information is available.
The options object has a meta property used to retain information that is available across the calls to the execute method.
For more information on commonly available APIs, refer to the section ThingWorx Flow Connector SDK.
The setMeta method of the options object can be used to retain information about the current or previous executions into the database. For example, it can be used to store the time when the method was last executed. It can also be used to store information for computing a delta between the previous and the current results. The output parameter is a callback that follows node’s error first convention. If an error occurs, it should be returned as the first parameter, Or, the first parameter should be null and a result that conforms to the output is returned as the second parameter.
• validate method—Invoked by ThingWorx Flow server before saving a trigger to the database. If validation fails the trigger will not be saved. This method can be used to validate the inputs , such a connectivity with the service.
• activate method—Called when an existing trigger is associated with another workflow. In most cases, it is sufficient to run validate from it. An example implementation of the activate method follows:
function activate(input, options, output){
return output(null,true)
}
return output(null,true)
}
To access the selected event of the trigger use the “event” property of the input object (input.event ). The document object contains the input fields from the form. The input field contains the usual properties like connection and access_token and any other fields from the input form. For example, to access the user_name property that is a part of the connection object, use an expression such as document.input.connection.user_name
Webhook Triggers
These are subscription-based triggers. Subscriptions are created on events in the connected system and a webhook URL gets called with the event payload when the event occurs in the connected system. The connected system must support Webhooks for this kind of trigger to function. It sends data to ThingWorx Flow engine in real-time, which enables your flow to run as soon as the specified event occurs in an external application or service.
You can create Webhook triggers using the following command:
flow add trigger
Executing the command creates
• A metadata file trigger.json—Contains inputs and output
• An index.js JavaScript file—Contains the code logic
These files are created under the directory <projectDir>\trigger\webhook\<triggername>\v1. The process to complete the trigger.json file for a Webhook trigger is similar to that of a Polling trigger. However, the code differs significantly.
The index.js file for Webhook trigger has the following structure:
module.exports = Trigger;
Trigger.execute = function execute(input, data, output) {
}
Trigger.activate = function execute(input, data, output) {
}
Trigger.register = function register(document, callback) {
}
Trigger.unregister = function unregister(document, callback) {
}
Trigger.execute = function execute(input, data, output) {
}
Trigger.activate = function execute(input, data, output) {
}
Trigger.register = function register(document, callback) {
}
Trigger.unregister = function unregister(document, callback) {
}
The following are the methods used in Webhook triggers:
• activate method—Can have a simple no-op implementation as follows:
function activate(input, options, output) {
return output(null, true);
}
return output(null, true);
}
• register method—Used to register the Webhook URL provided by ThingWorx Flow server with the external service. The register method receives a document object that has a property that contains the Webhook URL. The Properties of the document object are as follows:
◦ webhook_name—The name of the webhook object.
◦ webhook—The webhook url.
◦ input—The input object that contains other properties such as connection, access_token, and any other fields from the trigger input form.
The output of the method is stored on the document object as a “hook_response” property . This hook_reponse in many cases contains the ID of the trigger provided by the target system. Usually this id is sent back to the target system when trying to unregister the webhook from it.
• unregister method—Sends an unregister request that removes the Webhook subscription that was created when the register call was made to the connected systems. Use document.hook_response and its properties to get information that can be used to unregister.
After you have written the complete code for your trigger, you can proceed to create an authentication for your trigger.
• execute method—Use as follows:
◦ To convert service data from the form into a form that is suitable to use in flows or to a form that matches the defined output schema.
◦ In some cases, the service does not provide sufficient information. In such cases, it can query the service for additional information.
For more information and examples on Triggers, refer to ThingWorx Flow Connectors SDK Tutorial.