Mail
The ThingWorx Mail extension provides the ability to read and send e-mails from ThingWorx through external SMTP mail servers that are made available to it. You can create one or more mail Things in ThingWorx to store configuration information used to send e-mails.
The services provided by the Mail extension can be used directly or in conjunction with the ThingWorx Notifications feature. The ThingWorx Mail extension is available on support.ptc.com under Download Software > Order or Download Software Updates > ThingWorx Foundation > Release <latest version> > ThingWorx Mail Extension > Most Recent Datecode > Mail--<version>-Extension.
|
|
Make sure that you have a FileRepository Thing in which e-mail attachments can be stored.
|
|
|
A valid email address must contain an @ character. For example, [email protected]. If this format is not used, an error will be displayed. If the email address contains an @ character but not a period, it is also considered a valid email. For example, someone@companycom.
|
Configuration
You need to import the Mail_extension.zip extension to ThingWorx. After importing the Mail extension, a Thing Template named MailServer appears in the Thing Templates list.
To create and configure a new Mail Thing, do the following:
1. In ThingWorx, create a new Thing and assign the MailServer Thing Template.
2. Click the Configuration view.
The following screen appears: 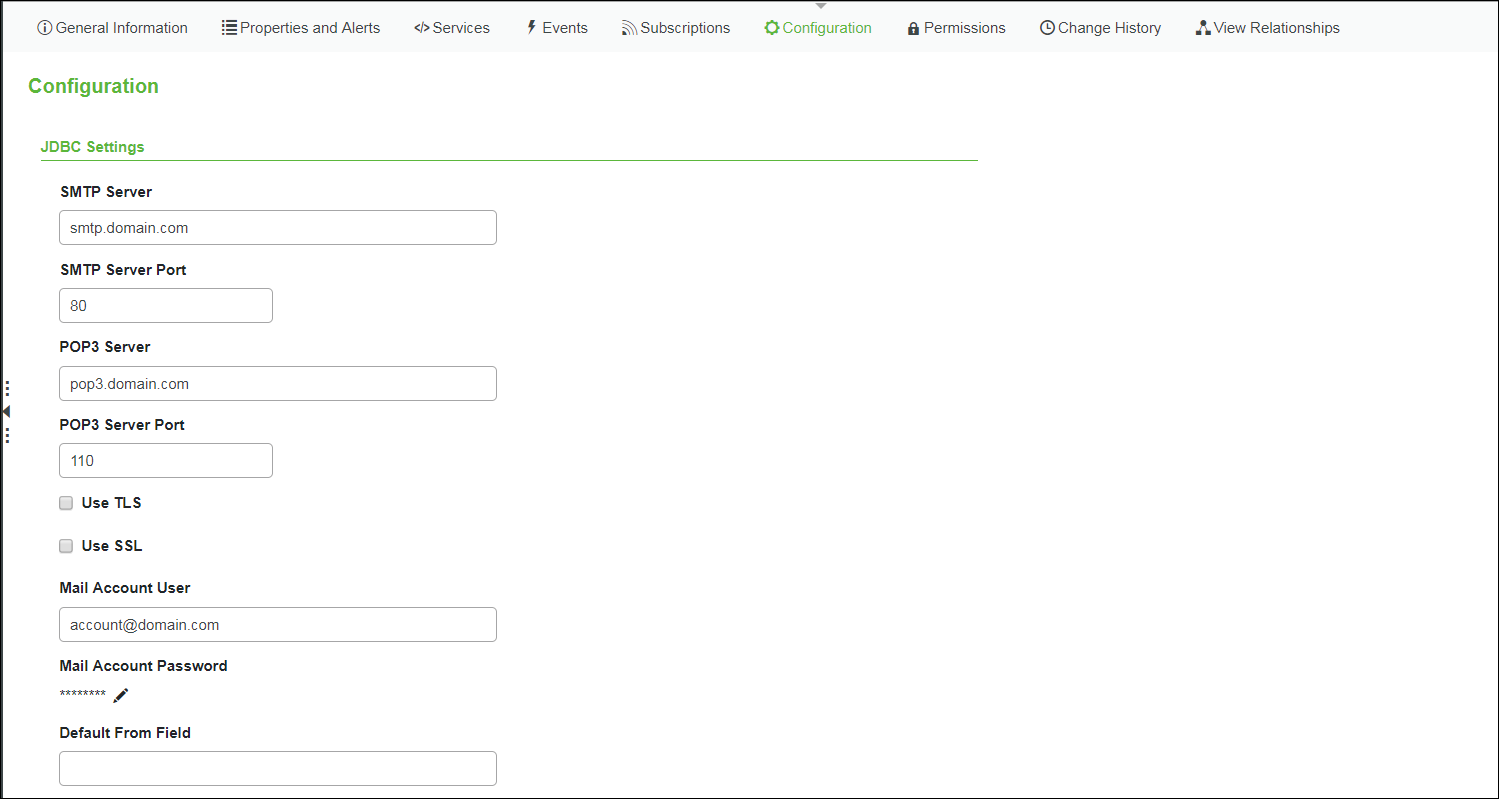

The default values in these fields above are examples. Change them as needed for your organization. |
3. Enter the following details used to connect to the SMTP server:
As many of these settings are dependent on how the server is set up, contact your administrator or see documentation associated with the server to determine the proper settings. |
JDBC Settings | Description | ||
SMTP Server | Address of the server from which e-mails are sent | ||
SMTP Server Port | Port through which ThingWorx logs in to the mail server to send e-mails | ||
POP3 Server | Address of the server from which e-mails are received | ||
POP3 Server Port | Port through which ThingWorx logs in to the mail server to check and retrieve e-mails | ||
Use TLS | Indicates whether to use TLS (Transport Layer Security) | ||
Use SSL | Indicates whether to use SSL (Secure Sockets Layer) | ||
Mail Account User | The user name for the e-mail account that is used to send and retrieve e-mails on the given mail server. This is different than the from field value, which is used for the sender address when sending e-mails. The from field value need to be a valid e-mail account. | ||
Mail Account Password | The password for the e-mail account. For Gmail (and in other cases), the specified e-mail account can be updated to allow less secure app sign-in (see KCS Article CS200624). | ||
Default From Field | Refers to the e-mail address to use as the from address when no address is specified when invoking the SendMessage services. This is primarily used when sending Notifications e-mails. | ||
Connection Timeout | Refers to how long ThingWorx should wait while trying to log in to the mail server before throwing an exception. The time should be entered in milliseconds | ||
Operation Timeout | Refers to how long ThingWorx should remain open without reading any data. The time should be entered in milliseconds. | ||
Socks Host | The host name of a Socks proxy server if used with the mail server. | ||
Socks Port | The port through which ThingWorx connects to the SOCKS proxy server, if used. | ||
Attachment File Repository | The name of the FileRepository Thing to use for processing attachments when reading e-mails from the mail server. | ||
No-Reply Address | The address for sending an e-mail from an anonymous or generic address. No reply e-mails are allowed to this address.
| ||
Reply Address | The address to which an e-mail recipient would reply. If the e-mail recipient replies to an e-mail that you have sent, the e-mail address that you have set in Reply Address field will appear. | ||
Error Address | The address to receive e-mails notifying of recipients that do not exist.
The sender of the notification e-mail would be either the address that you have set in No-Reply Address or, if it is not set, then the mail account user. No notification is sent when the recipient e-mail address is correct. Also, notifications are only sent for incorrect e-mail address and not for invalid user accounts. For example, if [email protected] is an invalid account, then there will not be any automated notification. |
Parameter | Description |
|---|---|
Platform Proxy Scheme | http/https for the proxy machine. |
Platform Proxy Host | Host name for the proxy machine. |
Platform Proxy Port | The port on which the proxy service is running on the proxy machine. |
4. To test the settings, click Save, and then select the Services area.
5. Click SendMessage, and then enter the following details:
◦ to — valid e-mail address specifying the recipient of the e-mail.
◦ subject — the subject of the e-mail.
◦ body — the content of the e-mail (this is an XML parameter).
6. Click Execute.
7. Check if an e-mail is received by the e-mail address specified in the to field.
If the e-mail is not received, check out the troubleshooting tips in KCS Article CS236135.
8. Click SendMessageWithNoReplyTo, and then enter the following details:
◦ to — valid e-mail address specifying the recipient of the e-mail.
◦ subject — the subject of the e-mail.
◦ body — the content of the e-mail (this is an XML parameter).
9. Click Execute.
This will send an e-mail from the default address you entered in the No-Reply Address field. |
10. Click SendMessageWithAttachment and then enter the following details:
Use this service only when you have a single attachment with the e-mail. Use SendMessageWithAttachments when you want to attach more than one file with the e-mail. |
◦ to — valid e-mail address specifying the recipient of the e-mail.
◦ cc — valid e-mail address specifying any other recipient to whom the email should be copied.
◦ bcc — valid e-mail address specifying any other recipient to whom the email should be copied and without being visible to other recipients.
◦ subject — the subject of the e-mail.
◦ body — the content of the e-mail (this is an XML parameter).
◦ fileRepository — the repository in which the e-mail attachments are stored.
◦ path — the path of file to be attached.
If you have stored the attachment in ThingworxStorage/repository/FileRepository, you can directly give the name of file in this field. For example, if the file name is Testfile.pdf,then you can enter this name as it is in this field. |
◦ attachmentName — the name of file to be attached.
◦ mimeType — the type of mime. For example, the mimeType for Testfile.pdf will be application/pdf.
11. Click Execute. This will send an e-mail with the file that you have attached.
12. Click SendMessageWithAttachments and then enter the following details:
◦ to — valid e-mail address specifying the recipient of the e-mail.
◦ cc — valid e-mail address specifying any other recipient to whom the email should be copied.
◦ bcc — valid e-mail address specifying any other recipient to whom the email should be copied and without being visible to other recipients.
◦ subject — the subject of the e-mail.
◦ body — the content of the e-mail (this is an XML parameter).
◦ attachments — the infotable field that you have to select to add multiple attachments. Click attachments and a new page appears as given below.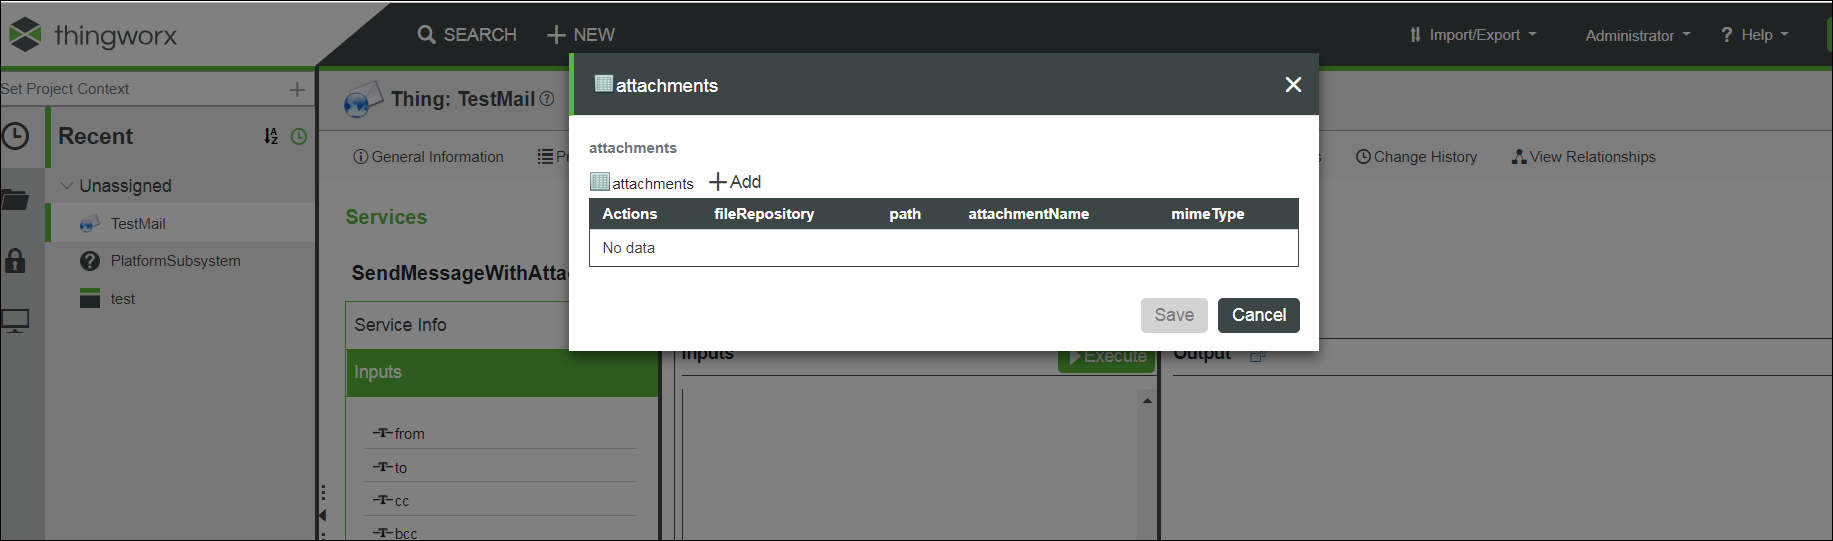
◦ Add — Click this to add an attachment.
◦ fileRepository — the repository in which the e-mail attachments are stored.
◦ path — the path of file to be attached.
If you have stored the attachment in ThingworxStorage/repository/FileRepository, you can directly give the name of file in this field. For example, if the file name is Testfile.pdf, then you can enter this name as it is in this field. |
◦ attachmentName — the name of file to be attached.
◦ mimeType — the type of mime. For example, the mimeType for Testfile.pdf will be application/pdf.
◦ Save — Click this and your attachment will be saved.
You can add multiple attachments using Add.Make sure you save all attachments and then you can see those listed in the info table. |
13. Click Execute. This will send an e-mail with multiple attachments.
14. Click SendMessageWithImage.and then enter the following details:
Use this service only when you want to attach a single image with the e-mail. Use SendMessageWithImages when you want to attach more than one image. |
◦ to — valid e-mail address specifying the recipient of the e-mail.
◦ cc — valid e-mail address specifying any other recipient to whom the email should be copied.
◦ bcc — valid e-mail address specifying any other recipient to whom the email should be copied and without being visible to other recipients.
◦ subject — the subject of the e-mail.
◦ body — the content of the e-mail (this is an XML parameter).
◦ Image — Click change. This will allow you to browse and select the image that you want to send with the e-mail.
◦ attachmentName — the name of image to be attached.
◦ mimeType — the type of mime. For example, the mimeType for Testimage.png will be image/png.
15. Click Execute. This will send an e-mail with image.
16. Click SendMessageWithImages and then enter the following details:
◦ to — valid e-mail address specifying the recipient of the e-mail.
◦ cc — valid e-mail address specifying any other recipient to whom the e-mail should be copied.
◦ bcc — valid e-mail address specifying any other recipient to whom the e-mail should be copied and without being visible to other recipients.
◦ subject — the subject of the e-mail.
◦ body — the content of the e-mail (this is an XML parameter).
◦ attachments — the infotable field that you have to select to add multiple images. Click attachments and a new page appears as given below.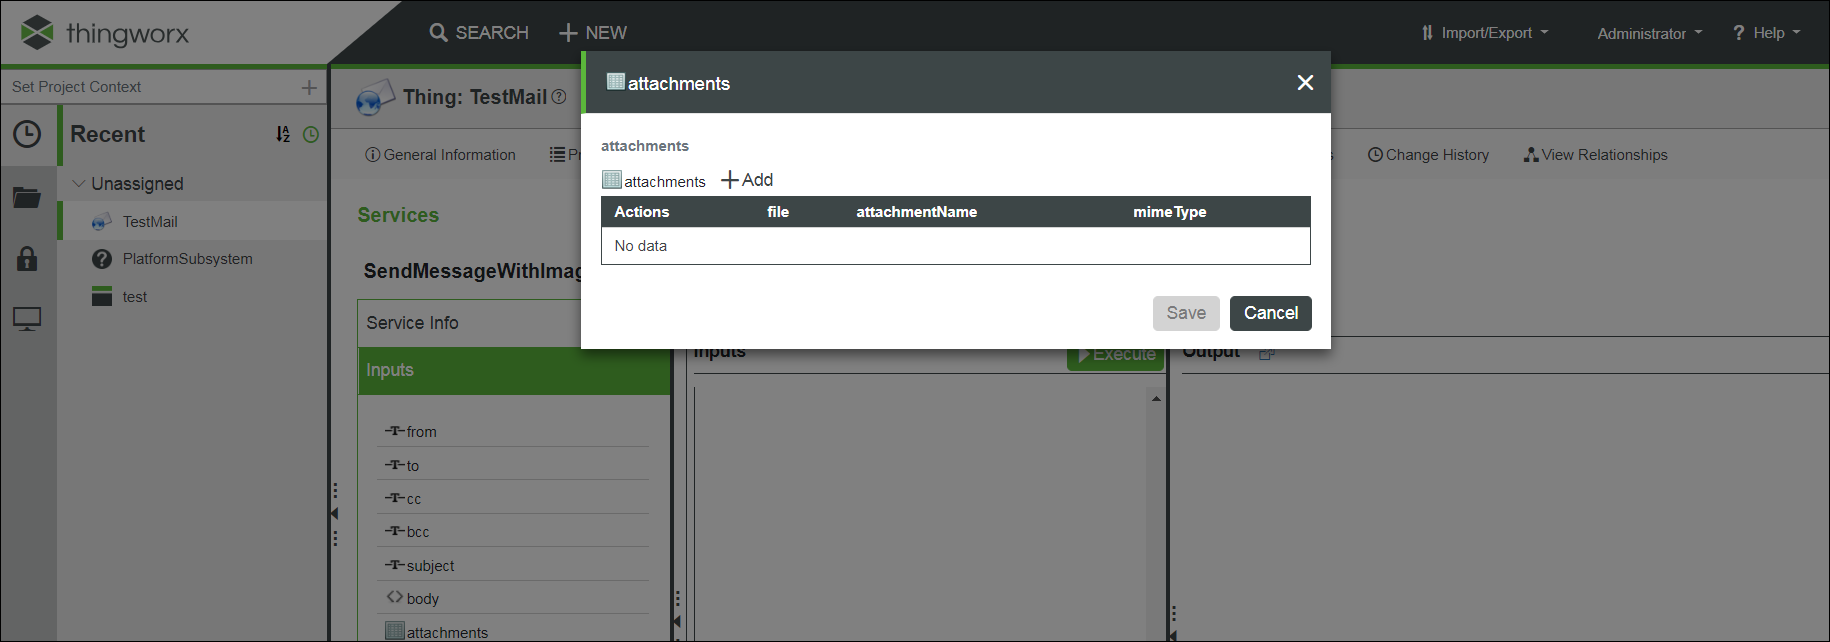
◦ Add — Click this to add an image.
◦ file — Click change. This will allow you to browse and select the image that you want to send with the e-mail.
◦ attachmentName — the name of image to be attached.
◦ mimeType — the type of mime. For example, the mimeType for Testimage.png will be image/png.
◦ Save — Click this and your image will be saved.
You can add multiple images using Add. Make sure you save all images and then you can see those listed in the infotable. |
17. Click Execute. This will send an e-mail with multiple images.
Click Monitoring > LOGS > SecurityLog and you can find the details of any e-mail that was not delivered.