MQTT
Release Notes
Message Queue Telemetry Transport (MQTT) is an open message protocol for M2M (machine to machine) communications that enables the transfer of telemetry-style data in the form of messages from pervasive devices along high latency or constrained networks to a server or small message broker. Pervasive devices may range from sensors and actuators, to mobile phones, embedded systems on vehicles, or laptops and full-scale computers.
MQTT works on publish/subscribe architecture. MQTT requires a message broker and communicating devices. The communicating devices can be called clients. The broker and clients can publish and subscribe to a parameter called “Topic”. You can secure the communication through MQTT using SSL.
The MQTT Extension provides connectivity to small electronic devices and sensors, and enables them to communicate with ThingWorx.
You can use any standard broker for MQTT as per the requirement of your organization. Refer to the product documentation of the broker that you wish to install for any user control settings.
|
|
In a Windows operating system, the broker runs as a service after installation.
|
Importing MQTT
You can download the MQTT extension at support.ptc.com under Download Software > Order or Download Software Updates > ThingWorx Foundation > Release <latest version> > ThingWorx MQTT Extension > Most Recent Datecode > MQTT--<version>-Extension Refer to Importing Extensions and import the MQTT_Extension.zip to your ThingWorx. When the extension is installed, the following appears in the list of Thing Templates:
• MQTTConnection
Allows a shared connection for the MQTTSubscriber Things.
• MQTTSubscriber
Allows subscriptions to one or more topics on the MQTT server. Add properties under Configuration > Property to the MQTT topic mappings section.
When editing an MQTTSubscriber Thing, restart the associated MQTTConnection Thing to refresh.
• MQTT
Allows all of the above configuration in a single Thing.

Configuring MQTT
The following section describes how to configure the parameters in MQTT after you install the extension in ThingWorx and want to establish connection with a broker.
1. Run the broker that you installed in the machine.
2. In ThingWorx, create a new Thing , select MQTT as the Thing Template and click Save.
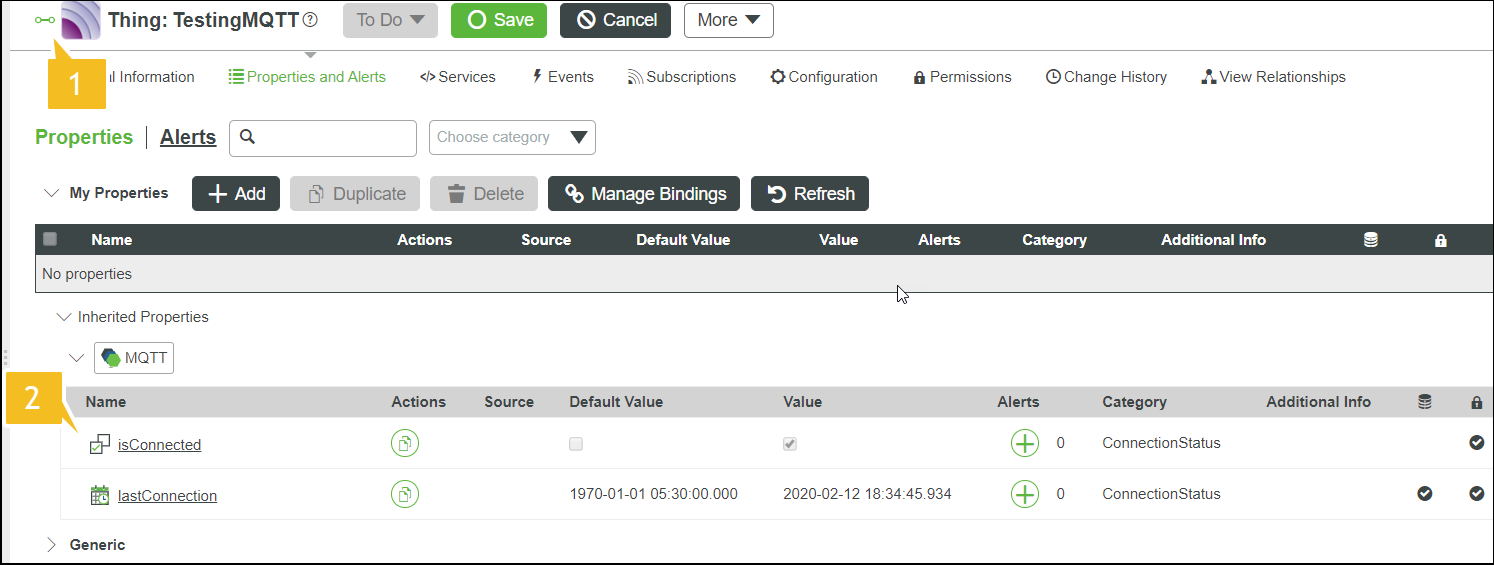
3. Click the Properties and Alerts view and the following screen appears:

In the image above, 1 and 2 call-outs indicate the following:
Call-out | Description |
1 | The green icon indicates that the Thing you created is connected to the broker. It appears red when the Thing is disconnected. |
2 | The isConnected property is set to TRUE in the Value field when connection is established between Thing and broker. The Value field is set to FALSE when it is disconnected. |
4. Click Add to add a property.
5. The following screen appears:

6. Enter the property name, base type, and other required details.
7. Save the information related to property.
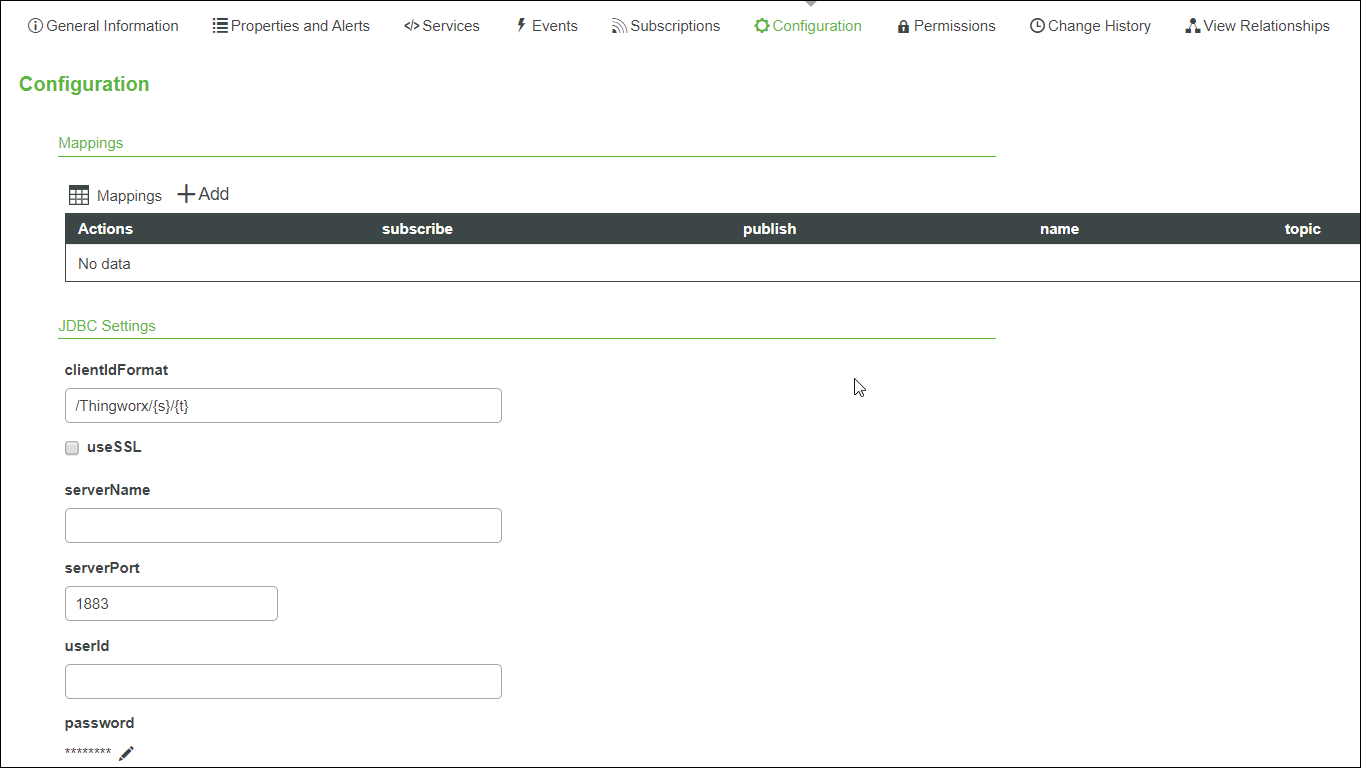
8. Click the Configuration view and the following screen appears:


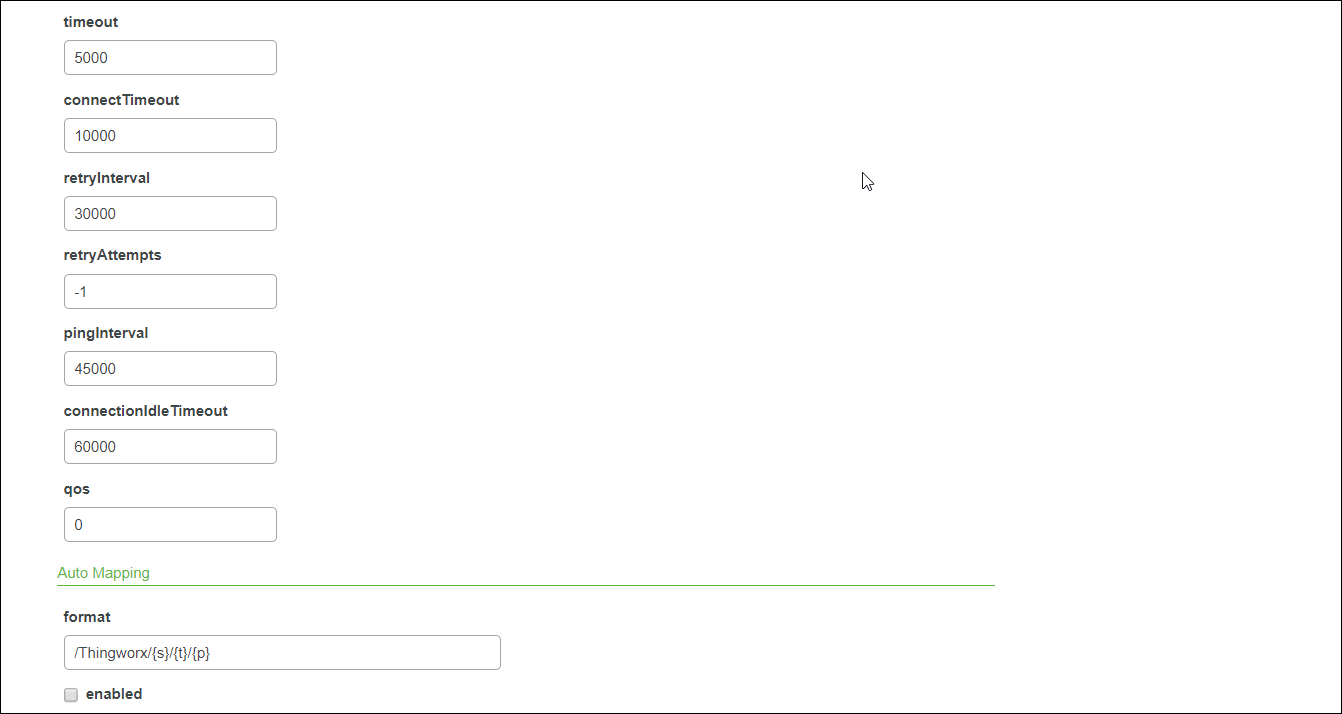
The following table describes the different parameters that you find in the Configuration view.
JDBC Settings | Description | ||
clientIdFormat | The name of the client that is registered with the MQTT broker.
The token {s} is for the server name of ThingWorx platform. It takes the value mentioned in the Federation Subsystem configuration for server name. The token {t} is for the current Thing name. If you want different platforms to be connected to one broker and have Things with same name, it is recommended to specify the server name in the Federation Subsystem | ||
useSSL | Select this if your broker supports secure connections. | ||
serverName | The host name where MQTT broker is running.
| ||
serverPort | The port for the MQTT broker. The default value is 1883. | ||
userId | The user name to connect to the broker. | ||
Password | The password for the userId. | ||
Timeout | The time in milliseconds to wait for a publish request to be successful. The default value is 5000 mS. | ||
ConnectTimeout | The time in milliseconds to wait for a connection to be established between the ThingWorx Platform and MQTT broker. | ||
retryInterval | The interval time in milliseconds to retry the connection if a connection to an MQTT broker is broken. The retry mechanism works only if the connection was established at some time and it later got broken. | ||
retryAttempts | The number of times retry connection attempts are made. For example, if an established connection is broken by network disturbances or due to any other issues, the number of attempts made to reset the connection are provided by value entered in this field. Each retry attempt is separated by the retryInterval mentioned above. | ||
pingInterval | The time in milliseconds to do periodic check of the connection status between ThingWorx Platform and the MQTT broker. The default value is 45 seconds. Every 45 seconds, a ping message is sent to the MQTT broker to check if there is a response. The response from the broker means that the connection is valid. | ||
connectionIdleTimeout | The idle time in milliseconds for a connection. If the connection is idle beyond this set time, it indicates that there was no message communication in the channel, and the Thing is marked as disconnected. When properties are not published or subscribed to, the pingInterval keeps updating the last active time so that the Thing does not get disconnected. | ||
qos | This value sets the priority level of communication between the broker and its clients. |
The AutoMapping configuration table has the settings for automatically mapping the properties for publish or subscribe. If the automatic mapping is enabled, you do not need to specify the table for Mappings. Any property that you create in the Thing is mapped to a property automatically. The topic name is decided by the format mentioned below:
AutoMapping | Description |
format | The format of the topic name that corresponds to a property. The {s} token is for the server name, {t} is for Thing name, and {p} is for the property name. |
enabled | You can select the automatic mapping feature. |
9. Enter the values in the fields as per your requirement and click Add in the Mappings setting.
The following screen appears:

10. Enter the property name that you added in step 6 here, the topic name, and select subscribe and/or publish. The property publishes on or subscribes to the topic name that you enter here.
11. Click Add.
12. In the Properties and Alerts view, click the Set value.

13. The following screen appears.

Enter the property value in the field and save it.
14. Follow the run commands that are specific to the broker installed in your machine and check the publishing and subscribing activities between the Thing property and broker.