Configuring Content Security Policy Header Values
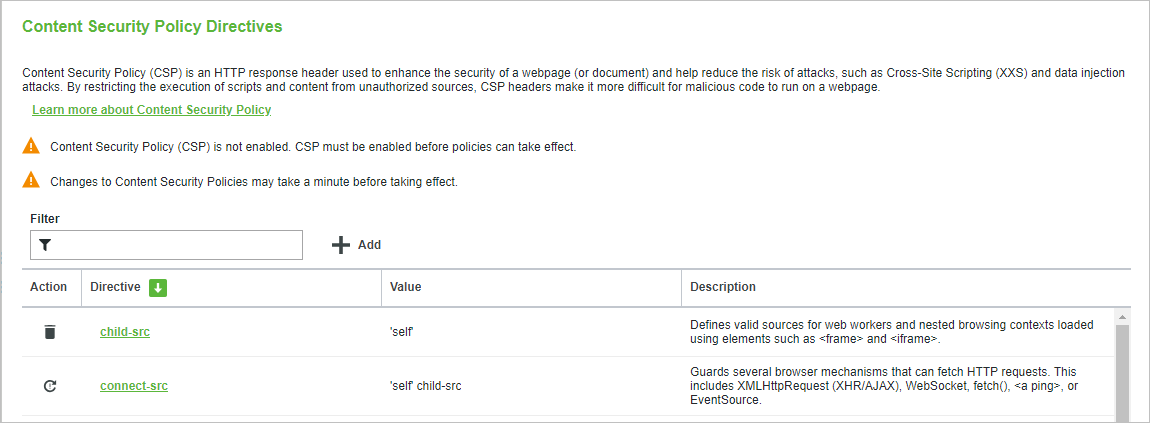
CSP header values are configured on the Platform Subsystem on the Content Security Policy Rules tab of the Platform subsystem.
The Content Security Policy Rules tab is only accessible by administrators. Non-administrators who attempt to access it receive a warning indicating that only administrators have access.
At the top of the page is a short explanation of Content Security Policy Directives and a link to the relevant topic in the ThingWorx Platform Help Center.
Warnings appear here if CSP is not enabled, and after a change is made to warn the administrator that the change may take up to 1 minute for the change to take effect.
Display Table
The table displays all configured directives, their values, and their directive descriptions.
The Directive, Value, and Description columns are sortable.
The Filter textbox above the table can be used to filter for directives, values, and descriptions.
Action Column
The action column will initially be empty. As directives are added and edited, icons will populate the action column to assist in editing, reverting, and saving changes.
• Reset — When selected, it resets the directive to the default value. Available for default directives only.
• Delete — When selected, it deletes the chosen directive. Only directives added by administrators can be deleted.
When selected, it deletes the chosen directive. Only directives added by administrators can be deleted.Directive Column
The configured CSP directives that control which resources are allowed to be displayed on the webpage and which are blocked. Directives are a combination of default entries and additional directives added to support specific applications.
Value Column
The policy for the specified directive. A common value is 'self'.
Description Column
A brief description of the directive. Only descriptions for Level 2 directives are displayed. The Level 3 specification is not finished, so no descriptions are displayed.
Adding Directives
The Add button appears above the table next to the Filter textbox. It enables administrators to add new directives.
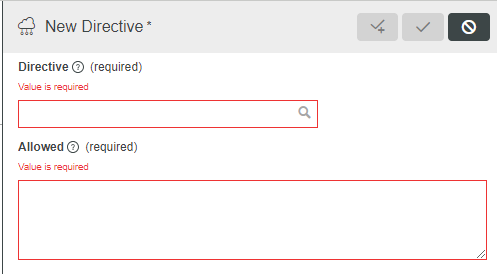
When selected, the Add button opens the New Directive right-side panel.
To add directives, complete the following steps:
1. Click Add to open the New Directive panel.
2. On the New Directive panel, enter the following information:
◦ Directive — This is a valid CSP Level 2 or Level 3 directive name that is validated against both specifications. Administrators can manually enter a valid directive name or click  to open a dialog box with all valid Level 2 directives. Level 3 directives are not available for selection, but can be manually entered. This field is required. Duplicate directive names are not permitted. Directive names are limited to 100 characters.
to open a dialog box with all valid Level 2 directives. Level 3 directives are not available for selection, but can be manually entered. This field is required. Duplicate directive names are not permitted. Directive names are limited to 100 characters.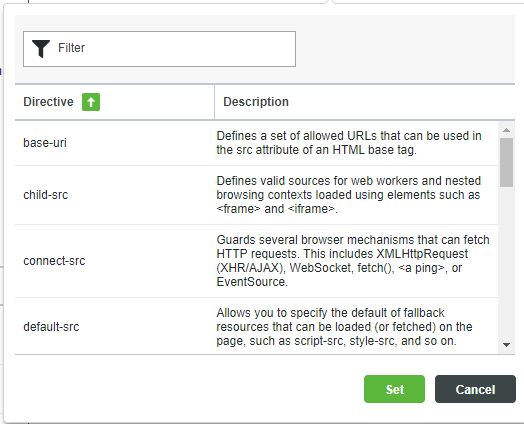
◦ Allowed This is a required value; however, a blank space is allowed to support certain directives that do not have values. Their presence in the overall CSP policy allows certain behavior. The Allowed values are validated against a CSP library. The validator checks for keywords and screens invalid syntax. Semi-colons (;) are not permitted, and the directive is blocked from being saved. Other syntax issues, such as colons (:), generate a warning; however, the directive can be saved. Composer allows administrators to save invalid values because they may be valid in Level 3, but the validator is Level 2 compliant. An error message is displayed on the panel when an Allowed value is invalid.
Allowed strings are limited to 1200 characters and should be as short as possible. The total CSP policy (all directives combined) is limited to 1200 characters.
3. Click the checkmark to add the directive.
Editing Directives
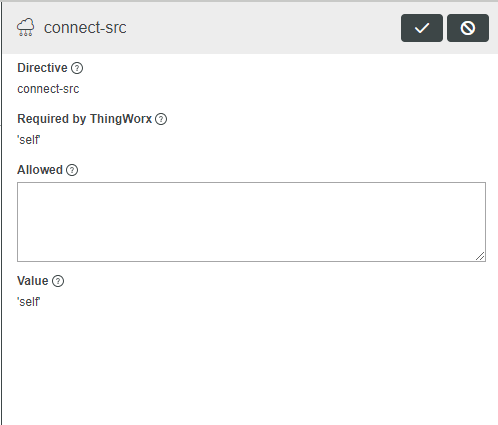
Selecting a directive in the table opens the Edit Directive window, which allows the administrator to edit a previously existing directive.
To edit directives, complete the following steps:
1. Select a directive to open the Edit Directive window.
2. On the Edit Directive window, enter the following information:
◦ Directive — Directive name being edited. Read-only.
◦ Required by ThingWorx — Directives required by ThingWorx to function properly. Read-only.
◦ Allowed — Values to be added to the default directive. Allowed values are validated against a CSP library for issues such as missing keywords, duplicate key word, and invalid key word. The validator checks for keywords and screens for invalid syntax. Semi-colons (;) are not permitted and prevent saving the directive. Other syntax issues, such as colons (:), generate a warning; however, the directive can be saved. Composer allows administrators to save the invalid values because they may be valid in Level 3, but the validator is Level 2 compliant. An error message is displayed on the rollout when an Allowed value is invalid.
◦ Value — Final directive value. This is a combination of the Required by ThingWorx and Allowed fields. Value strings are limited to 1200 characters and should be as short as possible. The total CSP policy (all directives combined) is limited to 1200 characters.
Typically, the default setting and the Allowed value are combined, so the values injected into the CSP header include both the default and Allowed values. For example, frame-ancestors defaults to 'self'. If an administrator updates the frame-ancestors directive configuration to include https://*.somedomain.com, then the final header value is ‘self’ https://*.somedomain.com. To enable setting object-src to 'none', instead of the Allowed value augmenting the default value, the Allowed value replaces the default value. For example, the default setting for object-src is 'self'. If you update object-src to https://*.somedomain.com, the directive sent to CSP is only https://*.somedomain.com. If you want 'self' included, you need to explicitly configure object-src to include 'self', as follows: 'https://*.somedomain.com' 'self'. If the object-src configuration includes 'none', it overrides any other settings. So, 'self' 'none' is effectively 'none'. Use single quote ('), not double quote (“) where quotes are required |
By default, frame-ancestor is set to 'self' on installation. If the Clickjack filter was configured in web.xml and ThingWorx and migration to CSP occurred, frame-ancestor is set to 'self' and the allow list that is defined in the Clickjack filter. |
Saving and Enforcing CSP Configuration Settings
Click Save to save all changes made to the CSP configuration. No additional steps are required for ThingWorx to enforce the new policy. However, there is a delay of up to 1 minute before the CSP header is updated and used.
Evaluating your CSP
Administrators can check their CSP by visiting CSP Evaluator. To do so, copy the CSP policy from the browser’s developer tools and test it in the CSP evaluator by doing the following:
1. Open the network in the browser’s developer tools.
2. Refresh the browser’s webpage.
3. Select a request and open the Content-Security-Policy header.
4. Copy the value and paste it in the CSP evaluator.
5. The CSP evaluator will analyze the settings.
Composer requires ‘unsafe-eval’ and ‘unsafe-inline’ configured for 'script-src' and 'style-src configured with ‘unsafe-inline’. These settings cannot be altered in ThingWorx. |