Tunneling
The ThingWorx Edge Java SDK fully supports application tunneling. Application tunnels allow for secure, firewall-transparent tunneling of TCP client server applications such as VNC and SSH. You can create mashups from which your users can start remote sessions with edge devices that are running your Java SDK application.
This topic explains how to run the SteamSensor application with tunneling from the command line, how to configure tunneling for your edge application. Finally, it provides the settings required for the Tunneling Subsystem of the ThingWorx Platform.
The ThingWorx Java SDK supports Legacy Tunnels, for more information see, ThingWorx Remote Access Architectures.
Required Setting for the Tunneling Subsystem
When you want to use tunneling, you must check the configuration for the Tunneling Subsystem of the ThingWorx Platform via ThingWorx Composer. There is a field where you can specify the host/IP of the endpoint for the tunnel, called Public host name used for tunnels. The following figure shows the configuration page for the Tunneling Subsystem, with this field highlighted:
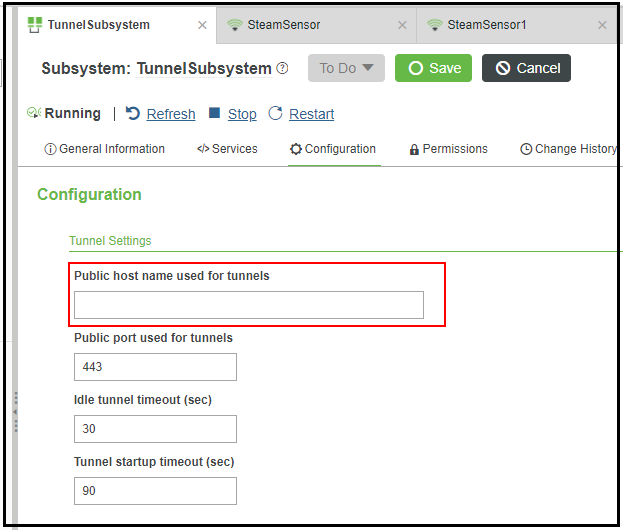
Why do you need to configure this address? Suppose that you start up your ThingWorx Platform in Microsoft Azure. The default IP address for the Tunneling Subsystem when the platform is running in Azure might be 10.121.x.x. Unless you change that address, the Tunneling Subsystem will tell the clients to attempt to connect to that host for the tunnel WebSocket. Since that IP address is a local network address, the tunnel will not work. Therefore, you must populate that configuration field with the external host/IP address that tunnels will use for connections.
Tunneling in the SteamSensor Example
As of v.7.0.0 of the Edge Java SDK, the SteamSensor example includes tunneling capabilities. By default the .jar connects to the SteamSensor Thing that is included in the import subdirectory for the example. Before you can run the SteamSensor with tunneling, you need to follow these steps:
1. Log in to ThingWorx Composer,
2. From the left navigation pane, select to import the Entities_SteamSensor.xml file from the installation directory, tw-jsdk\examples\steamsensor\import\. The import will create the SteamSensor Thing to which the application will connect.
3. From Composer, go to the SteamSensor Thing, by selecting > > .
4. In the Configuration page, make sure that the check box next to Enable Tunneling is selected, and that the reportingStrategy is set to AlwaysOnReporting. The Tunneling Destinations are defined for you in the entities file that you imported.
You are ready to run the SteamSensor application with tunneling.
To run the SteamSensor application with tunneling, use the -n flag on the command line, as shown here:
java -jar .\steamsensor.jar -h localhost -p 8080 -k <your_application_key> -n
Configuring Tunneling in Your Application
To enable tunneling in your own application, you need to either invoke ClientConfigurator.tunnelsEnabled(true), or set the tunnelsEnabled directive in your config file.
As of v.6.1.0, the Java SDK supports compression between the edge and the platform for tunneling by default. For more information about compression, refer to Compression. |
Example: Tunnel Configuration
Once it connects to the ThingWorx Platform, the SteamSensor client binds to the matching Remote Thing that was created using the RemoteThingWithTunnels Thing Template on the ThingWorx Platform. Once bound, the Thing can receive tunnel requests from the platform, and facilitate tunnels to local applications.
// Create a client config
ClientConfigurator config = new ClientConfigurator();
// Basic configuration. Refer too SimpleClient.java for additional info.
config.setUri("wss://localhost:443/Thingworx/WS");
config.setAppKey("xxxxxxxx-xxxx-xxxx-xxxx-xxxxxxxxxxxx");
config.ignoreSSLErrors(true);
// Ensure tunnels are enabled for this example
config.tunnels.Enabled(true);
try {
ConnectedThingClient client = new ConnectedThingClient(config);
VirtualThing myThing = new VirtualThing(ThingName, "Tunnel
Example", client);
client.bindThing(myThing);
client.start();
while (!client.isShutdown()) {
Thread.sleep(5000);
}
} catch (Exception e) {
e.printStackTrace();
}