Building and Running the Steam Sensor Example
To build and run the Steam Sensor example, follow these steps:
1. Start Android Studio and when the Welcome to Android Studio window opens, select Import project. Alternatively, if you already have a project open, select > .
2. When prompted, select the android-steam-sensor directory, and then click Next.
3. Assuming that you are importing your first ThingWorx project, follow these steps in the Import Project screen:
a. If given the option to choose a Gradle distribution, choose to use the gradlew command that is provided with the ThingWorx Android SDK.
b. Leave the default setting for Project format (.idea).
c. Click Finish.
4. During this process, you may be asked to install or choose an Android SDK version. This project targets Android SDK 5.1, also called API 22. The project should import cleanly and be ready to use.
5. In ThingWorx Composer, import the Entity file, examples/android-steam-thing/entity/Things_SteamSensor1.xml. As a result, you should be able to find the SteamSensor1 thing in Composer. This application updates this thing.
6. In Android Studio, select > to start the application.
7. In the application, choose the Launch Emulator option and click the ellipsis button (...).
8. Select the Create Virtual Device button on the bottom of the next window.
9. If you have an Android device, you should attach it to your system using a USB cable and consult your vendor's documentation on placing that device in "Developer Mode". Otherwise, you can create a simulated Android device.
If given the option, choose an x86 device over an ARM device to get better performance, If you do not have any x86 choices, consider clicking the Show downloadable images button to find one. The Steam Sensor application should start in the simulator.
10. If the application is starting for the first time, the settings page appears. You must provide the following information:
◦ A URI of the form ws://hostname:8080/Thingworx/WS for HTTP access.
◦ A URI of the form wss://hostname:443/Thingworx/WS for HTTPS access.
◦ An Application Key (appKey) that has been generated on your ThingWorx platform in the Application Keys section of ThingWorx Composer.
|
|
You can also build the sample applications from the command line, as explained in Building an Example Project from the Command Line.
|
Proxy Support
All example Android applications, including the SteamSensor, have a preference settings like this:
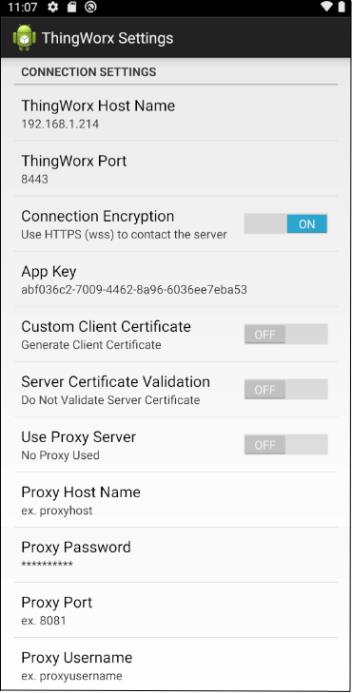
If the Use Proxy Server setting is enabled, the proxy preferences shown in the following table are used. The SteamSensor example now requires the named arguments described in the following table:
Named Argument | SteamSensor Usage |
|---|---|
-c <arg> | Specifies the number of Steam Sensors to create. |
-d | If used, disables HTTPS error checking. |
-f | If used, forces the use of HTTPS on the selected port. |
-g <arg> | Specifies the name of the gateway. If not specified, no gateway is created. |
-h <arg> | Specifies the host name of the ThingWorx Platform to connect to. |
-j <arg> | Specifies the proxy server's host name. If not provided, no proxy is used. |
-k <arg> | Specifies the application key (appKey) used to authenticate with ThingWorx Platform. |
-l <arg> | Sets a logging level: • 1=TRACE • 2=DEBUG • 3=INFO, • 4=WARN • 5=ERROR • 6=FORCE • 7=AUDIT |
-n <arg> | Specifies the ThingName. Default value is SteamSensor |
-p <arg> | Specifies the port used by ThingWorx Platform. Default value is 8080. |
-q <arg> | Specifies the proxy password (optional). |
-r <arg> | Specifies the proxy port (optional). |
-u <arg> | Proxy User (Optional) |
The example includes a configuration file for the squid proxy server, called squid.conf. Read through the settings in this file and change the values as indicated in the comments before running the application with your squid proxy server.