Setting Up an EMS or LSR Thing for the Remote Access and Control Application
For devices running the EMS or LSR to be available in ThingWorx Asset Advisor, you need to set up Thing Templates for the types of devices. These Thing Templates must implement the following Thing Shapes:
• PTC.Factory.PhysicalAssetThingShape
• PTC.SCA.SCO.AssetIdentifierThingShape
• PTC.SCA.SCO.StatusThingShape
• PTC.ISA95.IdentifierThingShape
• PTC.SCA.SCO.MonitoredPropertiesThingShape
For complete details, refer to the topic, Creating Custom Thing Templates for Equipment Types in the ThingWorx Apps Help Center.
The Remote Access and Control application in Asset Advisor enables users to create remote sessions with devices at remote sites and also to transfer files to and from those remote devices. The next two sections explain the setup for a Thing in ThingWorx Composer required to take advantage of these features.
Remote Access
The procedure below is focused on getting you started with a single EMS or LSR Thing. For a large number of devices of the same models, create Thing Templates for your models and apply the appropriate Thing Shapes and other settings for to the Thing Templates. For details, refer to the topic, Creating Custom Thing Templates for Equipment Types in the ThingWorx Apps Help Center.
1. In ThingWorx Composer, navigate to the Thing and on the General Information page, add the following Thing Shapes for Remote Access:
◦ PTC.SCA.SCO.FIleTransferHistoryHandlerThingShape
◦ RemoteAccessible
◦ PTC.SCA.SCO.RemoteTunnelingThingShape
For details, refer to Creating Custom Thing Templates for Equipment Types in the ThingWorx Apps Help Center.
2. Click Save and select Properties | Alerts
3. On the Properties page, verify that isConnected or isReporting property shows a value of a check mark (dimmed), as shown below:
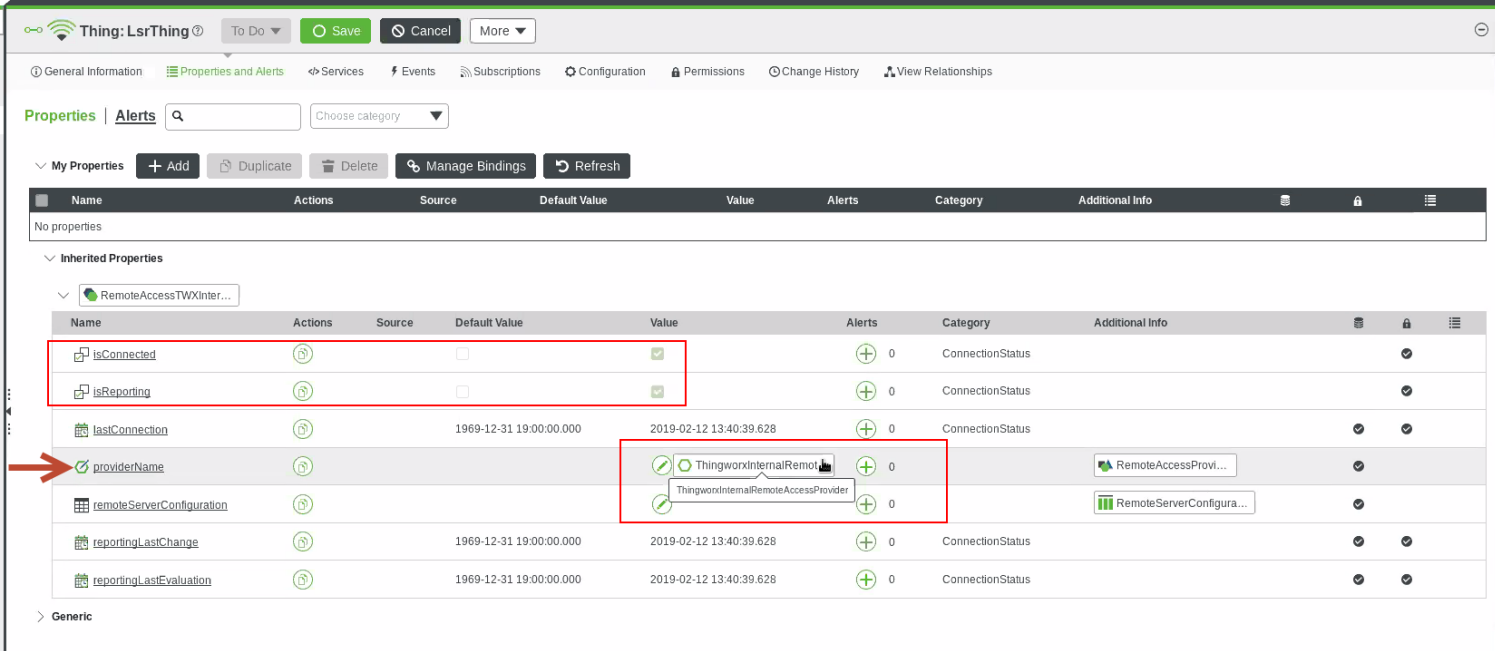
The isReporting property was added for ThingWorx v.8.4.0, the Thing Presence feature. Checking isConnected suffices for earlier versions of the platform. |
4. As indicated in the screen shot above, set the value of the providerName property to ThingworxInternalRemoteAccessProvider.
5. Click Save and select Configuration.
6. On the Configuration page, select the Enable Tunneling check box and make sure that the reportingStratey is AlwaysOnReporting.
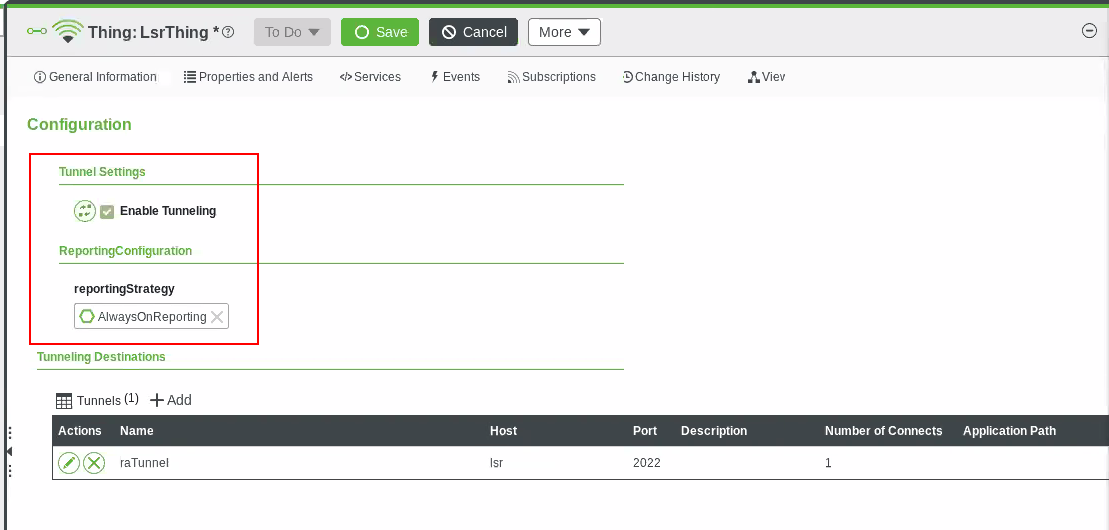
7. Under Tunneling Destinations, click + Add. The Tunnels window appears. Here is an example of a configured Tunnel:

a. Enter the Name that will be used to identify what tunnel to use.Choose a name that indicates the type of remote interface. For example, vnc or ssh.
b. Configure the Host and Port from the point of view of the edge device where the server component of the client/server application is running, not the ThingWorx Platform. For example, when you want to access the edge device from an SSH client you would type the host name of the device, and then the number of the port on which the EMS is listening. Typically, this port is 22. If you have secure communications set up between the EMS and the platform, the port might be 8443. The port for a VNC tunnel is typically 5900.
The port should be any public port not already in use. |
d. The Number of Connects and Protocol should retain their default values, unless you have a reason to change them.
e. Click Save. The tunnel and the settings appear in the table of Tunneling Destinations on the Configuration page:

8. Click Save.
To test the Remote Access functionality, download the ThingWorx Remote Access Client (RAC) from the ThingWorx Remote Access Client Downloads page. This tool works in conjunction with the RAClientLinker widget and the Remote Access and Control application in Asset Advisor to establish a connection (tunnel) to use for a remote session.
For any end user to connect to a remote device, the user needs to have a tunnel created between the local machine and the remote device. The Remote Access Client creates that tunnel. |
Configuring an EMS Thing for File Transfer and File Transfer History in Asset Advisor
The Remote Access and Control application of Asset Advisor provides file transfer and file transfer history functionality. Assuming that you have configured the EMS for file transfers, follow these steps to configure an EMS Thing for file transfers and file transfer history in Asset Advisor:
1. Connect the edge device to ThingWorx Platform.
2. Log in to ThingWorx Composer, navigate to the EMS Thing
3. Under General Information, set the Identifier.
4. Click Save.
The File Transfer action in the Asset Advisor UI enables you to copy files from the local system repository (TW>RSM.Thing.FileRepository) to a remote location (a device), and from the remote location to the local system repository. For information about setting up a custom file repository, refer to "Configuring a Custom File Repository Location in the ThingWorx Help Center. |