使用 SSL 进行安全连接
您的站点可以使用双向 SSL 在 ThingWorx 服务器与 Windchill 应用程序之间提供安全通信。PTC 建议在生产环境中使用 SSL。扩展可以使用 SSL 在服务器之间进行相互身份验证,并保护通信本身。
SSL 连接要求两个系统彼此信任;为此,必须将新旧 WindchillConnector 事物模板配置为引用 Java 密钥和信任存储 (位于为事务提供密钥的 ThingWorx 服务器上)。Windchill 服务器上的 HTTP 服务器必须配置为信任这些密钥。
SSL 配置差别很大,本指南不会尝试描述 SSL 配置中的所有可用选项。因此,按以下步骤为配置 SSL 过程提供概述。
此过程假定 ThingWorx 和 Windchill 都配置为针对其标准通信使用 SSL。它也依赖于随 PTC HTTP 服务器最新版本提供的配置脚本。最新的 PTC HTTP 服务器包括在 Windchill 11.0 M030 及更高版本中。
|
|
例如,商业可信通配证书可用于 Windchill,而自签署证书可在 ThingWorx 与 Windchill 之间使用。
|
配置 ThingWorx 使用密钥存储和信任存储
ThingWorx 需要 Java 密钥存储和信任存储。
1. 为 ThingWorx 创建 TrustStore 并导入 Windchill SSL 证书。
2. 为 ThingWorx 创建密钥库,并在密钥库中生成密钥对。
3. 将 Windchill 配置为信任 ThingWorx。
4. 在用来将 ThingWorx 连接到要保护的 Windchill 系统的 WindchillConnector 事物模板的配置中引用上述存储区。
为 Windchill 配置客户端身份验证
在 Windchill 服务器上,在 PTC HTTP 服务器中配置 SSL 身份验证以信任 ThingWorx 密钥和证书。
|
|
代码示例已重新格式化以便适应页面大小,因此可能包含行号、隐藏的编辑字符 (如制表符和行尾字符) 和额外的空格。在剪切并粘贴代码时,请检查上述字符并将其移除,之后再尝试在您的应用程序中使用此示例。
|
1. 更新 PTC HTTP 服务器配置,以参考 CA 证书文件。
a. 在 <HTTPSERVER_HOME>\conf\ca-bundle.crt 中创建文件。建议使用此位置,但并非必需。
b. 保存 ca-bundle.crt。
c. 在 <HTTPSERVER_HOME>\conf\sslvhostconf.d 中创建 sslclientauth.conf 文件。
d. 将 SSLCACertificateFile 添加到 <PATH_TO>\ca-bundle.crt,使其引用 ca-bundle.crt 文件。例如:
SSLCACertificateFile
<HTTP_Server>\conf\ca-bundle.crt
e. 保存更改。
2. 将 ThingWorx 客户端证书添加到 PTC HTTP 服务器的受信任 CA 证书列表。
a. 编辑您之前在 SSLCACertificateFile 条目中所指向的 ca-bundle.crt 文件。
b. 编辑 ca-bundle.crt 并粘贴 ThingWorx 客户端证书的 PEM 文件内容。
c. 保存更改。
3. 针对 sslClientAuth URL 配置 PTC HTTP 服务器。
a. 在 <windchill-home>/codebase/wt.properties 的 wt.webapp.name 条目中查找 Windchill Web 应用程序名称。
b. 打开 shell 或命令提示符,然后输入以下内容:
cd <HTTPSERVER_HOME>ant -f webAppConfig.xml -DappName=[windchill-web-app] -Dresource=sslClientAuth -DresourceAuthType=sslClientAuth addAuthResource
c. 将 Windchill 配置为信任 ThingWorx 证书。
a. 编辑 <windchill-home>/codebase/WEB-INF/web.xml。
b. 查找 <filter-name>TrustedSSLAuthFilter</filtername>。
c. 在现有的 <init-param> 元素后添加另一个这样的元素,其中 [thingworx-cert-name] 为 ThingWorx 证书的名称:
<init-param><param-name>trustedSubjectPattern.1</param-name><param-value>
[thingworx-cert-name]</param-value></init-param>
d. 保存更改。
配置 Windchill 连接器
|
|
如果仅使用旧款连接器执行 Info*Engine 任务,则适用此配置。
您还可以使用 OData 连接器执行 Info*Engine 任务。请参阅 Customizing ThingWorx Navigate (《自定义 ThingWorx Navigate》) 中的 "Executing Info*Engine services with the OData Connector"。
|
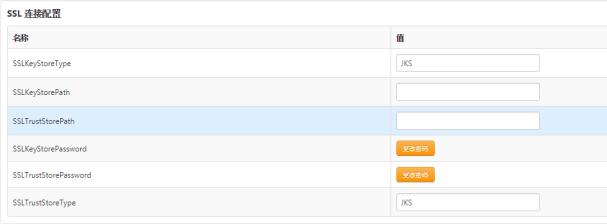
1. 在 ThingWorx Composer 中,编辑用于表示连接至所配置 Windchill 系统的 WindchillConnector 事物模板。
2. 指定 ThingWorxKeyStore.jks 的路径 (请参见屏幕截图中的示例),并指定密码。
3. 指定 ThingWorxTrustStore.jks 的路径 (请参见屏幕截图中的示例),并指定密码。
4. 指定 Windchillhttps 地址和 SSL 端口。
5. 保存事物。
6. 查看 ThingWorx 应用程序日志,以验证不存在任何配置错误。
7. 启动 ptc-connected-demo-mashup 以验证 ThingWorx - Windchill 信任的 SSL 配置。