Create a New Task from Scratch for ThingWorx Navigate
Building blocks of a task
Your task is made up of several basic parts:
• Mashup—The user interface of the task.
• Services—Java or Java script that performs the actions. The services are on ptc-windchill-integration-connector.
• Windchill—The source of your data.
Use ThingWorx Composer to create the mashup and connect it to the services.
Example: Create a new task
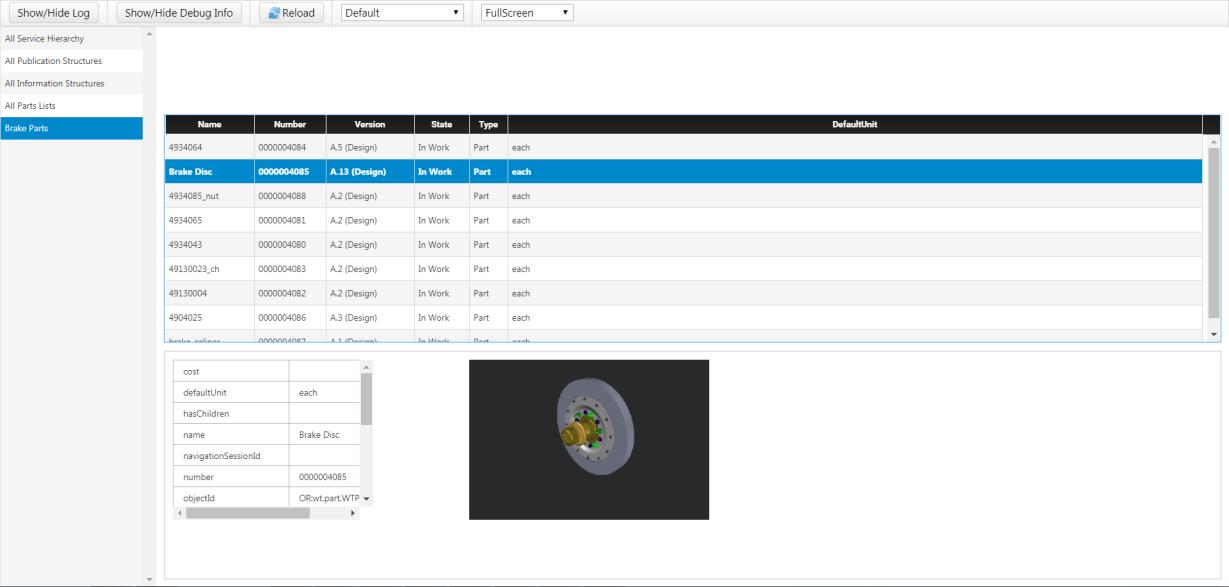
In the sections below, we’ll go through building a new task from start to finish in ThingWorx Composer. With our example task, users search for Windchill data and receive the results in a table. When they select an item from the table, they’ll see more properties in a table below, and they’ll see an interactive 3D representation of the item. They can click a link to open the representation in Creo View. Here’s how it will look when we’re done:
This example shows you how to combine the building blocks of a task into a working mashup. You may find that many of the services your organization needs are already included with the demo mashup and the ptc-windchill-integration-connector.
As a result, you can assemble many custom tasks using only the
ThingWorx user interface and these out-of-the-box services. If you need to write your own services, we have steps for some commonly-used services that you may find helpful. Check the Windchill Extension guide on the PTC
Reference Documents site.
But first, let’s build the example task.
Plan the task
It’s helpful to plan the functionality and the layout of your task before you start. Then you will know what services you need, the panels you need for each service, and how they will be laid out. Once you have your plan, you can start assembling the services you need on the connector. Continue to the next section for the steps.
| The procedure uses the New Composer user interface for ThingWorx Composer. |
Duplicate ptc-windchill-integration-connector-proxy (Only for Windchill and Fixed Authentication)
| This section is only applicable to Windchill and Fixed authentication. For SSO, skip to the next section. |
1. On the left, in the
 Browse
 tab, under
VISUALIZATION, select
Media. The media list opens on the right.
2. Select the check box next to ptc-windchill-integration-connector-proxy, and then click Duplicate. The New Media window opens on the right, with the settings from ptc-windchill-integration-connector-proxy:
◦ Tags—TWXNavigate:ptc-sample-mashup, TWXNavigate:Navigate, PTC:Navigate, Applications:connected-plm.
3. Set a name for your new connector proxy. For this example, let’s use sample-connector-proxy. Then, click Save.
Duplicate ptc-windchill-integration-connector
1. On the left, in the
Browse tab, under
MODELING, select
Integration Connectors. The list of integration connectors opens on the right.
2. Select the check box next to ptc-windchill-integration-connector, and then click Duplicate. The New Thing window opens on the right, with the settings from ptc-windchill-integration-connector:
◦ Tags—TWXNavigate:Navigate, PTC:Navigate
◦ Base Thing Template—WindchillSwaggerConnector
◦ Implemented Shapes—WindchillContentProxyServiceProvider
3. Set a name for your new connector. For this example, let’s use sample-connector. Then, click Save.
4. For Windchill and Fixed authentication, set or edit the value for MediaEntityName using the following steps:
a. Click Properties and Alerts to open the properties and alerts for the new integration connector.
b. For the
MediaEntityName property, click
Set value. If the
MediaEntityName property is already set, click

to edit the set property. A panel opens on the right.
c. In the Set value of property field, set the value as the name of the integration connector proxy you duplicated in the previous section. Here, we will set it as sample-connector-proxy.
d. Click

to save.
5. Click Services to open the services for the new integration connector. Search for the service Search_Get_SavedSearches, and then click to open and edit it.
6. Under Route Info, click +New API Map. The New API Map dialog box opens.
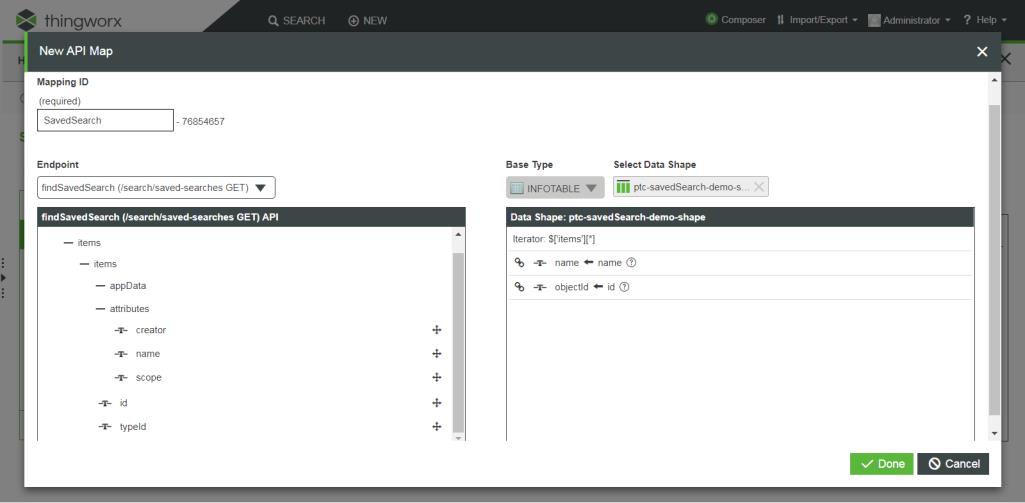
7. Set these properties:
◦ Mapping ID—SavedSearch
◦ Endpoint—findSavedSearch
◦ Select Data Shape—ptc-savedSearch-demo-shape
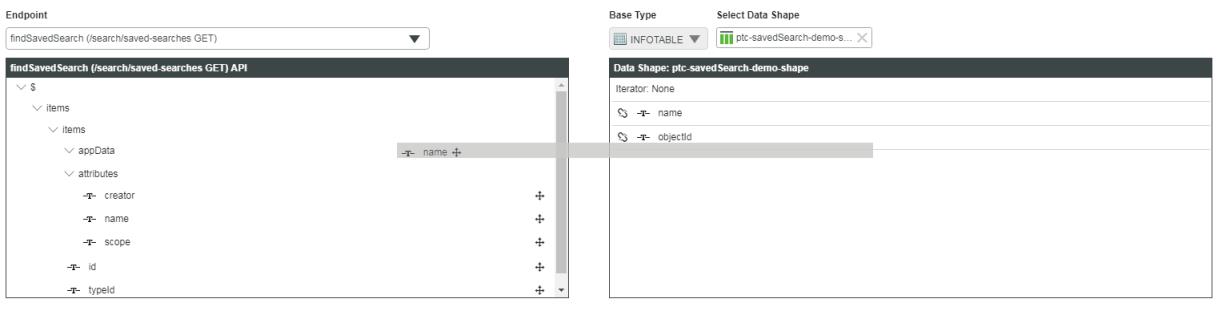
8. Drag the name attribute from the Endpoint tree to the name attribute of the Data Shape.
9. Drag id from the Endpoint tree to the objectid attribute of the Data Shape. Your new API map should look like this:
10. Click Done, and then on the Search_Get_SavedSearches Route page, click Save and Continue.
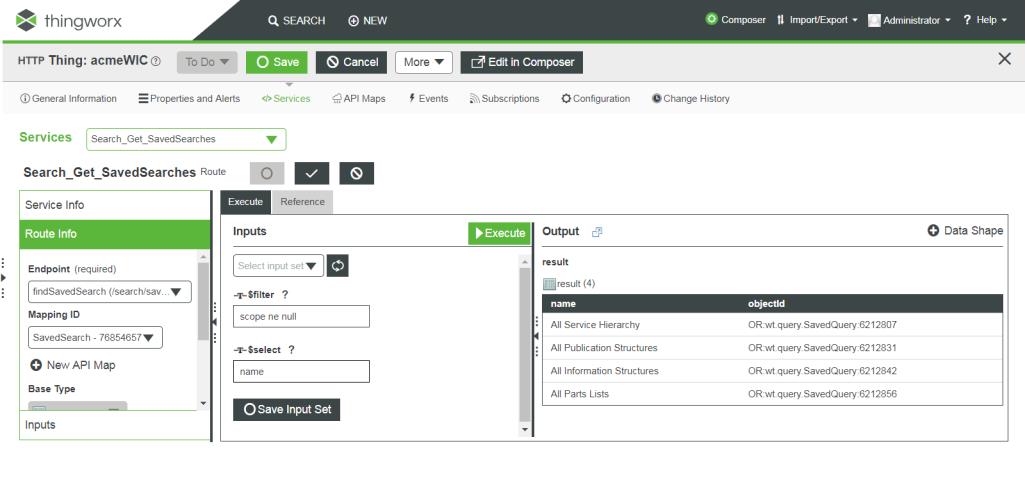
11. Test the service by typing the following under Inputs:
◦ $filter—scope ne null
◦ $select—name
Click Execute. Under Output, the global saved searches appear in the results table:
12. Click Done. The Route is updated.
Add a new local service: Execute Saved Search
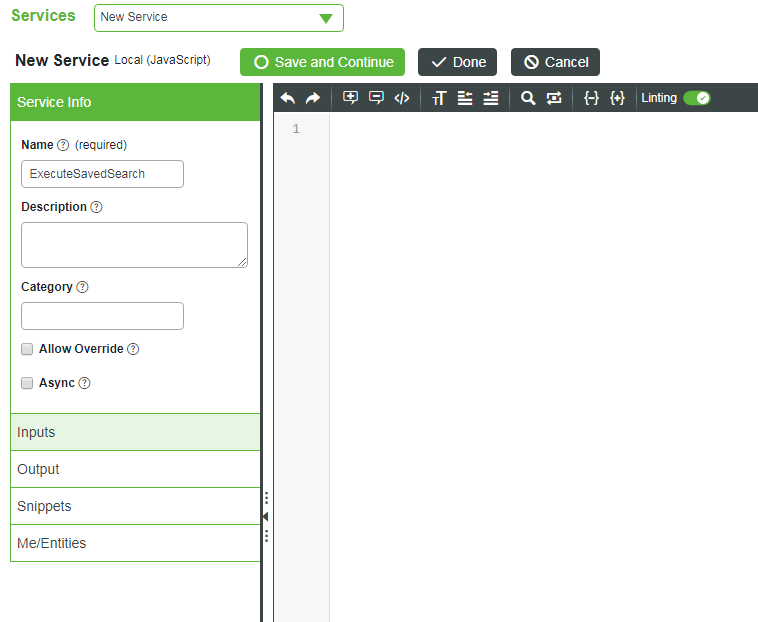
1. On the Services page, click +Add, and then select Local (JavaScript). The New Service page opens.
2. In Service Info, under Name, type ExecuteSavedSearch.
3. Click the Inputs section, and then click +Add.
4. In the New Input dialog box, name this input oid, and make sure the Base Type is set to STRING.
5. Click Done.
6. In the Output section, set these parameters:
◦ Type of output—INFOTABLE
◦ Data Shape—ptc-part-demo-shape
7. In the Snippets tool, copy this code:
// result: JSON
var csrf_token = me.Security_Get_CSRF().items[0].attributes.nonce;
var params = {
infoTableName : "InfoTable",
dataShapeName : "ptc-part-demo-shape"
};
// CreateInfoTableFromDataShape(ptc-part-demo-shape)
var result = Resources["InfoTableFunctions"].CreateInfoTableFromDataShape(params);
var select = "";
// infotable datashape iteration
var dataShapeFields = result.dataShape.fields;
for (var fieldName in dataShapeFields) {
select += ',' + fieldName;
}
// result: JSON
var searchResult = me.Search_Get_SavedSearch_Results({
arguments: undefined /* JSON */,
oid: oid /* STRING */,
CSRF_NONCE: csrf_token /* STRING */,
$select: select /* STRING */
});
var row = {};
for each (var hit in searchResult.items) {
row = hit.attributes;
row.objectId = hit.id;
result.AddRow(row);
}
8. Click Done.
Add a new local service: Get Viewable Links
1. Back on the Services page, click > again, to add another new service.
2. Under Service Info, name the service GetViewableLinks.
3. Click Inputs, and then add this input:
◦ Name—oid
◦ Base Type—STRING
4. Click Done.
5. Click Output, and then set this output:
◦ INFOTABLE
◦ Data Shape—ptc-creoview-info-shape
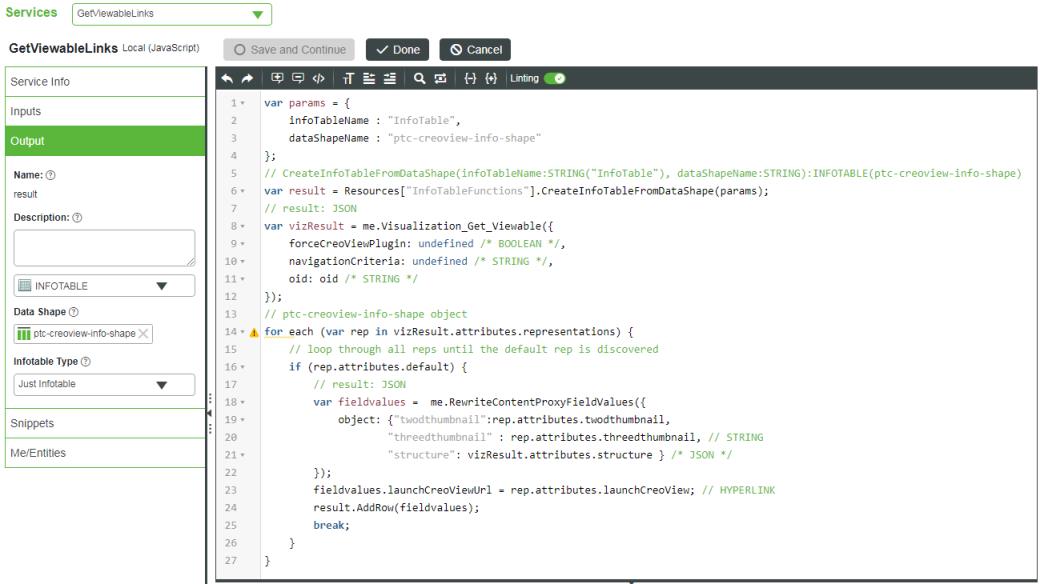
6. In the Snippets tool, copy this code:
var params = {
infoTableName : "InfoTable",
dataShapeName : "ptc-creoview-info-shape"
};
// CreateInfoTableFromDataShape(infoTableName:STRING("InfoTable"), dataShapeName:STRING):INFOTABLE(ptc-creoview-info-shape)
var result = Resources["InfoTableFunctions"].CreateInfoTableFromDataShape(params);
// result: JSON
var vizResult = me.Visualization_Get_Viewable({
forceCreoViewPlugin: undefined /* BOOLEAN */,
navigationCriteria: undefined /* STRING */,
oid: oid /* STRING */
});
// ptc-creoview-info-shape object
for each (var rep in vizResult.attributes.representations) {
// loop through all reps until the default rep is discovered
if (rep.attributes.default) {
// result: JSON
var fieldvalues = me.RewriteContentProxyFieldValues({
object:
{"twodthumbnail":rep.attributes.twodthumbnail,
"threedthumbnail" :
rep.attributes.threedthumbnail, // STRING
"structure":
vizResult.attributes.structure } /* JSON */
});
fieldvalues.launchCreoViewUrl = rep.attributes.launchCreoView; // HYPERLINK
result.AddRow(fieldvalues);
result.AddRow(fieldvalues);
break;
}
}
Your service now looks like this:
7. Click Done. The service is created.
8. Now, click Save to save your connector.
Create a new mashup and set the layout
With the integration connector ready, it’s time to build the mashup for the task.
1. In the upper menu of ThingWorx Composer, click + NEW. Start typing mashup, and then select Mashup from the list.
2. Define the new mashup:
◦ Mashup Type—Page
◦ Layout Options—Responsive
Click Done.
3. On the General Information page, type a name for the mashup, and then click Save.
4. Click Design. The mashup builder opens.
5. From the Widgets tab, drag Layout to the workspace of the mashup builder. The Configure Widget dialog box opens.
| You can type the name in the box to quickly get the widget without scrolling through the list. |
6. Click Horizontal, and then under Layout Options, configure this layout:
◦ Left Sidebar—Selected
◦ Columns—1
7. Click Done.
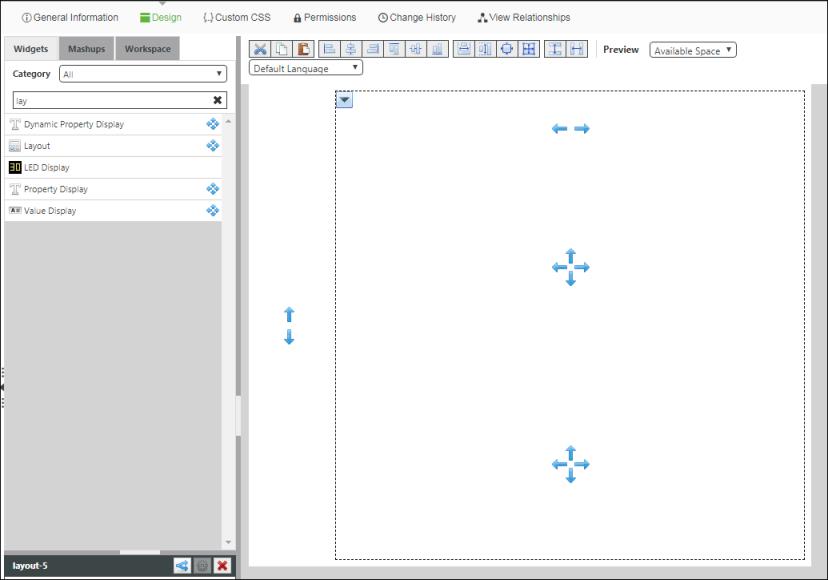
8. Drag another layout into the column area. Define these options:
◦ Vertical
◦ Header
◦ Rows—2
Here’s your mashup so far:
Now, we’ll add widgets.
Add widgets to the layout
You now have the basic framework of your task. Next, add widgets to define the visual components for each panel.
1. Search for and drag these widgets to the following locations:
◦ List—Left sidebar. Displays a list of saved searches from Windchill. When you select an item from the list, its details appear in the Grid panel.
◦ Grid—Top row of the right-hand layout. Shows the details of the item that the user selects.
◦ Panel—Bottom row of the right-hand layout. Shows a 3D visualization of the part or assembly, with a display of the properties for the selected parts.
2. Select the Panel widget, and then drag a Property Display widget to the left side of the panel.
3. Drag a ThingView widget to the right side of the same panel, next to Property Display. This widget shows a 3–D view of the selected item.
The user interface of the task is ready. Continue to the next section to add services.
Add services
Now that we have the widgets in place, the user interface is built. We’ll connect sources of information using the integration connector we created earlier, sample-connector. In the next step, we’ll add the data source and the services that we need to make the mashup work.
1. On the
Data tab, in the upper-right panel of the mashup builder, click

to add a new data source. The
Add Data dialog box opens.
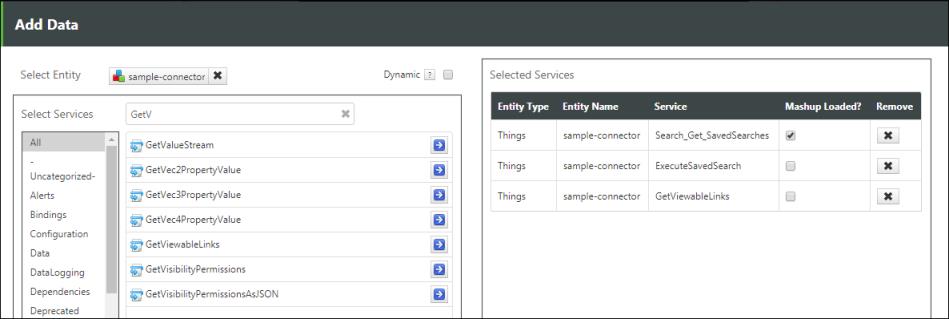
2. In the Search entities box, start typing the name of your integration connector, such as sample-connector.
3. From the results, select the integration connector. The services available for that entity appear on the left.
4. Find these services, and then click

to select each service:
◦ Search_Get_SavedSearches
◦ ExecuteSavedSearch
◦ GetViewableLinks
The services are added to the list under Selected Services.
5. Under Selected Services, for Search_Get_SavedSearches, select the Mashup Loaded? check box. When selected, saved searches from Windchill appear as soon as the mashup is loaded.
6. Click Done.
Connect the services to the widgets
The data services are in place, along with the elements of the user interface. In the next steps, we’ll connect everything.
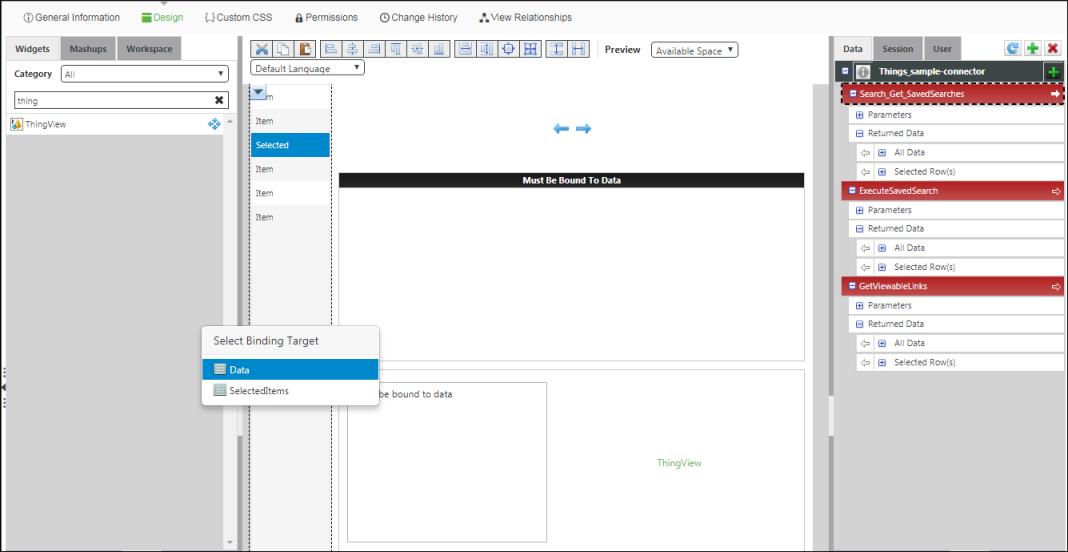
1. On the Data panel, under Search_Get_SavedSearches, expand the Returned Data section.
2. Drag All Data into the List widget. This returns all the data found in a saved search.
3. For the Select Binding Target, select Data. A connection diagram appears at the bottom of the composer.
| This step replaces manual client-side Java scripting required in earlier versions of ThingWorx. |
4. Next, we can configure the widget. Set these parameters in the list widget:
◦ AutoSelectFirstRow—Selected
◦ DisplayField—name
◦ ValueField—objectid
◦ DisplayName—Saved Searches
| Click outside the text box to save each entity. |
Bind data between services
Some of the services rely on the data from another service. For example, when the user selects a saved search from the list, we want it to be executed. In the next steps, we’ll create these connections between the services. This is referred to as binding. We’ll also bind services to widgets, such as connecting ExecuteSavedSearch to entering a keyword in the search box.
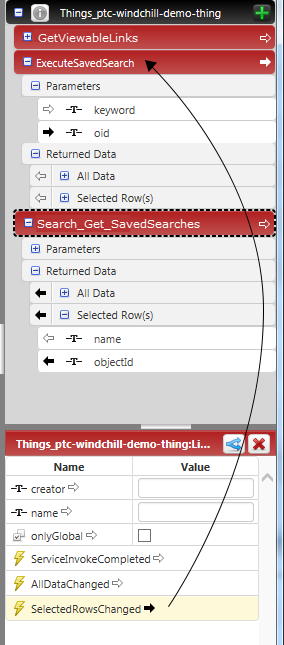
1. Under ExecuteSavedSearch, expand Parameters.
2. Under Search_Get_SavedSearches, expand Returned Data, and then expand Selected Row(s).
3. Under Selected Row(s), drag objectId to oid, which is in the Parameters section of ExecuteSavedSearch.
The first connection is complete.
4. For the second connection, select Search_Get_SavedSearches.
5. Then, drag SelectedRowsChanged from the bottom of the panel to ExecuteSavedSearch.
This connection executes the ExecuteSavedSearch service when the user selects a row in the list.
For the next connection, bind data to the grid and the ThingView widget.
1. Under ExecuteSavedSearch, drag All Data to the grid widget.
2. To bind the data, under Select Binding Target, select Data.
3. If you want to change the display of columns, in the grid widget, hover over

, and then click
Configure Grid Columns. The
Configure Widget dialog box opens, and you can configure the order, formatting, display, and other attributes.
4. Expand ExecuteSavedSearch, and then expand Selected Rows. Drag the objectId output to the input parameter oid under GetViewableLinks.
5. Expand GetViewableLinks, and then expand All Data. Drag the structure output parameter to the ThingView widget.
6. Under Select Binding Target, select ProductToView.
The next step is to connect the search functionality. The ExecuteSavedSearch service calls Search_Get_SavedSearch_Results. This route has an optional input parameter we can use to allow the user to specify a keyword for the search. Create the JSON object:
1. Open your connector. For our example, it’s sample-connector.
2. Click Services. The Services page opens.
3. Open Search_Get_SavedSearch_Results.
4. In the Inputs section, under arguments, paste the following:
{
"keyword": "<my search keyword string>",
"searchType": "wt.doc.WTDocument or WCTYPE|wt.doc.WTDocument",
"maxResults": 200
}
5. Enter the following required input parameters. You can obtain them from Windchill, in the details of your saved searches.
◦ oid
◦ CSRF_NONCE
6. Click Save Input Set, and then type a name for the input set.
7. Click Save Input Set again, and then click Save to save the connector.
8. From the Services dropdown menu, select ExecuteSavedSearch. ExecuteSavedSearch opens.
9. Under Inputs, click Add. The New Input dialog box opens.
10. Under Name, type searchTerm.
11. Under Base Type, select TEXT.
12. Click Done.
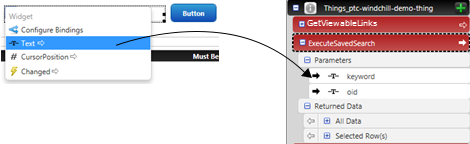
13. Expand ExecuteSavedSearch, and then expand Parameters.
14. Select the text box widget, and then click the arrow to open the list. Drag Text to keyword, under ExecuteSavedSearch.
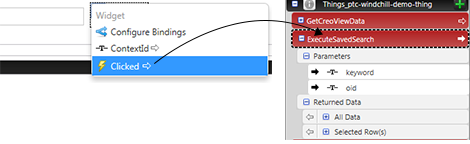
15. Back in the search box panel, select the button widget, and from the list, drag Clicked to ExecuteSavedSearch.
16. Let’s add labels for the search box and the button. Select each element, and then choose Label from the menu. Type a name for each entity, such as these:
◦ Text box—Items to find
◦ Button—Find
17. Save your changes.
Check your connections
Here are the connections you should see at this point. Select each entity below to see its connection:
List widget
ExecuteSavedSearch
Search_Get_SavedSearches
Display the part structure as a table
To show the part structure in our table widget, you’ll connect the part structure data to the grid widget. Note that in this step, we’re dragging in the opposite direction from before—from the service to the widget.
1. Under ExecuteSavedSearch, expand Returned Data, and then drag All Data to the grid widget.
2. Under Select Binding Target, select Data.
3. Now that the data is connected to the grid, we’ll set up the table. Select the grid widget, and then choose Configure Grid Columns from the menu.
4. Under Configure Widget, select and reorder the properties to show.
5. Save your changes.
Show the viewable when the item is selected
Our task will show an item’s viewable when the item is selected in the grid. To set this, let’s connect the structure data to the Creo View widget, and then we can set the widget to update dynamically when the user selects another item.
1. Under the GetCreoViewData service, under Returned Data, expand All Data, and then select structure. Drag it to the Creo View widget.
2. Under Select Binding Target, select ProductToView.
3. To configure the dynamic update, select ExecuteSavedSearch. Then, in the lower-left pane, drag SelectedRowsChanged to the service GetCreoViewData.
4. Click Save.
Add a link to open the item in Creo View
To give your users a quick way to open the 3D viewable file, we’ll add a link to open it in Creo View. To use this service, your users must have Creo View installed, or they must have access through Windchill to Creo View Lite.
1. Under GetCreoViewData, expand Returned Data and All Data.
2. Select launchCreoViewUrl, and then drag it to the link widget.
3. Under Select Binding Target, select SourceURL.
4. We also need to connect the item’s Windchill object ID to the service: Under GetCreoViewData, expand Parameters.
5. Then, under ExecuteSavedSearch, expand Returned Data, then Selected Row(s).
6. Select objectId and drag it to the oid parameter under GetCreoViewData.
7. Finally, we’ll name the link. Select the link widget, and then choose Text. Type text for the link, such as View item in Creo View.
8. Click Save.
Show an item’s properties when it is selected in the table
Your search results table shows some of the item’s properties. To add a more detailed list of properties, let’s connect the property display widget, and then we’ll select the properties to show.
1. Under ExecuteSavedSearch, expand Returned Data, and then select Selected Row(s).
2. Drag Selected Row(s) from the service to the property display widget.
3. Under Select Binding Target, select Data.
4. Now that the display widget is connected to the data, we can select the properties to show: Select the widget, and then click the arrow in the upper-left corner.
5. Choose Configure Widget from the menu.
6. Under Configure Widget, select and reorder the properties to show.
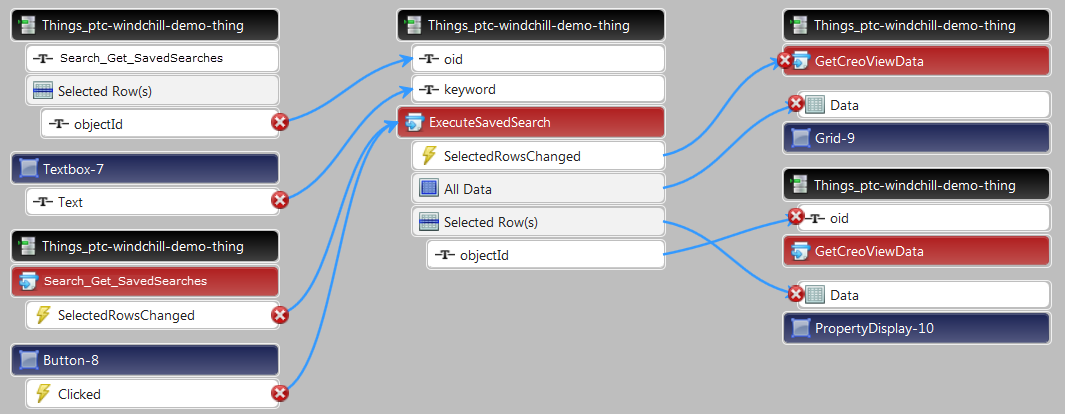
Check your connections again
At this point, these are the connections you should see. Select each entity that follows to see its connections:
GetCreoViewData
ExecuteSavedSearch
ListSavedSearch
Save and name the mashup, then view our new task
We’re almost finished. In these last steps, we’ll name and save the mashup, and then we’ll view your new ThingWorx Navigate task.
1. Click Save.
2. Under General Information, type a name for the task in the Name box.
3. Click View Mashup. Your new task opens. Congratulations!
You can now add your task to the ThingWorx Navigate home page, and add tailoring. See the next topic, “Add a Custom Task to Your Homepage.”
Need more information? Here are some resources