License ThingWorx Navigate
The ThingWorx Navigate License Setup tool opens automatically after the installation is completed successfully. This tool helps you download and deploy your license. The file name of the tool is ThingWorxNavigateLicensingConfigurator-{version}-{operating system}-installer.exe.
If you need to open ThingWorx Navigate License Setup manually, you can find it in this location:
<Navigate_installation_Directory>\ThingworxNavigate\NavigateInstallers
The method you use to obtain the license depends on whether your site has an internet connection. For both methods, you need credentials for the PTC Support Site.
Licensing for systems with an internet connection
If your site has an internet connection, you can get your license automatically by connecting to the PTC license server.
1. On the Configure your license screen, select Yes, we’re connected, and then click Next.
2. Provide your PTC Support credentials:
◦ User name—Usually your e-mail address
◦ Password
3. Click Next. Your license is automatically downloaded and deployed.
Offline sites
During the installation, your Device ID was generated for your ThingWorx instance. You need this Device ID to generate a license from the PTC License Management site. Then, import the file on the server where you installed ThingWorx Navigate:
1. On the Configure your license screen, select No internet connection on this system, and then click Next. The Import ThingWorx Navigate license file page opens.
2. Under Copy your Device ID, click Copy to file. Your Device ID is copied to a text file.
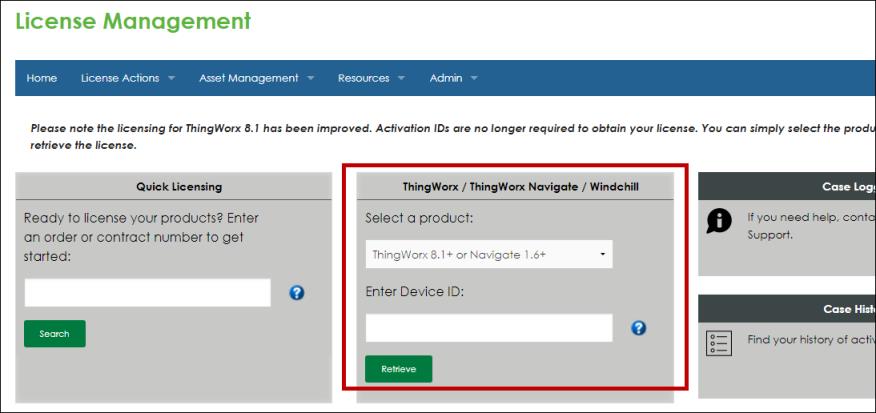
4. Find the section for ThingWorx / ThingWorx Navigate / Windchill:
5. Under Select a product, select the release you installed.
6. Under Enter Device ID, enter your Device ID.
7. Click Retrieve. The license file is generated and downloaded. This process can take a minute or two.
8. Rename the downloaded license file with this name: license_capability_response.bin, and then transfer the renamed license back to the server where you installed ThingWorx Navigate.
9. Back in the licensing tool, under
Provide your license, click

, and then browse to
license_capability_response.bin.
10. Click Next. Your license is deployed.
For more help with offline licensing, you can also check the
ThingWorx Licensing Guide for disconnected sites.
Next steps
If you’re updating licenses for an existing setup of ThingWorx Navigate, then you’re done.
If you’re setting up ThingWorx Navigate for the first time, the next task is configuration:
• Configure now—Your system meets all the prerequisites for configuration and you want to keep going with the setup. Let’s do it. Select the check box and click Close. The configuration tool opens automatically.
• Configure later—If you’d rather return to the configuration later, clear the Configure now check box, and then click Close.
| ThingWorx Navigate is not ready to use until you complete the configuration. |
Skip licensing
You can run ThingWorx Navigate on a temporary license to continue with the setup:
• You don’t have access to your license file yet.
• You don’t have PTC Support credentials yet.
• You’re having trouble connecting to the PTC License Server.
The temporary license is included with the product download. It contains 10 seats, and it’s valid for 30 days. You must update to a paid license during the 30-day period. After your trial license expires, you cannot use the installation tools to complete your installation.
Update your trial license to a paid license
During your 30-day trial period, you can follow the steps below to update to a paid license:
1. Open the ThingWorx Navigate License Setup tool from this location:
<Navigate_installation_directory>\ThingworxNavigate\NavigateInstallers\ThingworxNavigateLicensingConfigurator-{version}-{operating system}-installer
2. Click Next.
Then, provide the location of the ThingWorx installation:
1. Next to
Path, click

. The
Browse for Folder dialog box opens.
2. Select the location, and then click OK.
3. Click Next.
Apache Tomcat is automatically restarted after this step.
Next, get the ThingWorx Application Key
1. Click the link, Click here to get the Application Key. ThingWorx Composer opens in a browser window.
2. On the Browse tab, under SECURITY, click Application Keys. The list of application keys opens on the right.
3. Click the name of your App Key to open it.
4. Under Key ID, copy the value.
5. Back in the ThingWorx Navigate License Setup tool, paste the value in the box next to Application KeyId.
6. Click Next.
Continue to a method for obtaining your license:
• Yes, we’re connected—Go to the section above, “Licensing for systems with an internet connection.”
• No internet connection on this system—Go to the section above, “Offline sites.”
Troubleshoot licensing
If there is a problem with licensing, check the ThingworxNavigateLicensingConfigurator-install logs at this location:
<Navigate_installation_directory>\ThingworxNavigate\
If you are unsure about the status of your license, follow these steps to check whether you have the full, paid license or a limited, trial license:
In ThingWorx Composer, under Monitoring, click > . Check your licensed entities:
• A list of licensed entities appears—You have a full license deployed.
• No entities appear—You are running a trial license.


 , and then browse to license_capability_response.bin.
 . The Browse for Folder dialog box opens.