Configure ThingWorx Navigate with a Clustered Windchill Environment
You can use ThingWorx Navigate with a clustered Windchill environment. Use the URL of the load balancer to connect ThingWorx Navigate to Windchill. The URL to use depends on these conditions:
• ThingWorx Navigate configuration—Single sign-on or Windchill authentication
• Windchill basic configuration—HTTP or HTTPS protocol
This topic contains a basic refresher on the clustered environment and examples of configurations with ThingWorx Navigate.
|
|
There are security factors you must consider when you use a Windchill cluster in a ThingWorx Navigate configuration. Make sure to review the details below before you use a cluster configuration in production.
|
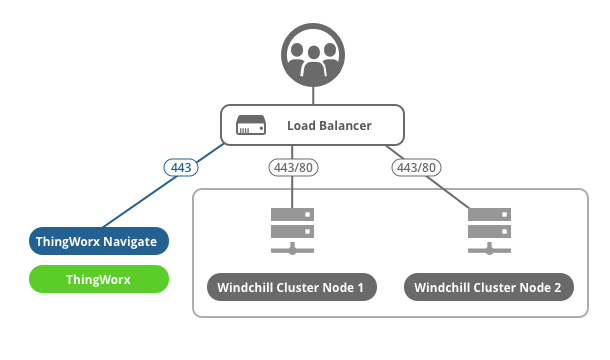
Diagram of ThingWorx Navigate configured with a Windchill cluster
Background on Windchill clusters
The main advantages of using a cluster are increased performance, scalability, and reliability. A cluster has these components:
• Two or more application-tier hosts that are connected to a single database instance and that are fronted by a load-balancing router.
• Load-balancing router—Takes requests from clients, including Windchill users and ThingWorx Navigate users. The load balancer distributes the requests among one of the Windchill instances. As a result, the users are less affected if a server crashes or traffic is high.
To the rest of the network, this router appears as a single Windchill server. It has its own hostname, and it should always use an HTTPS protocol.
For more information on clusters, see the chapter “Installing and Configuring a Cluster Windchill Environment” in the
Windchill Help Center.
In the sections that follow, you’ll find four examples of how to configure a Windchill cluster for each of the authentication configurations for ThingWorx Navigate. We recommend single sign-on for ThingWorx Navigate; it is the most secure configuration. The other configurations require additional setup and security considerations, to ensure an end-to-end solution is configured.
ThingWorx Navigate Single sign-on with a Windchill cluster configured with HTTPS and OAuth (recommended)
This is the most secure setup. Your configuration details follow:
• ThingWorx Navigate authentication type—SSO
• Load balancer protocol—HTTPS
• Windchill servers—HTTPS and OAuth configured. SAML authentication is optional.
Since Windchill is HTTPS, no SSL certificate termination occurs at the load balancer.
Verify the URL of the load balancer in these places in ThingWorx Composer:
For ptc-windchill-integration-connector, the Base URL is [https]://[LB-host]:[port]/[windchill-web-app]/oauth
For ptc-windchill-integration-connector-proxy:
• Base URL—[https]://[LB-host]
• Test Connection URL—[https]://[LB-host]:[port]/[windchill-web-app]/oauth/servlet/WindchillAuthGW/wt.httpgw.HTTPServer/echo
ThingWorx Navigate Single sign-on with a Windchill cluster configured with HTTP and OAuth
Your configuration details follow:
• ThingWorx Navigate authentication type—SSO
• Load balancer protocol—HTTPS
• Windchill servers—HTTP and OAuth configured. SAML authentication is optional.
Since Windchill is HTTP, the SSL certificate termination occurs at the load balancer.
Verify the URL of the load balancer in ThingWorx Composer.
For ptc-windchill-integration-connector, the Base URL is [https]://[LB-host]:[port]/[windchill-web-app]/oauth.
For ptc-windchill-integration-connector-proxy:
• Base URL—[https]://[LB-host]
• Test Connection URL—[https]://[LB-host]:[port]/[windchill-web-app]/oauth/servlet/WindchillAuthGW/wt.httpgw.HTTPServer/echo
ThingWorx Navigate with Windchill Authentication, with a Windchill cluster configured with HTTPS
| Using certificates in a 2-way SSL configuration ensures encryption and secure data transfer. This is enforced with validation on both sides to confirm the connection and communication between ThingWorx/ThingWorx Navigate, and Windchill. Because we support only Windchill as the Identity Provider, the sharing of credentials is limited to only ThingWorx and Windchill. |
Your configuration details follow:
• ThingWorx Navigate authentication type—Windchill Authentication with 2-way SSL
• Load balancer protocol—HTTPS
• Load balancer type—Layer 4
• Windchill servers—HTTPS and 2–way SSL configured
Since Windchill is HTTPS, no SSL certificate termination happens at the load balancer.
Verify the URL of the load balancer in ThingWorx Composer. For ptc-windchill-connector and ptc-windchill-connector-proxy, this is the correct format:
https://<loadbalancer_host>:port>/Windchill/sslClientAuth
| Only a Load Balancer operating at OSI Layer 4 can support this configuration. If you are using Load Balancer operating at OSI Layer 7, you must use Windchill Authentication with the Trusted Host configuration described below. |
ThingWorx Navigate with Windchill Authentication, with a Windchill cluster configured with HTTP
| This alternative configuration is not recommended, and you should only use it for demo and proof-of-concept purposes. The configuration connects ThingWorx Navigate and Windchill without SSO or SSL. Instead, the Trusted Host property is configured. Using a Trusted Host opens the connection between the ThingWorx platform and Windchill to allow all communication from the identified Trusted Host’s IP address. This adds a risk of Man in the Middle (MIM) attacks. Sensitive information is exposed over this connection. In addition, even though your system might be behind a firewall, there is risk from internal attacks and network misconfigurations. If an attacker breaches one of these network boundaries, the attacker has direct visibility to the non-encrypted information being shared. That adds risk to the existing Windchill product and the ThingWorx Navigate configuration. It is your responsibility to determine if you are willing to accept the risk of using this setup. PTC does not recommend this configuration, and PTC does not take responsibility for any security breaches or attacks on systems configured using the Trusted Host option. |
Your configuration details follow:
• ThingWorx Navigate authentication type—Windchill authentication
• Load balancer protocol—HTTPS
• Windchill servers—HTTP and trustedHost property configured. Instructions for configuring this property are below.
Since Windchill is HTTP, the SSL certificate termination occurs at the load balancer.
In addition to the steps below, make sure you perform the required steps in the section “Complete the Windchill cluster configuration” at the end of
Set Up ThingWorx Navigate with Windchill Authentication.
In the ThingWorx Navigate Configuration tool, provide this URL in the field for Windchill:
https://<loadbalancer_host>:port>/Windchill/trustedAuth
In addition, there are several manual steps to perform on the Windchill side. We need to establish the IP addresses of the ThingWorx server and the load balancer as trusted hosts. In this way, we safeguard the ThingWorx Navigate connection to Windchill using the load balancer.
This also improves security by preventing untrusted client hosts from reaching the Windchill/trustedAuth/ URL pattern through the load balancer.
Follow these steps on the Windchill side:
1. Stop the Windchill method server.
2. Go to WT_HOME/codebase/WEB-INF/web.xml, and then open it in a text editor.
3. Find the sections TrustedSSLAuthFilter and TrustedAuthFilter, and then add the parameter clientHostHeader as below, in both sections. For example:
<filter>
<description>Filter allowing a trusted SSL certificate to specify the remote user for the request</description>
<filter-name>TrustedSSLAuthFilter</filter-name>
<filter-class>wt.httpgw.filter.TrustedAuthFilter</filter-class>
<init-param>
<param-name>trustTrustedHosts</param-name>
<param-value>false</param-value>
</init-param>
<init-param>
<param-name>clientHostHeader</param-name>
<param-value>X-Forwarded-For</param-value>
</init-param>
</filter>
<filter>
<description>Filter allowing a trusted client to specify the remote user for the request</description>
<filter-name>TrustedAuthFilter</filter-name>
<filter-class>wt.httpgw.filter.TrustedAuthFilter</filter-class>
<init-param>
<param-name>clientHostHeader</param-name>
<param-value>X-Forwarded-For</param-value>
</init-param>
</filter>
4. Add the parameter TrustedHostFilter to the same file. For example:
<filter>
<description>Filter allowing a trusted client to specify the remote user for the request</description>
<filter-name>TrustedHostFilter</filter-name>
<filter-class>wt.servlet.TrustedHostFilter</filter-class>
</filter>
<filter-mapping>
<filter-name>TrustedHostFilter</filter-name>
<url-pattern>/trustedAuth/*</url-pattern>
</filter-mapping>
5. Save and close web.xml.
6. Now, open the Windchill shell in a command prompt.
7. If wt.auth.trustedHosts is not already added, add the property below to xconf.properties:
<Property name="wt.auth.trustedHosts" overridable="true"
targetFile="codebase/wt.properties"
value="<TWXHost_IP> <LBHost_IP>">
TWXHost is the ThingWorx host name, and LBHost is the load balancer host name.
8. Run xconfmanager -p.
9. If wt.auth.trustedHosts is not set in the wt.properties file, set the property using the following xconfmanager command. Or, add it directly in wtproperties:
xconfmanager --set wt.auth.trustedHosts==<TWXHost_IP> <LBHost_IP> -t codebase/wt.properties -p
TWXHost is the ThingWorx host name, and LBHost is the load balancer host name.
10. Start the Windchill Method Server.
Windchill is now configured with the trustedHost property.
| If you need more help using xconfmanager, search for the topic “Using the xconfmanager Utility” in the Windchill Help Center. |