Example: Create a Custom Task for ThingWorx Navigate
In the sections below, we’ll go through building a custom task from start to finish in ThingWorx Composer. With our example task, users search for Windchill data and receive the results in a table. When they select an item from the table, they’ll see more properties in a table below, and they’ll see an interactive 3D representation of the item. They can click a link to open the representation in Creo View. Here’s how it will look when we’re done:
This example shows you how to combine the building blocks of a task into a working mashup. You may find that many of the services your organization needs are already included with the demo mashup and the WindchillSwaggerConnector.
As a result, you can assemble many custom tasks using only the
ThingWorx user interface and these out-of-the-box services. If you need to write your own services, we have steps for some commonly-used services that you may find helpful. Check the Windchill Extension guide on the PTC
Reference Documents site.
But first, let’s try building the example task.
Create a new mashup in ThingWorx Composer
It’s helpful to plan the layout of your task before you start. Then you know how many panels you’ll need, what services will go in them, and how they will be laid out.
1. Under VISUALIZATION, click Mashups, and then click the New button. The New Mashup dialog box opens.
2. Under Mashup Type, select Page.
3. Under Layout Options, select Responsive, and then click Done. The mashup editor opens.
4. On the Widgets tab, select Panel, and then drag the panel to the layout preview area. Drag additional panel widgets and adjust their size until you get the layout you’ve planned. In our example, use the layout in the picture above.
Add widgets to the panels
You now have the basic framework of your task. Next, we’ll add widgets to define the visual components for each panel.
1. Drag a widget to each panel. For this example, we’ll add these widgets:
◦ List—Displays a list of saved searches from Windchill. When you select an item from the list, its details will appear in the Grid panel.
◦ Text Box—Gives your users the ability to do another search.
◦ Button—Runs the search.
◦ Grid—Shows the details of the item that the user selects.
◦ Property Display—Shows the attributes of the selected item in the Grid panel.
◦ Creo View—Shows a 3–D view of the selected item.
◦ Link—Opens the selected item in the Creo View client application.
Add data sources and services
Now that we have the widgets in place, the user interface is built. We need to provide them sources of information. This example task uses our out-of-the-box data source, ptc-windchill-demo-thing. In the next step, we’ll add the data source and the services that we need to make the mashup work.
1. On the Data tab, in the upper-right panel of ThingWorx, click the plus sign to add a new data source. The Add Data dialog box opens.
2. In the Search entities box, start typing the data source you need. For our example, we’ll type ptc-windchill.
3. From the results, select the data source. For this example, it’s ptc-windchill-demo-thing. The services available for that entity appear on the left.
4. Click the blue arrow button to add the services you need. For the example mashup here, we’ll select these services:
◦ GetCreoViewData
◦ ExecuteSavedSearch
◦ ListSavedSearches
In the example, we want to show saved searches from Windchill as soon as the mashup is loaded. To do this, select the Mashup Loaded? check box for ListSavedSearches.
5. After you select all the services you need, click Done.
Connect the services to the widgets
The data services are in place, along with the elements of the user interface. In the next steps, we’ll connect everything.
1. On the Data panel, under ListSavedSearches, expand the Returned Data section.
2. Drag All Data into the List widget. This will return all the data found in a saved search.
3. For the Binding Targets, select Data. A connection diagram appears at the bottom of the composer.
| This step replaces manual client-side Java scripting required in earlier versions of ThingWorx. |
4. Next, we can configure the widget. Set these parameters in the list widget:
◦ DisplayField—name
◦ ValueField—objectid
◦ Label—Saved Searches
| Click outside the text box to save each entity. |
Bind data between services
Some of the services rely on the data from another service. For example, when we select a saved search from the list, we want it to be executed. In the next steps, we’ll create these connections between the services, called binding. We’ll also bind services to widgets, such as connecting ExecuteSavedSearch to entering a keyword in the search box.
1. Under ExecuteSavedSearch, expand Parameters.
2. Under ListSavedSearches, expand Returned Data, and then expand Selected Row(s).
3. Under Selected Row(s), drag objectId to oid, which is in the Parameters section of ExecuteSavedSearch.
The first connection is complete.
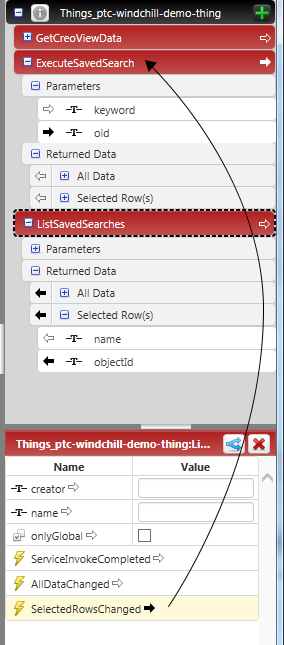
4. For the second connection, select ListSavedSearches.
5. Then, drag SelectedRowsChanged from the bottom of the panel to ExecuteSavedSearch.
Now we’ll connect the search functionality. The input in the text box will connect to the input parameter keyword, and the button will connect to the service to get the data.
1. Expand ExecuteSavedSearch, and then expand Parameters.
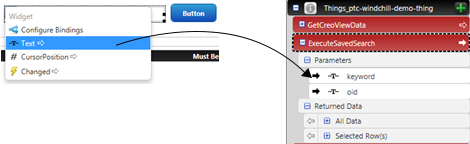
2. Select the text box widget, and then click the arrow to open the list. Drag Text to keyword, under ExecuteSavedSearch.
3. Back in the search box panel, select the button widget, and from the dropdown menu drag Clicked to ExecuteSavedSearch.
4. Let’s add labels for the search box and the button. Select each element, and then choose Label from the menu. Type a name for each entity, such as these:
◦ Text box—Items to find
◦ Button—Find
5. Save your changes.
Check your connections
Here are the connections you should see at this point. Select each entity below to see its connection:
List widget
ExecuteSavedSearch
ListSavedSearches
Display the part structure as a table
To show the part structure in our table widget, you’ll connect the part structure data to the grid widget. Note that in this step, we’re dragging in the opposite direction from before—from the service to the widget.
1. Under ExecuteSavedSearch, expand Returned Data, and then drag All Data to the grid widget.
2. Under Select Binding Target, select Data.
3. Now that the data is connected to the grid, we’ll set up the table. Select the grid widget, and then choose Configure Grid Columns from the menu.
4. Under Configure Widget, select and reorder the properties to show.
5. Save your changes.
Show the viewable when the item is selected
Our task will show an item’s viewable when the item is selected in the grid. To set this, let’s connect the structure data to the Creo View widget, and then we can set the widget to update dynamically when the user selects another item.
1. Under the GetCreoViewData service, under Returned Data, expand All Data, and then select structure. Drag it to the Creo View widget.
2. Under Select Binding Target, select ProductToView.
3. To configure the dynamic update, select ExecuteSavedSearch. Then, in the lower-left pane, drag SelectedRowsChanged to the service GetCreoViewData.
4. Click Save.
Add a link to open the item in Creo View
To give your users a quick way to open the 3D viewable file, we’ll add a link to open it in Creo View. To use this service, your users must have Creo View installed, or they must have access through Windchill to Creo View Lite.
1. Under GetCreoViewData, expand Returned Data and All Data.
2. Select launchCreoViewUrl, and then drag it to the link widget.
3. Under Select Binding Target, select SourceURL.
4. We also need to connect the item’s Windchill object ID to the service: Under GetCreoViewData, expand Parameters.
5. Then, under ExecuteSavedSearch, expand Returned Data, then Selected Row(s).
6. Select objectId and drag it to the oid parameter under GetCreoViewData.
7. Finally, we’ll name the link. Select the link widget, and then choose Text. Type text for the link, such as View item in Creo View.
8. Click Save.
Show an item’s properties when it is selected in the table
Your search results table shows some of the item’s properties. To add a more detailed list of properties, let’s connect the property display widget, and then we’ll select the properties to show.
1. Under ExecuteSavedSearch, expand Returned Data, and then select Selected Row(s).
2. Drag Selected Row(s) from the service to the property display widget.
3. Under Select Binding Target, select Data.
4. Now that the display widget is connected to the data, we can select the properties to show: Select the widget, and then click the arrow in the upper-left corner.
5. Choose Configure Widget from the menu.
6. Under Configure Widget, select and reorder the properties to show.
Check your connections again
At this point, these are the connections you should see. Select each entity below to see its connections:
GetCreoViewData
ExecuteSavedSearch
ListSavedSearch
Save and name the mashup, then view our new task
We’re almost finished. In these last steps, we’ll name and save the mashup, and then we’ll view your custom ThingWorx Navigate task.
1. Click Save.
2. Under General Information, type a name for the task in the Name box.
3. Click View Mashup. Your new task opens. Congratulations!
You can now add your task to the ThingWorx Navigate homepage, and add tailoring. See the next topic, “Add a Custom Task to Your Homepage.”
Need more information? Here are some resources