Example Configuration Using SSL for Secure Communications
The following example illustrates one way to configure Windchill and ThingWorx for trusted SSL communications. This example uses a self-signed certificate to secure communications between Windchill and ThingWorx, which is appropriate for environments where the communication occurs within the corporate firewall. Where traffic occurs on the Internet, a commercial trusted certificate is advised.
|
|
• These instructions rely on configuration scripts that come with the most recent version of the PTC HTTP Server. The most recent PTC HTTP Server is included with Windchill 11.0 M020 and the most recent CPS releases for Windchill 10.2.
• This example assumes that Windchill is already configured to use SSL.
• This example applies to the old Windchill Connector, WindchillConnector, which was used in PTC Navigate 1.4 and earlier.
• Old Windchill connectors can be used with ThingWorx Single Sign-on environment as well.
• The key used here does not need to be the same as that used for either the Windchill or ThingWorx web interface.
• Code examples have been reformatted to fit the page and could contain line numbers, hidden editing characters (such as tabs and end-of-line characters), and extraneous spaces. If you cut and paste code, check for these characters and remove them before attempting to use the example in your application.
|
1. Create a truststore for ThingWorx and import the Windchill certificate:
2. Create keystore for ThingWorx.
3. Configure Windchill to trust ThingWorx.
|
|
If ThingWorx and Windchill are on separate systems, step 3 a, b, c can be performed on the Windchill server. Then copy the *.jks files to the ThingWorx server.
|
a. Update PTC HTTP Server configuration to reference the CA certificates file.
a. Navigate to and edit <HTTPSERVER_HOME>/conf/extra/httpd-ssl.conf.
b. Uncomment the SSLCACertificateFile entry so that it refers to the ca-bundle.crt file. Note the location of the ca-bundle.crt file.
c. Save changes.
b. Add the ThingWorx certificate to PTC HTTP Server’s list of trusted CA certificates.
a. Edit the ca-bundle.crt file you pointed to previously in the SSLCACertificateFile entry.
|
|
If the file does not yet exist, create the file and any required directories.
|
b. Append the contents of the ThingWorx certificate (servercert.pem from step 2a above) held in the trust store to this file.
c. Save changes.
c. Configure PTC HTTP Server to export the certificate information to Windchill.
a. Edit <HTTPSERVER_HOME>/conf/extra/httpd-ssl.conf.
b. Find the line with SSLOptions.
c. Uncomment out the line with SSLOptions +ExportCertData.
For example:
SSLOptions +FakeBasicAuth +ExportCertData +StrictRequire<FilesMatch "\.(cgi|shtml|phtml|php)$"> SSLOptions +StdEnvVars/FilesMatch><Directory "C:/ptc/Windchill_10.2/HTTPServer/cgi-bin"> SSLOptions +StdEnvVars</Directory>
d. Save changes.
d. Configure PTC HTTP Server for the sslClientAuth URL.
a. Find the Windchill web app name in <windchill-home>/codebase/wt.properties in the entry wt.webapp.name.
b. Open a shell or command prompt and enter the following:
cd <HTTPSERVER_HOME>ant -f webAppConfig.xml -DappName=[windchill-web-app]
-Dresource=sslClientAuth -DresourceAuthType=sslClientAuth addAuthResource
c. Configure Windchill to trust the ThingWorx certificate.
a. Edit <windchill-home>/codebase/WEB-INF/web.xml.
b. Find <filter-name>TrustedSSLAuthFilter</filtername>.
c. Add another <init-param> element after the existing one where [thingworx-cert-name] is the name of the ThingWorx certificate. For a self-signed certificate, the certificate name is the Owner value for the certificate when running keytool -list -v -keystore <path-to-ThingWorxKeyStore.jks>:
<init-param><param-name>trustedSubjectPattern.1 </param-name><param-value>[thingworx-cert-name]</param-value>
</init-param>
d. Save changes.
4. Configure ThingWorx for SSL.
a. In ThingWorx Composer, edit the ptc-windchill-demo-thing thing template that represents the connection to the Windchill system being configured.
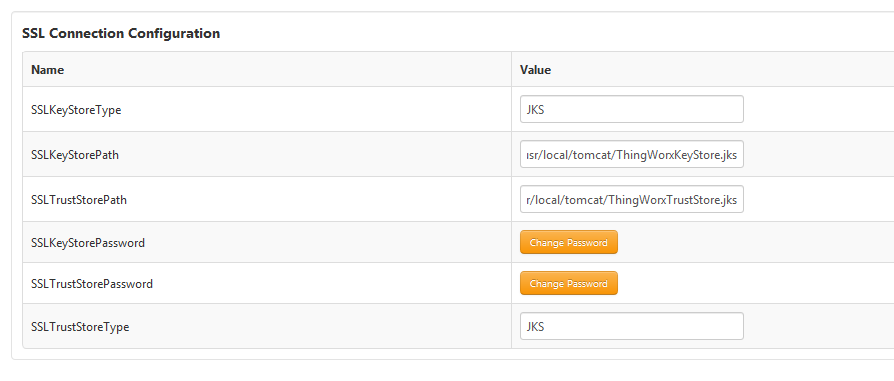
b. Specify path to ThingWorxKeyStore.jks (see example in screenshot), and also specify the password.
c. Specify path to ThingWorxTrustStore.jks (see example in screenshot), and also specify the password.
d. Specify the Windchillhttps address and SSL port.
e. Save the thing.
f. View the ThingWorx Application Log to verify that no configuration errors exist.
5. Launch ptc-connected-demo-mashup to verify the ThingWorx – Windchill trusted SSL configuration.