Demonstrate various ways to use PRN related functions and see the effect of the PRN system variables on the creation of .prn files.
1. On the Math Formatting tab, in the Results group, change the Display Precision to 10.
2. Use the identity function to define a matrix, then fill its first column with numbers.
3. Evaluate matrix M.
Display Precision is set to 10, so PTC Mathcad limits the display of all result numbers to 10 decimal fraction digits.
PRNPRECISION < PRNCOLWIDTH
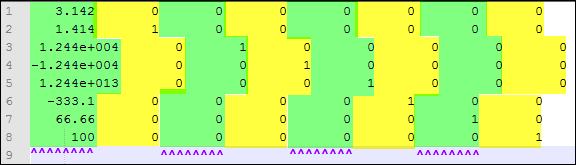
1. Evaluate PRNPRECISION and PRNCOLWIDTH to show their default values.
2. Use the WRITEPRN function to write matrix M to a .prn file.
3. Use the READPRN function to read the written file.
Since PRNPRECISION is set to 4, numbers are rounded so that a maximum total of 4 non-zero digits are displayed in the results. The top six numbers contain more than 4 digits and get rounded up to 4 non-zero digits. The number 66.66 contains exactly four digits so it remains unchanged. The number 99.999 is also rounded up to 4 digits and becomes 100.
4. Open the 1.prn file in any text editor and view its content. The highlight colors are added to show the column borders, and the hats are added to show the width of the columns.
◦ Each matrix column, regardless of the width of its data elements, is written to a corresponding file column.
◦ If the data width is larger than the column width, as in rows 3-5, then the data in the adjacent columns appears to be shifted to the right. This is only a visual effect that has no impact on the row-column coordinates of the data.
◦ Since PRNPRECISION is set to 4 and PRNCOLWIDTH is set to 8, written data that has a total of four or less digits fits within the column and appears right-justified. Note that the decimal point takes-up a position within the column.
◦ The sign of a number also takes-up a position within the column. If the sign is negative then it is printed to the left of the number as shown in row 4. If it is positive then it is not printed and the sign placeholder remains blank as shown in rows 3 and 5.
◦ Numbers that have more than 4 whole number digits are converted to engineering notation showing a 1-digit whole number, a 3-digit decimal fraction, followed by e+power. Note that each of these entities takes-up one of the column positions, as you can see in rows 3-5.
PRNPRECISION = PRNCOLWIDTH
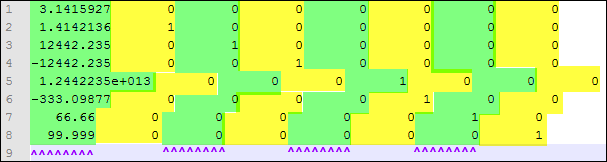
1. Set PRNPRECISION to 8 and write matrix M to a different .prn file.
2. Use the READPRN function to read the written .prn file.
Since PRNPRECISION is set to 8, numbers are rounded so that a maximum total of 8 digits are displayed in the results. The top six numbers contain more than 8 digits and get rounded up to 8 digits. The number 66.66 and 99.999 contain less than 8 digits so they remain unchanged.
3. Open the 2.prn file in any text editor and view its content.
◦ Since PRNPRECISION and PRNCOLWIDTH are set to 8, written data that has a total of eight digits does not fit inside a column of 8 positions because the sign and decimal point require two additional positions. This causes the data in rows 1-4 and 6 to visually "push" the data in the adjacent columns by 2 positions.
◦ The data in row 5 requires 7 additional positions and results in visually pushing the data in the adjacent columns to the right by the same amount of positions.
◦ The data in rows 7 and 8 has less than 8 digits and fits within the 8-position column.
PRNPRECISION > PRNCOLWIDTH
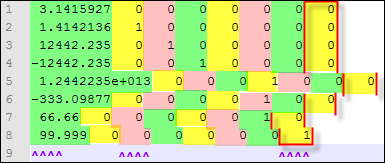
1. Set PRNCOLWIDTH to 4 and write matrix M to a different .prn file.
2. Use the READPRN function to read the written .prn file.
3. Open the 3.prn file in any text editor and view its content.
◦ Since PRNPRECISION is set to 8 and PRNCOLWIDTH is set to 4, written data that has a total of eight digits does not fit inside a column of 4 positions.
◦ The written data in rows 1-4 and 6 require 10 positions which causes the data to visually "push" the adjacent columns to the right by the same amount.
◦ The data in row 5 requires 5 additional positions and results in visually pushing the data in the adjacent columns by the same amount. Each column has been highlighted to show its elements. A frame is drawn around the last column.
Concatenating strings to create a file name to use with WRITEPRN
1. Define a matrix that describes a part.
2. Extract the serial number of the part.
3. Use the concat function to concatenate the full path of the file.
4. Use the WRITEPRN function to write the data to a new file.
5. Use the READPRN function to read the file.
6. Use the READTEXT function to read the same file.
The READTEXT function returns the written data in a different form than READPRN.
◦ The top four rows contain raw information and are generated by the WRITEPRN function.
▪ The first row contains information about the tool that wrote the data.
▪ The second row contains date and time information.
▪ The third row is a blank line.
▪ The fourth row contains the dimensions of the original data matrix.
◦ The fifth row contains the data of the original matrix.
◦ NaNs are used to fill all empty elements of the returned matrix.