Propagating Traces to Branched Documents
The fields that are copied when you branch a document are determined by your administrator. PTC recommends that trace relationship fields are not automatically copied during branching. This enables you to control which trace relationships get copied to the branched document using the propagate traces command.
For more information on trace relationships, see
“Managing Trace Relationships”.
For more information on branching a document, see
“Branching Documents”.
Example 1: Propagating Traces Between Two Branched Documents
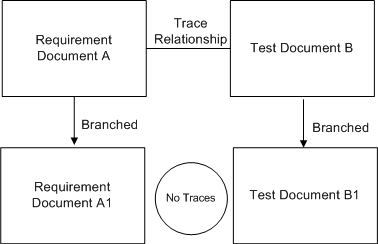
Planning is started for Version 2 of a particular software component. Version 1 of this component has a requirements document and a trace relationship to a related test node. When the analyst starts work on the requirements for Version 2, he branches the original requirements document. Because the administrator has not set up trace relationships to be copied during a branch operation, the trace relationship to the test document is not copied. When the test author starts work on the test plan for Version 2, she branches the original test document. The trace relationship to the requirements document is not copied.
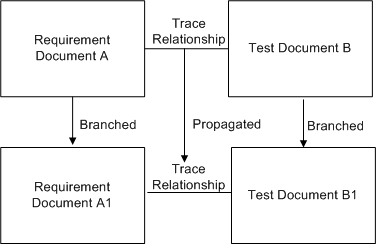
Before the requirements analyst publishes the requirements document for Version 2, he wants to have a related test plan. He needs to copy the trace relationship that exists between the requirements and the test document in Version 1 to Version 2. He does this using the propagate traces command.
This example illustrates a simple propagation of a trace relationship between two branches.
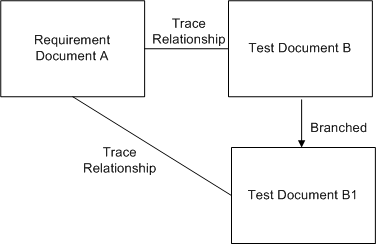
Example 2: Propagating an Existing Trace Relationship to a Branch
You can copy an existing trace relationship between two documents to a branch of one of the documents. This creates a trace relationship from one version of the document to two versions of the related document. For example, a trace relationship exists between a requirement document and a test document, a new test case for the requirement has been created by branching the existing test case, and you want to create a trace relationship from the requirement to the new test case.
How Traces Are Propagated
When propagating traces, you start by selecting the document that you want to propagate traces to. In the Propagate Traces wizard, this is called the Copy To Start document. In Example 1, you select Requirement Document A1 as the document you want to propagate traces to. You then specify the following:
1. The document you want to propagate traces from, for example, the original requirements document that was branched from. In the Propagate Traces wizard, this is called the Copy From Start document. In Example 1, this would be Requirement Document A.
2. The document that has a trace relationship with the document you want to propagate traces from. In the Propagate Traces wizard, this is called the Copy From End document. In Example 1, this would be Test Document B.
3. The document you want to propagate the trace document to, for example, a test document in the branched requirements document. In the Propagate Traces wizard, this is called the Copy To End document. In Example 1, this would be Test Document B1.
4. The trace relationship you want to propagate to the target document, for example, the Tests relationship.
This process creates two maps:
• One relating each entry in the Copy to Start document to a corresponding entry in the Copy from Start document.
• One relating each entry in the Copy to End document to a corresponding entry in the Copy from End document.
Integrity Lifecycle Manager then propagates the trace relationships. For each Copy From Start document that traces are being propagated from, Integrity Lifecycle Manager determines all the trace relationships that go to the Copy To Start document. For each trace relationship, Integrity Lifecycle Manager finds the corresponding Copy From End and Copy To End documents. If the trace relationship does not exist in the Copy to End document, Integrity Lifecycle Manager creates it.
| Traces are propagated correctly even if the document contents have been edited or moved. |
Suspect Traces
After propagating trace relationships using this command, any of the newly created trace relationships that are considered to be suspect are flagged for your review. Traces are flagged as suspect in the following situations:
• If a suspect flag exists on the trace relationship being copied (even if the trace relationship already exists on the Copy To End document and is not suspect)
• If the Copy From Start document's shared item ID is not the same as the Copy To Start document’s shared item ID, or if the Copy To End document’s shared item ID is not the same as the Copy From End document’s shared item ID, then the new trace is marked suspect on the Copy To End document.
Key Considerations
• You can only propagate traces between one pair of documents at a time.
• Traces are propagated as of the current time, not as of time the branch was created. Therefore, any changes made to the traces since the branch was created are propagated.
• When new trace relationships are created through trace propagation, it is noted in the document node history and the document history.
• Traces between content items and non-document items are ignored during trace propagation.
• When propagating traces in the GUI, the Copy To Start document and the Copy From Start document must be related to each other in the branching history. The CLI command im propagatetraces does not have this restriction.
Related Links


