Modeling Fasteners—Connecting Solids
Connecting Solids
To create a fastener between solids select Connecting Solids on the Fastener Definition dialog box. Fasteners connecting solids are modeled as single springs between the two solid components to be fastened.
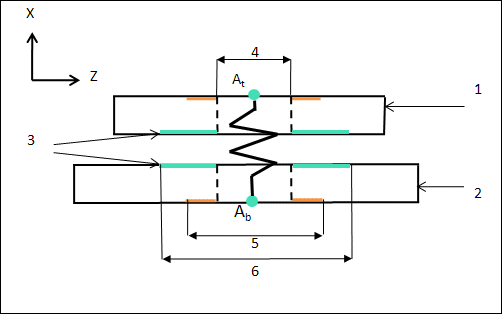
A cross section of a bolt fastener between two solid components is shown in the following figure:
Fig 1
1. top component
2. bottom component
3. generated annular regions kept separate with the “Fix Separation” mechanism
4. fastener shaft diameter
5. fastener head and nut diameter
6. separation test diameter
To create a bolt fastener between the components 1 and 2 you need to select a circular edge of the hole on the upper surface of the top component and a circular edge of the hole on the lower surface of the lower component. The bolt fastener is modeled as a spring connecting the two points At and Ab.
A cross section of a screw fastener between two solid components is shown in the following figure:
Fig 2
1. top component
2. bottom component
3. generated annular regions kept separate with the “Fix Separation” mechanism.
4. fastener shaft diameter
5. fastener head and nut diameter
6. separation test diameter
To create a screw fastener, select a circular edge of the hole on the upper surface of the top component and a circular edge on the bottom component. The fastener is modeled as a spring between the point At on the top component and the point Ab on the bottom component.
The following points apply to both bolt and screw fasteners:
• The ends of the spring are linked with weighted links to the surfaces shown in orange. The outer diameter of the upper orange surfaces has a value specified in the Fastener Head and Nut Diameter box. The inner diameter is the fastener shaft diameter.
• If fastener stiffness is defined with the Using spring stiffness property option, the stiffness is calculated using all the spring stiffness properties that you define. Define suitable values in order to model the fastener stiffness correctly.
• If fastener stiffness is defined using the Using diameter and material option then fastener stiffness is set to the stiffness of a Timoshenko cylindrical beam with the specified material and diameter. The length of the beam is the distance between the two points At and Ab.
Fastener Measures
For fasteners connecting solids, measures for axial force, shear force, bending moment, torsion force, axial stress, shear stress, and bending stress in the fastener are calculated using the spring between At and Ab.
In both the previous figures axial forces are along the X-axis and shear forces are along Y- and Z-axes.
After you run an analysis you can view these values in the
summary file.
Measure Name | Description |
fastenerName_shear_force | Shear force for a fastener. |
fastenerName_shear_stress | Shear stress in a fastener. It is calculated only if you define stiffness using the Using diameter and material option. |
fastenerName_axial_force | Axial force in a fastener. |
fastenerName_axial_stress | Axial stress developed in a fastener. It is calculated only if you define stiffness using the Using diameter and material option. |
fastenerName_bending_moment | Bending moment in a fastener. |
fastenerName_bending_stress | Bending stress in a fastener. It is calculated only if you define stiffness using the Using diameter and material option. |
fastenerName_torsion_moment | Torsional moment in a fastener. It is calculated only if you select the Frictionless Interface check box. The fastener carries all the torsional moment since there is no friction between the two components. |
fastenerName_torsion_stress | Torsional stress in a fastener. It is calculated only if you define stiffness using the Using diameter and material option and you select Frictionless Interface. In this case the fastener carries all the torsional stress since there is no friction between the two components. |
Fix Separation
For a fastener it is important that the two contacting surfaces do not interpenetrate. You can make sure that the contacting surfaces do not interpenetrate using one of the following methods:
• Create a contact interface between the two surfaces that are in contact that is the lower surface of the top component and the upper surface of the bottom component. In this case the Fix Separation settings on the fastener dialog box are ignored. This method increases the computation time for an analysis.
• Select the Fix Separation check box on the Fastener Definition dialog box. The interface between the two contacting surfaces is modeled as a stiff distributed spring that enforces separation between the green annular surfaces shown in the previous two figures. The outer diameter of the green region is the value of the Separation Test Diameter. The inner diameter is the fastener shaft diameter.
If you select the Fix Separation check box the Frictionless Interface check box is visible. If you select Frictionless Interface, the tangential stiffness of the distributed spring between the contact regions is 0. If you clear the Frictionless Interface check box, the tangential stiffness of the distributed spring between the contact interfaces has a very large value.
If you select the Fix Separation check box, in addition to the fastener measures between the two points At and Ab, the resultant compression force, shear force, bending moment and torsional moment for the distributed spring between the contact interfaces (green annular regions) are also calculated.
|  Shear force and torsional moment are calculated only if the Frictionless Interface check box is not selected. |
These quantities are available as automatic measures and are displayed in the Model Tree.
After you run an analysis you can review these values in the
summary file.
Measure Name | Description |
fastenerName_intf_norm_forc | This measure tracks the total normal force between the two fastened components at the fix separation annular region shown in green in Fig 1 and 2 above. It is the measure of Ft—Fc where: Ft—tensional force at the annular region Fc—compression force at the annular region A negative value of this measure indicates that there is net compression. Positive values indicate net tension and that the components are separating. |
fastenerName_sep_stress | Stress for the contact interface region This measure is the ratio of tensile force at the interface to the area in tension at the interface. The area here is the annular region shown in green in Fig 1 and 2. For a valid interface, the value of this measure is zero or a small positive number. |
fastenerName_intf_comp_forc | Compressive force in the fastener contact interface region. |
fastenerName_intf_bend_momt | Bending moment for the fastener contact interface region. |
fastenerName_intf_shr_forc | Shear force on the fastener contact interface region. It is calculated only if you do not select the Frictionless Interface check box. |
fastenerName_intf_tors_momt | Torsional moment of the fastener contact interface region. It is calculated only if you do not select the Frictionless Interface check box. |
|  The static form of all fastener measures are computed for static analyses and dynamic shock analyses. For dynamic analyses “d” appears as a suffix for the measure name. The dynamic forms of these measures for dynamic random, dynamic frequency, and dynamic time analyses are calculated. The separation stress measure for dynamic random or dynamic shock analyses is not calculated. |
|  A positive value for the separation stress measure indicates that the distributed separation spring has the undesired consequence of forcing the two contacting areas to remain in contact with each other, even though they should naturally separate. To fix this issue clear the Fix Separation check box and create a contact interface between the two parts that are connected by the fastener. |


