Example: Using Mirror Symmetry
Mirror symmetry relies on the principle that you can describe the behavior of an entire model using one segment, provided that segment is the mirror image of each of the other segments. Therefore, you can model the segment rather than the whole, and still get an accurate idea of your model's behavior.
To use mirror symmetry, you must be able to divide your model in such a way that each segment you remove mirrors the segment that remains. The easiest way to determine whether a model shows this type of symmetry is to imagine folding the model. If you can fold the model in such a way that the segments are geometrically identical and have loads and constraints with identical orientation and placement, your model demonstrates mirror symmetry. Additionally, all loads on each segment must have the same value.
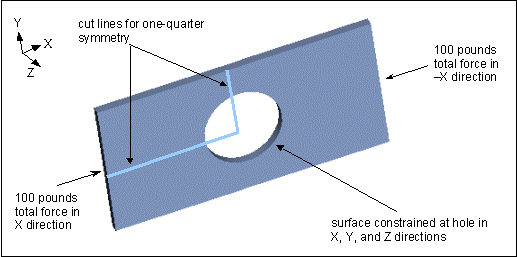
If you want to take advantage of mirror symmetry in your model, you need to complete two steps—identifying the axes or planes of symmetry in your model and applying mirror constraints. For example, let us say you are working with a rectangular plate that has a hole at its center. A bolt secures the plate at the hole, locking it in place, and the plate bears an identical force load acting on either end. The model qualifies for mirror symmetry because the geometry, loads, and constraints are all symmetrical.
Looking at the model as a whole, you would first decide how to divide the model. The best choice is as follows:
You can choose to cut the original model at the division lines, or simply apply mirror symmetry constraints along those lines. Note that, if you use the division plan proposed above, you will end up working with one quarter of your model. You could also choose to cut the original model in half instead, but your resulting model would have more elements and be less efficient for the Creo Simulate solver. Thus, you should always strive to find the smallest symmetric section. The remainder of this discussion assumes that you are working with a cut model.
To apply mirror symmetry constraints you must select enough geometric entities to define a plane. If you cut the model as in the figure below, you can create mirror symmetry constraints by selecting the surfaces created by the cuts. If you choose not to cut the model, you would need to define enough datum points or axes to define the plane.
Here, you add a mirror constraint in the X direction along the vertical cut, where the surface would normally merge with the rest of the part geometry. Similarly, you add a mirror constraint in the Y direction along the horizontal cut. In this way, you mimic the way that the geometry would behave were it part of the full model. Note that mirror symmetry constraints are not available in FEM mode. However, you can add constraints simply by defining a displacement constraint and selecting the surfaces at the horizontal and vertical cuts as the constraint references.
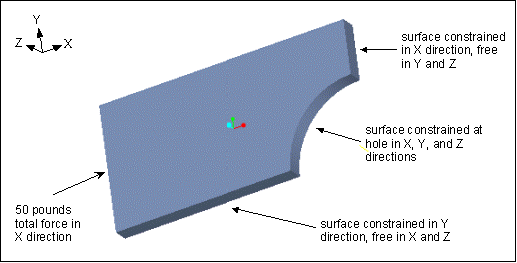
In addition to adding the mirror symmetry constraints at the cuts, you also need to adjust the load on the symmetric section by dividing the additive load seen by the model by the number of segments that result from the cut process. This situation occurs whenever you apply your load using a total load distribution. In this case, the model sees an additive total force load of 200 pounds—100 pounds on one end of the model, and 100 on the other. To develop the symmetric segment, you cut the model into 4 parts. Dividing 200 by 4 yields a 50 pound load on the symmetric segment.
| Tip: If you had modeled this problem using a pressure load or force per unit area load distribution, you would not need to divide the load. For both of these load types, Creo Simulate performs any load division automatically. |