Example: Featuring Your Part
The order in which you create features and the aspects of your part that you choose to develop as separate features affect how easily you can change the shape of your model. For example, let us say you are building the following shelf bracket:
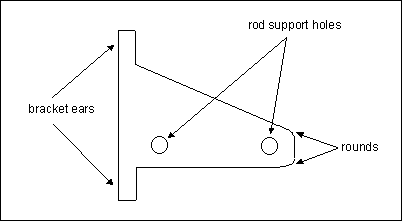
This bracket is made of steel and supports a bookshelf that rests on two rods. The bracket ears and vertical face slide into a die-cast slot in the shelf post. The support holes accept a rod with a predetermined diameter.
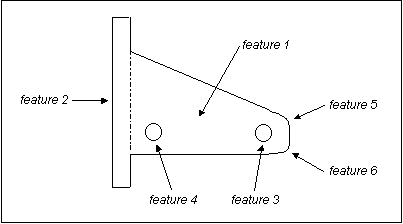
If you want Creo Simulate to look at all the features of the shelf bracket when performing shape changes instead of focusing only on the shelf plate and holes, you might develop the part as follows:
In this case, you define the shelf plate (feature 1) as the base feature and build the rear plate (feature 2) off the back surface of the base feature. Because you want Creo Simulate to move the two holes independently, you design each as a separate feature (feature 3 and feature 4).
When planning the rounds (feature 5 and feature 6), you can choose between two alternatives. You can either incorporate the rounds into the profile of feature 1 as you build that feature or you can treat the rounds as a separate feature.
For the purposes of Creo Simulate, you should strongly consider the latter method. With this method, you can suppress the rounds if Creo Simulate encounters a conflict between a round and the movement of any of the defining surfaces.