To Create a Point Pattern Using a Sketch in Creo Flexible Modeling
1. Click
Flexible Modeling >
 Flexible Pattern
. The
Pattern tab opens.
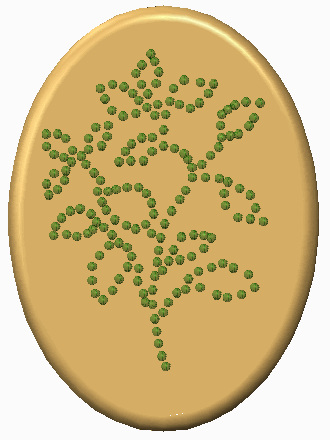
2. To set the pattern type, select Point from the list.
3. To use points from an external or internal sketch to create the pattern, click

.
4. To select references to define the pattern leader, click the References tab, and perform any of the following actions:
◦ Click the Leader surfaces collector, and select surfaces. If needed, click Details to open the Surface Sets dialog box.
◦ Click the Leader curves and datums collector, and select curves and datums.
5. To pattern the selected rounds and chamfers that attach the patterned geometry to the model, click the References tab and check the Transform selected attachment rounds/chamfers check box. If you do not check this check box, the selected attaching rounds and chamfers are removed and optionally recreated.
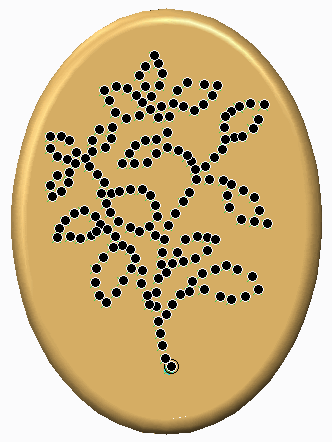
6. To define the sketch to place pattern members, on the References tab, click the Sketch collector, and perform one of the following actions. The sketch must contain geometry points, geometry coordinate systems, or both.
◦ To select an external sketch, select the sketch.
◦ To define an internal sketch, click
Define and create a sketch. Points must be created using
Sketch >
 Point
Point in the Datum group, and coordinate systems must be created using
Sketch >
 Coordinate System
 in the Datum group.
7. If needed, click the
Options tab and set options.
◦ Use alternate origin—Uses an origin different than the default geometric center of the lead feature or geometry to place the pattern leader.
◦ Follow leader location—Offsets all pattern members from the sketch plane using the same distance as the pattern leader's offset.
◦ Follow surface shape—Positions pattern members to follow the shape of the selected surface. Click the collector and select a surface.
◦ Follow surface direction—Orients the pattern members to follow the surface direction.
◦ Spacing—Spaces the pattern members on the surface.
◦ Follow curve direction—Places pattern members in the sketch plane to follow the curve.
8. To set the
attachment options, click the
Attachment tab and do the following:
◦ To attach all pattern members to the model geometry, select the Attach pattern members check box.
|  When the Attach pattern members check box is not selected, the resulting geometry is a quilt. The appearance of the original solid surfaces is propagated to both sides of the resulting quilt. |
◦ To attach all pattern members to the model geometry with rounds or chamfers of the same type and dimensions as the pattern leader, select the Create rounds/chamfers check box.
9. Click

.