About the Ribbon
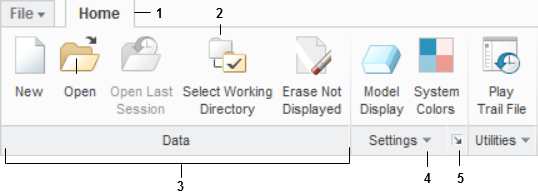
The ribbon contains command buttons organized in a set of tabs. On each tab, the related buttons are grouped. You can minimize the ribbon to make more space available on your screen. You can customize the ribbon by adding, removing, or moving buttons. The following figure shows the different elements of a ribbon.
1. Tab
2. Button
3. Group
4. Group overflow button
5. Dialog box launcher
Tab—Some tabs are available when you are in a particular mode or application, or when you need them in a particular context. The Model, Analysis, Annotate, Render, Tools, View, Applications tabs are some commonly available tabs when you are in a mode. The Home tab is available when Creo Parametric has no model opened.
Tabs related to a particular context open or close automatically when you activate or deactivate the context. Similarly, tabs related with a particular object open or close automatically when the related objects are selected or deselected, respectively. Tabs that contain tools of an application or controls of a tool have specific buttons to open and close them.
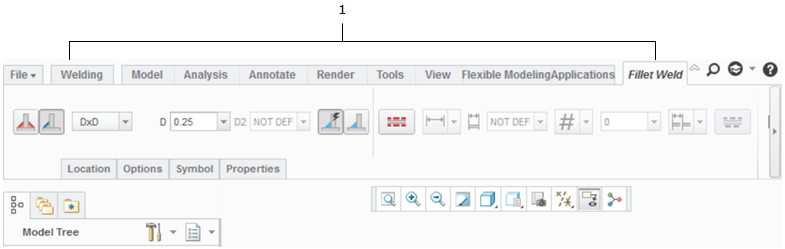
The following figure is an example of a tab that opens when you are in an application. When you open a model and click
Model >
Applications >
 Welding
 >
 Fillet Weld
, the
Welding and
Fillet Weld tabs appear.
1. Tabs match a particular Creo Parametric mode.
Tabs within tabs contain options that help you to perform advanced modeling tasks or retrieve additional feature. For example, the Fillet Weld tab contains the Location, Options, Symbol, and Properties tabs.
You can click and drag a tab to detach it as a floating dashboard and place it anywhere on the screen. The location of the floating dashboard is retained until you drag it back to the ribbon or reset the window options.
• To reattach a floating dashboard to the ribbon, click and drag the floating dashboard to the ribbon tab and release the pointer.
• To reset all floating dashboards to the default location, click Reset Panels Position on the Window Settings tab (File > Options).
Button—Each button on the ribbon consists of an icon and a label. Some examples of buttons are shown below:
 ,  | Button for a task |
 ,  | Button with two portions • Each portion performs a different task. • One portion displays the default icon or the icon of the last selected button in the current session. Clicking the icon runs the command that the icon represents. The button label remains unchanged irrespective of the last selection. However, the tooltip reflects the name of the tool that the icon represents. • The other portion displays an arrow. Clicking the arrow opens a list of related buttons. |
| Group overflow button opens a list of buttons. |
Gallery—Provides a set of visual options.
1. Gallery
Dialog box launcher—A button

in the lower-right-corner of some groups. Clicking
opens a dialog box with more options related to that group.
1. Dialog box launcher