To Insert Dimensions from a Common Reference
1. Click
Annotate >
 Dimension
, or click
 Reference Dimension
. The
Select Reference dialog box opens.
2. Select one of the following reference options on the Select Reference dialog box:
◦ 
— Any reference on an entity or surface. Click the arrow next to the icon and select a reference type;

entity,

surface, or

any reference.
◦ 
— Tangent point to an arc or circle.
◦ 
— Midpoint of an edge or an entity.
◦ 
— Intersection point of two entities.
◦ 
— Imaginary line between two points. Additionally, you can specify to draw this imaginary line as horizontal or vertical.
3. Select a reference. A ghost image in the linear dimension format appears for the selected reference.
4. Hold down the CTRL key and select another reference. Depending on the type of reference you select, a ghost image in the linear or angular dimension format appears between the first and the second selected references.
5. Hold down the CTRL key and select another reference. A ghost image in the linear or angular dimension format appears between the first and the third selected references.
The ghost image of two dimensions appear with the first selected reference as the common reference.
You can continue to hold down the CTRL key and select additional references to create additional dimensions from a common reference. A ghost image appears between the first and the newly-selected reference.
6. Middle-click on the drawing to specify the location for the dimension.
The Dimension ribbon tab becomes active. You can select the available options on the Dimension ribbon to modify properties of the newly created dimensions.
You are still in the dimensioning mode and you can create another reference dimension. Only the latest created dimension appears selected, and you can use the options on the Dimension ribbon to modify properties of multiple common reference dimensions selected after the placement.
7. Middle-click or click in the graphics area to complete the dimension creation.
A distance of twice the height of the dimension text is maintained between the dimensions that are created using a common reference.
| • Hold down the CTRL key and click on one of the currently selected references to remove the reference. • If you again select the first reference, the common reference sequentially shifts from the first reference to the next selected reference. • The orientation that you select for the first dimension is applied across all the subsequent dimensions that you create using a common reference. You can explicitly change the orientation of the subsequent dimensions, if required. |
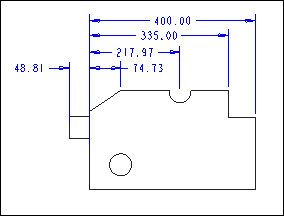
Dimensions with a Common Reference