Setting Up the Model
Set up the model by applying a load to the planar surface, applying a constraint to the hole surfaces, creating a volume region, and assigning a material to the model.
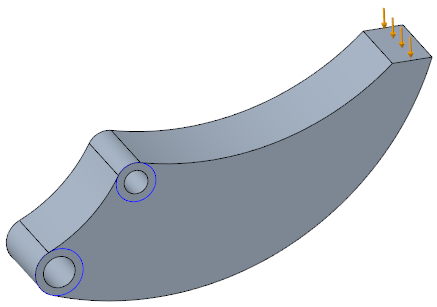
Apply a Load to a Planar Surface
1. Select the top flat surface.
2. Click
Home >
Loads >
 Force/Moment
. The
Force/Moment dialog box opens.
3. Under Force, next to Y, type -1000.
4. Click OK. The dialog box closes, and the load appears on the surface.
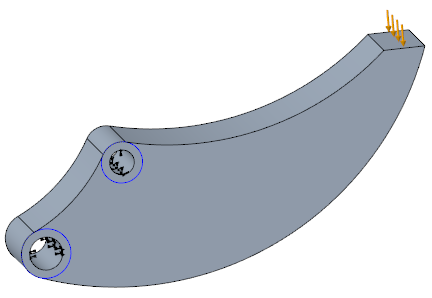
Apply a Constraint to the Hole Surfaces
1. Select the cylindrical surface inside of one of the holes.
2. Click
Home >
Constraints >
 Displacement
 The
Constraint dialog box opens.
3. Press CTRL and select the cylindrical surface on the inside of the other hole. The surfaces are added to the collector.
4. Click OK. The dialog box closes, and the constraint appears on the hole surfaces.
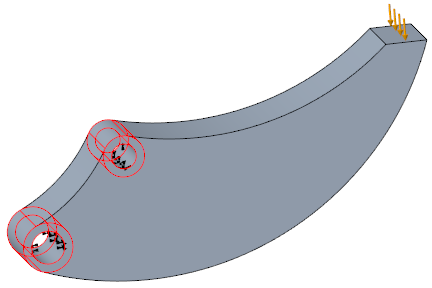
Create a Volume Region
Create a volume region so the region can be excluded from the optimization later.
1. In the Model Tree, select Sketch 1.
2. Click
Home >
Volume Region >
 Extrude
. The
Extrude tab opens.
3. Pull the depth handle to the other side of the part. This reverses the direction of the extrude so it points in toward the part.
4. Right-click the handle, and select Through All. This defines the depth of the volume region as through the entire part.
5. Click

. The
Extrude tab closes.
Assign a Material to the Model
1. Click
Home >
 Material Assignment
. The
Material Assignment dialog box opens.
2. Under Material, select Steel.
3. Click OK. The Material Assignment dialog box closes.