Automatic Points Generation for Measure Cylinder
When you choose Automatic from the ADD POINTS menu, the Measure Cylinder Points dialog box appears. The initial values in its input fields correspond to the measure parameter values that you specified for the step.
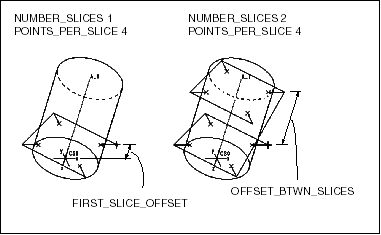
The system generates the first slice at First Slice Offset from the start plane in the direction that you have specified when defining geometric references. The number of Measured points in the slice is defined by the Points per Slices value. If Number of Slices is greater than 1, the system generates the rest of the slices at Offset Between Slices distance from the previous slice.
Similar to measuring a plane, if an automatically generated point falls off the surface, or within BORDER_CLEARANCE from the surface boundaries, the system will not place it.
You can edit the values for First Slice Offset and Offset Between Slices, or use the UP and DOWN arrows next to the input fields to increase and decrease Points per Slices and Number of Slices. When you click on an arrow, the corresponding value in the input field is changed by 1, and the system redistributes the points according to the new values. When you click OK, the system generates the default probe path by connecting all the point locations.
The illustration below shows automatically generated points and path for Measure Cylinder.

